
Confirm appointments, send SMS, emails, form links and appointment letters from the diary, understand appointment reminders and confirmations, and resend portal references.
Who it is for: practice managers and administrators, receptionists.
In this guide:
- Confirm an appointment
- Text a patient about their appointment
- Email a patient or send them a form
- Send an appointment letter
- Send appointment reminders
- Resend a patient’s portal reference
1. Confirm an appointment
You can mark an appointment as confirmed and understand how confirmations happen automatically.
Why this matters. A confirmed appointment is much less likely to be missed. Many practices phone or text the day before to confirm, especially for long or high-value appointments such as a crown prep or a new patient exam. Then they offer any unconfirmed slots to patients on the cancellation list.
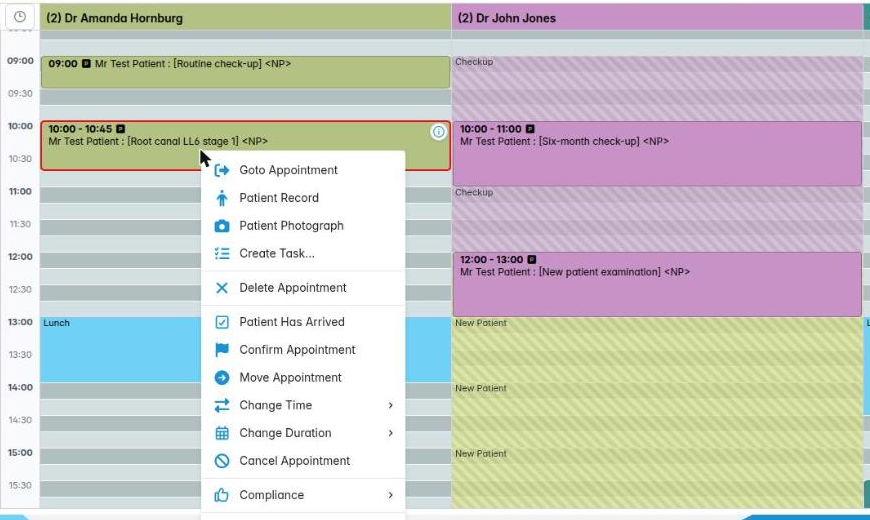
Where to find it. Right-click an appointment and choose Confirm Appointment.
How to
- When the patient confirms, by phone, text reply or in person, right-click the appointment and choose Confirm Appointment.
- A green flag appears on the appointment in every open diary.
- Once it is confirmed, Confirm Appointment is greyed out on the menu.
Automatic confirmation
- If the practice has ticked Appointment Confirmed under Confirmation on Reminder Sent (Preferences › Diary Settings), sending a reminder marks the appointment as confirmed by itself. Not every practice wants this. A reminder that was sent hasn’t necessarily been read.
Booking confirmations to patients
- Preferences › Recalls & Reminders › Appointment Booking Confirmation controls whether patients are sent an email or SMS automatically when you book (Confirm Booking by Email / SMS), delete (Confirm Deletion by …) or reschedule (Confirm Rescheduling by …) an appointment. Rescheduling messages are sent when you choose Move and Notify.
Good to know
- Before the day starts, look for long appointments without a green flag and give those patients a call.
- A confirmed appointment can still be cancelled or moved as normal.
More detail: The practice diary.
2. Text a patient about their appointment
You can send an SMS from an appointment, using templates and appointment merge fields.
Why this matters. A quick text is often the fastest way to reach someone. For example: “Dr Shah is running 20 minutes late”, “Please bring your denture”, or “Can you come in 15 minutes early?”. Sent from the appointment, the text can fill in that appointment’s date, time and clinician for you.
Where to find it. Right-click the appointment and choose Send SMS.
How to
- Right-click the appointment and choose Send SMS. The window is titled Send SMS : (patient) and shows their Mobile Number.
- Type the Message, or choose a template from Insert template and edit it.
- Use Insert field to add details that are filled in when the text is sent, such as the appointment date, time and clinician, the patient’s first name, or the practice phone number.
- Click Send.
Good to know
- If the patient has no mobile number on file, you’ll see No Mobile Number: “Patient doesn’t have a mobile number”. Add one in their record first.
- If the message has fields that can’t be filled in for this text, you’re asked whether to send it anyway. Check the wording before you say yes.
- Texts go through the practice’s Esendex account. Each one uses SMS credit. Check Reports › SMS Limits if texts stop going out.
- Keep texts short and avoid clinical detail. A phone can be seen by other people.
- Only use the patient’s own number. Check the record before texting a family member’s phone.
More detail: The practice diary.
3. Email a patient or send them a form
You can send a text email or a personal form link from an appointment.
Why this matters. Email suits longer messages: pre-appointment instructions, directions to a new site, or a link to a form the patient should fill in before they come, such as a medical history or consent form. Sending from the appointment fills in that visit’s details automatically.
Where to find it. Right-click the appointment and choose Send Email.
How to send a text email
- Right-click the appointment and choose Send Email.
- Leave Email type as Text Email. Check the Email address.
- Type a Subject and Message. Use Insert template and Insert field to add standard wording and appointment details.
- Click Send (Text Email).
How to send a form link
- Set Email type to Patient Form Email.
- Pick the published form from the list. The patient gets their own link, which works once.
- Make sure the message contains the form link (Add form link or Insert field), then click Send (Patient Form Email).
- A message confirms who the email went to, or explains why it wasn’t sent.
Good to know
- If the patient has no email address, you’ll see No Email Address: “Patient doesn’t have an email address”.
- Patients who haven’t given GDPR consent may be skipped for form emails.
- Delivery problems appear under Online › Email Problems.
- Online medical history and GDPR consent forms each have their own videos.
More detail: Online medical history forms.
4. Send an appointment letter
You can create an appointment letter from a template, preview it and email it to the patient.
Why this matters. Some patients and situations need a formal letter rather than a text. For example: a first appointment with pre-visit instructions, a sedation appointment with escort and fasting rules, or a patient who prefers post. The letter is also saved to the patient’s documents.
Where to find it. Right-click the appointment and choose Send Appointment Letter.
How to
- Right-click and choose Send Appointment Letter. Patient Appointment Letter opens.
- Use Template Search to find the letter template, then click it in the list (Template Name, notes).
- Under Document Details, check the Document Name. It starts as the template name and today’s date. Add any Notes.
- Click OK. The letter is prepared and an Email Preview opens.
- Read the preview carefully, then click OK to email it, or Cancel to stop.
- You’ll see “Document Successfully Emailed”, or “Failed to Email Document” if it didn’t go.
Good to know
- Letter templates are set up by the practice in Utilities › System Templates / Patient Templates.
- For a sedation appointment, make sure the letter covers the escort, eating and drinking, and travel arrangements, as your sedation policy requires.
- If the patient prefers post, print the letter from their Documents tab instead.
More detail: The practice diary.
5. Send appointment reminders
You understand how appointment reminders are produced and sent by SMS or email, and what affects them.
Why this matters. Reminders are the best way to cut FTAs. Most practices send them one or two days ahead, by text for most patients and by email for those who prefer it. Reminders are sent from Reminders Due, not from the diary itself.
Where to find it. Patients › Reminders Due.
How to
- Open Reminders Due. Use Back a day / Forward a day to choose the day.
- The top panel, Send Individual Reminder, lists one reminder per appointment (Appointment Date, Patient, Clinician, Status). The lower panel, Send Group / Joint Reminder(s), groups family members with appointments close together into one message to the principal member.
- Click Send Email / SMS Reminder(s) on a panel and confirm, to send all of its electronic reminders.
- Right-click a single row to Send This Reminder, Close This Reminder (for example, if you’ve already phoned them) or Show Patient’s Reminders.
What affects reminders
- Preferences › Recalls & Reminders: Look Ahead (days) sets how far ahead reminders are listed. Late Arrivers Pre-appointment Adjustment (mins) applies to patients flagged as late arrivers.
- Preferences › Esendex holds the SMS account (Username, Password, Account, and an Account Alias of up to 11 characters, which is the sender name patients see).
- Preferences › Email Account Settings holds the outgoing email account.
- Each patient’s reminder method and their GDPR consent decide whether they get a reminder and how.
Good to know
- If the practice ticks Appointment Confirmed under Confirmation on Reminder Sent, sending a reminder confirms the appointment too.
More detail: Reminders due.
6. Resend a patient’s portal reference
You can resend the patient portal sign-up reference from an appointment.
Why this matters. The patient portal lets patients book online, fill in their forms and join video consultations. They need their portal reference to register. If they’ve lost the email or it went to spam, you can resend it while they’re on the phone or at the desk.
Where to find it. Right-click an appointment and choose Resend Portal Ref.
How to
- Check that the patient’s email address is correct in their record. The reference goes to that address.
- Right-click their appointment and choose Resend Portal Ref.
- Resend Portal Ref asks “Are you sure you want to resend this patients portal reference?”. Click Yes.
- Ask the patient to check their inbox and spam folder in the next few minutes.
Good to know
- Online › Online Registrations shows who has registered and lets you resend the reference from there too (Send portal reference & link).
- If emails to the patient keep failing, look in Online › Email Problems.
- Never read a portal reference or password out to someone you haven’t identified as the patient, or as their parent or guardian for a child.