Book existing and new patients, set the appointment details, use booking zones and urgent slots, book families, block out time and place treatment plan appointments.
Who it is for: practice managers and administrators, clinicians, dental nurses, receptionists.
In this guide:
- Book an appointment from an empty slot
- Complete the appointment details
- Check you have the right patient before you book
- Book an appointment for a new patient
- Use booking zones to book the right type and urgent slots
- Book appointments for a family
- Block out time with a diary event
- Place a planned treatment appointment in the diary
1. Book an appointment from an empty slot
You can place a new appointment in the diary and choose the patient it is for.
Why this matters. Booking appointments is the core reception job. In ChiralCloud you pick what you are placing from the palette on the left, then click where it goes. The time is held for you while you find the patient, so nobody else can book over it.
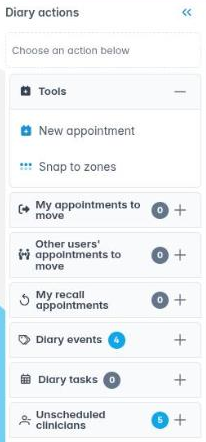
Where to find it. The palette runs down the left-hand side of the Practice Diary and Clinician Diary. Click a group heading such as Appointments or Diary Events to open or close it. A heading ending in + has entries hidden inside.
How to
- Under Appointments, click New Appointment. It is highlighted.
- In the clinician’s column, click an empty slot to book one slot length. To book a longer appointment, press and drag down over the time you need.
- The slot is reserved, and Select the patient for this appointment opens.
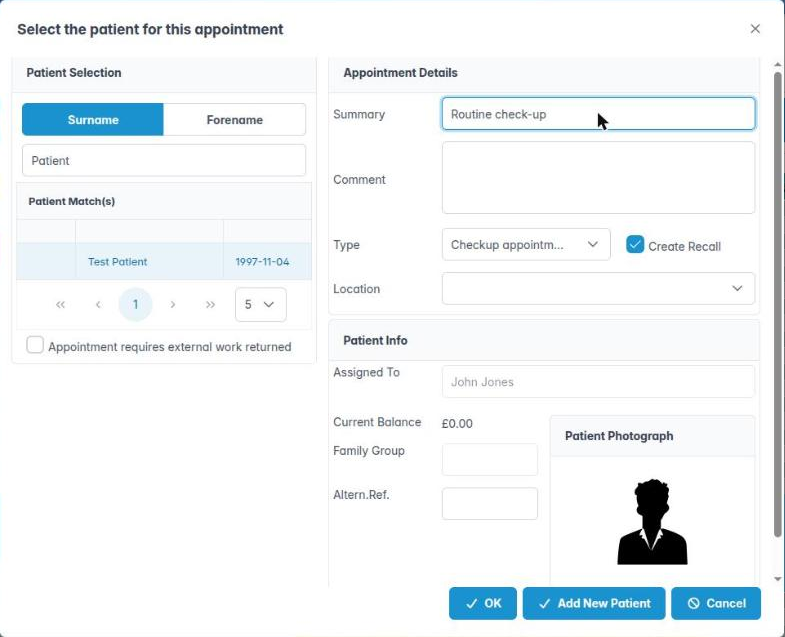
- Under Patient Selection, choose Surname or Forename, then type at least two letters. Matching patients appear under Patient Match(s), with an NHS or private icon and their date of birth.
- Click the right patient. Always check the date of birth when two patients share a name.
- Type a Summary, for example “Exam + scale”. The summary is required.
- Check the other details (see Complete the appointment details) and click OK.
Good to know
- Cancel gives the reserved slot back.
- If the clinician’s login is locked, you will see Locked Clinician and you can’t book them.
- OK stays greyed out until you have chosen a patient, a type and a summary.
- You can’t drag or book on an iPad in the same way. Tap New Appointment, then tap the slot.
More detail: The practice diary.
2. Complete the appointment details
You can set the type, recall, location, NHS referral and lab flag correctly when booking.
Why this matters. These details drive a lot of what happens later. The appointment type sets the colour and can create a recall. The NHS referral fields feed the claim, and the lab flag warns everyone that work must be back first. A minute spent here saves problems later.
Where to find it. In the right-hand side of Select the patient for this appointment.
How to
- Type starts as the clinician’s usual appointment type. Change it if this is a different job, such as an exam, a hygiene visit or a fit.
- Create Recall is ticked when the type has a recall linked to it. Untick it if this patient should not get a recall from this visit.
- Comment is for longer notes, such as “Bring denture” or “Needs wheelchair access”. Insert template is available when you edit the comment later.
- Location picks the site, for practices with more than one.
- Check Patient Info. Assigned To is the patient’s usual clinician. Current Balance turns red if they owe money, so you can mention it kindly. Family Group shows their billing group. Altern.Ref. holds any other reference number.
- Tick Appointment requires external work returned if lab work must be back before this visit, such as a crown fit. A lab icon then shows on the appointment.
- For NHS patients, an NHS panel appears. Tick Treatment On Referral and enter the Referral Date if the patient was referred to you for this treatment.
Good to know
- The appointment length comes from the slot you dragged, not from the type. Use Change Duration afterwards if you need to.
- Choose the type carefully. Appointment types set the diary colours, the reports and what patients can book online.
More detail: The practice diary.
3. Check you have the right patient before you book
You can confirm a patient’s identity and record from the diary without losing your place.
Why this matters. Booking the wrong “John Smith” causes real problems. The wrong patient gets the reminder, the wrong record gets the notes and the claim, and someone who expected to be seen gets turned away. The GDC expects you to keep accurate patient records, so identity checks are part of the job.
Where to find it. Use Find Patients on the diary toolbar (the people icon), and the Patient Match(s) list while you book.
How to
- On the phone, ask for the patient’s full name and date of birth. If you’re unsure, ask for the first line of their address too.
- While booking, search by Surname first. If the surname is common, switch to Forename and search again.
- Compare the date of birth in Patient Match(s). Look at the photo in Patient Info, if there is one.
- If you need more, such as the address, alerts or medical warnings, click Find Patients on the diary toolbar. Patient search opens in its own tab, so your diary stays where it was.
- If the patient isn’t on the system at all, use Add New Patient in the booking window (see Book an appointment for a new patient). Don’t create a second record for someone who is already registered.
Good to know
- The search needs at least two letters and updates as you type.
- The patient’s usual clinician (Assigned To) and Current Balance appear as soon as you click their name. That’s a good moment to mention any money owed or a medical history update that is due.
- Never confirm personal details to a caller who hasn’t given them to you first.
More detail: The practice diary.
4. Book an appointment for a new patient
You can register a new patient and book their first appointment in one go.
Why this matters. New patients often call to book before they have filled in any forms. ChiralCloud lets you create a basic record and book the appointment in the same window. The patient can complete their full details and medical history before they arrive.
Where to find it. In Select the patient for this appointment, click Add New Patient.
How to
- Place a New Appointment in an empty slot as usual. When the patient search shows they aren’t registered, click Add New Patient.
- The window changes to Create the patient for this appointment. Fill in the name panel: title, first name and surname. Choosing the title also sets the gender.
- Under General, check the Patient Journey stage, which starts at your new patient stage. Pick who they are Assigned To, and how they were referred if you know. A Provider, Patient or Independent referrer opens a small window to choose who.
- Enter Mobile and Email. Both are required, so reminders and online forms can reach the patient. Add Altern.Ref. and the Main Address if you have them. For an NHS patient, complete the NHS panel.
- Click Next. Fill in the Appointment Details (Summary, Comment, Type, Create Recall, Location).
- Click OK. Use Prev if you need to go back.
Good to know
- If a patient with the same name and date of birth already exists, you’ll see “A patient with this name and date of birth already exists”. Find and use the existing record instead.
- Send the patient their online medical history form before the visit, so the clinician has an up-to-date history.
More detail: The practice diary.
5. Use booking zones to book the right type and urgent slots
You can book into a booking zone so the time and type match what the zone was set aside for.
Why this matters. Booking zones keep the right time free for the right work. For example, new patient exams in the morning, hygiene in the afternoon, and an urgent slot each session for patients in pain. Booking into a zone uses exactly the time and type it was set up for.
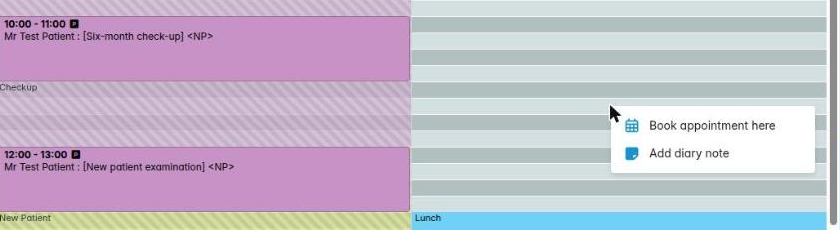
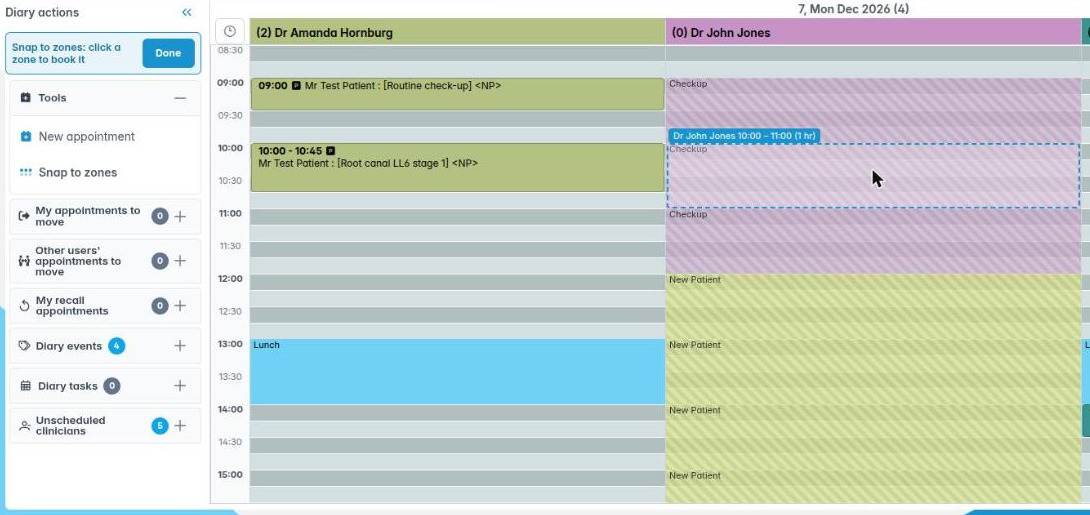
Where to find it. Under Appointments in the palette, click Snap to Zones (the zoning icon). Zones show as grey-hatched coloured areas when Show Zoning is on.
How to
- Make sure zones are showing. If not, click Show Zoning on the toolbar.
- Click Snap to Zones in the palette.
- Click anywhere inside a zone. The booking takes the whole zone’s start and end time, and the Type is set from the zone.
- Choose the patient and enter a Summary as usual, then click OK.
Urgent and emergency slots
- Keep urgent zones for patients who need to be seen that day, such as for pain, swelling or trauma. Book them in as soon as the patient calls. Don’t hold them back for routine work unless your practice policy allows it late in the day.
- NHS practices must give urgent access, and an urgent course is claimed separately. Use your practice’s urgent appointment type so the clinician and the claim are set up correctly.
- Swelling that affects breathing or swallowing, or uncontrolled bleeding, needs A&E or 999. It is not a diary booking.
Good to know
- Find available slot on the toolbar searches zones by type and date.
- Zones are set up by the administrator in Diary Schedules (Booking zones video).
More detail: Housekeeping clinicians schedules.
6. Book appointments for a family
You can book family members together and make sure reminders and billing go to the right person.
Why this matters. Parents often book the whole family at once, back to back or with two clinicians at the same time. Booking them together makes the visit easy for the family. Using the family group means one joint reminder and one bill go to the person who pays.
Where to find it. Use the normal booking window. The Family Group box in Patient Info shows which billing group each patient belongs to.
How to
- Book the first family member as usual, often the youngest child first.
- Book the next member straight after, either in the next slot or in another clinician’s column at the same time. For example, the children with the hygienist while a parent sees the dentist.
- As you select each person, check that Family Group shows the same group. If it is blank or wrong, fix it in the patient’s Family Group tab after booking.
- Put a short note in the Comment, such as “Booked with siblings”, so whoever moves one appointment knows to move the others.
Good to know
- Patients in the same family group with appointments close together can get a group / joint reminder. This is sent to the principal member instead of one message each (see Patients › Reminders Due).
- Under-16s should normally come with a parent or guardian. Check your practice’s consent policy for older children.
- Each child’s NHS exemption is checked for them individually. Under-18s get free NHS dental care.
- If one family member cancels, check whether the others still want to come.
More detail: The practice diary.
7. Block out time with a diary event
You can add, edit and delete non-patient diary events such as meetings, training or blocked time.
Why this matters. Not every block of time is for a patient. Staff meetings, CPD and training, practice inspections, equipment servicing and “do not book” holds all need to be in the book, so nobody fills that time with patients.
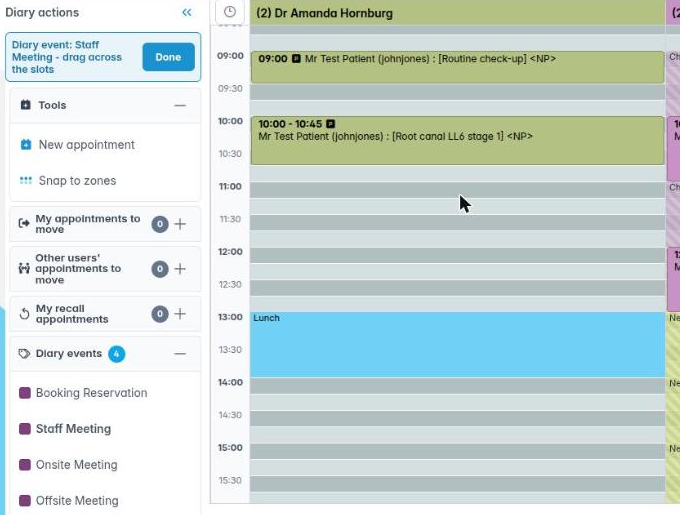
Where to find it. Open the Diary Events group in the palette. You’ll see the event types your practice has set up, each in its own colour.
How to add an event
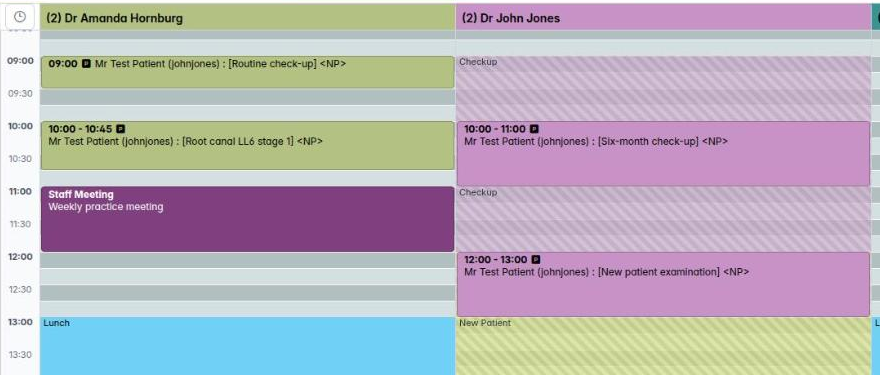
- Open Diary Events and click the event type, such as Staff Meeting.
- Click or drag over the time in the clinician’s column.
- A window titled with the event type opens. Type a note, for example “CQC visit – all surgeries”, and click OK.
How to change an event. Right-click the event:
- Edit Diary Event Comment lets you change the note.
- Delete Diary Event asks “Are you sure you want to delete this diary event?”. Click Yes to remove it.
- Change Time and Change Duration move or resize it (see Change the time or length of an appointment).
- You can also drag an event, or drag its bottom edge, on a desktop computer. You will be asked to confirm with Move Diary Event / Resize Diary Event.
Good to know
- Hovering over an event shows its type and note.
- Holidays and time off come from the clinician’s schedule. They can’t be edited from the diary.
- Event types are set up in Housekeeping › Diary Types. You need the Add Diary Event Types permission.
More detail: The practice diary.
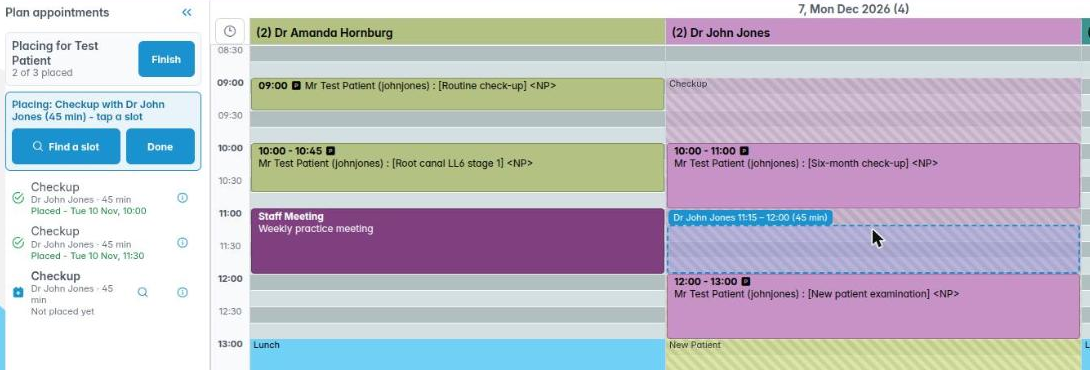
8. Place a planned treatment appointment in the diary
You can book an appointment that was planned in a treatment plan, with the right clinician.
Why this matters. When a dentist plans a course, such as fillings over two visits and then a crown prep, each visit is created in the treatment plan with its clinician and type already set. Placing them from the plan keeps the treatments attached to the visit, so they show in the appointment editor and on the claim.
Where to find it. In the patient’s treatment plan, right-click a planned appointment and choose Place appointment in diary.
How to
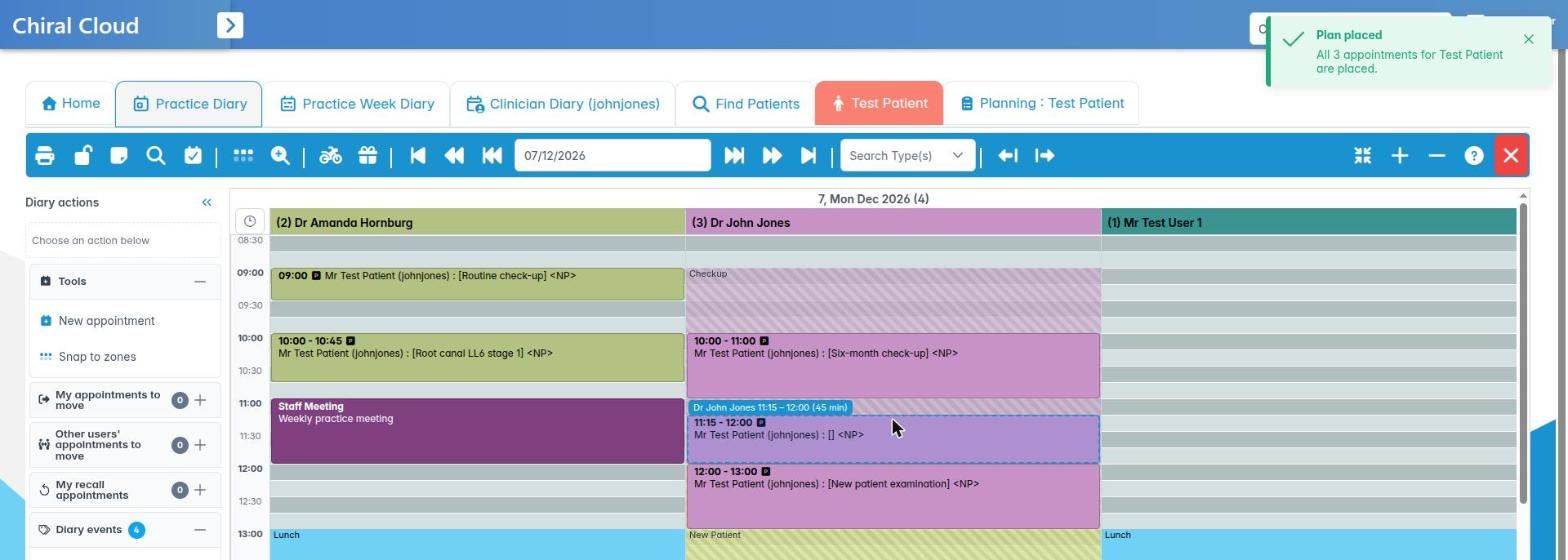
- From the treatment plan, choose Place appointment in diary. The Practice Diary opens in placement mode.
- The palette now shows Place Planned Appointment with an entry headed Place Appointment for : patient name.
- Click the entry, then click or drag a free time in the planned clinician’s column.
- The appointment is booked and the diary goes back to normal.
- To stop without booking, click Cancel Placement at the top of the palette.
Good to know
- If you click another clinician’s column, you’ll see Place Treatment Plan Appointment: “This appointment is planned with : (name)”. Click Close and choose the right column. To change the clinician, change the plan first.
- If the planned clinician’s login is locked, you’ll see Locked Clinician.
- When a clinician hands a patient over at the end of a visit, the same placement happens from the Reception Action Task (see Act on a clinician’s handover).
More detail: The practice diary.