
Check patients in at the desk or kiosk, send forms to the tablet, open appointments, record chair times, act on handovers, deal with late arrivals, track lab work and create follow-up tasks.
Who it is for: practice managers and administrators, clinicians, dental nurses, receptionists.
In this guide:
- Mark a patient as arrived
- Let patients check themselves in at the kiosk
- Send forms and questionnaires from the diary
- Open the appointment, record or plan from the diary
- Check a patient into and out of the chair
- Act on a clinician’s handover
- Deal with patients who arrive late
- Raise and track lab work from the diary
- Create a follow-up task from an appointment
1. Mark a patient as arrived
You can check a patient in at reception, see any money owed, and send forms to the tablet as they arrive.
Why this matters. Marking a patient as arrived tells the clinician they are waiting. It records their check-in time for the arrival reports, and it is your chance to send any outstanding forms to the waiting-room tablet. Patients who are never marked arrived count as failed-to-attend, so don’t skip this step.
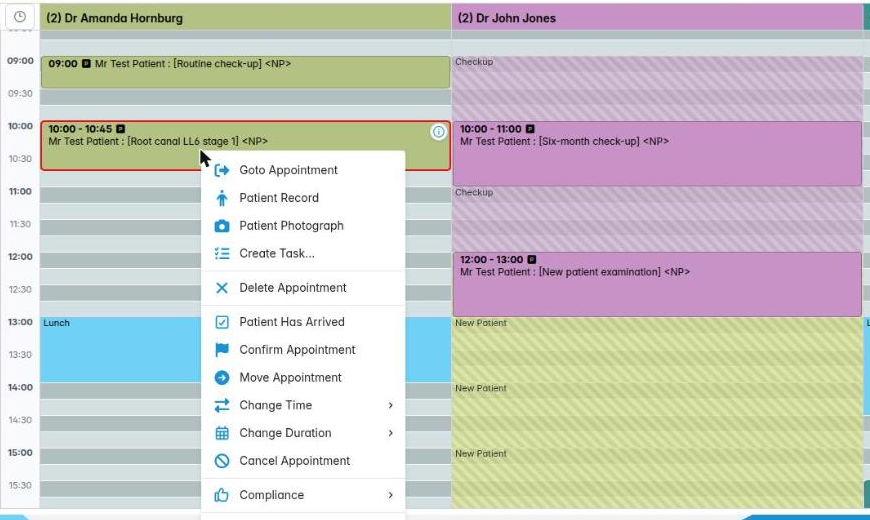
Where to find it. Right-click the appointment (long-press on a tablet) and choose Patient Has Arrived.
How to
- Greet the patient and check their name and date of birth.
- Right-click their appointment and choose Patient Has Arrived.
- If they owe money, the window shows Account Balance in red. Mention it politely, or ask them to see you before they leave.
- Under Tablet Options, choose any forms they should fill in while they wait: Details (to update contact details), Medical History and Consents. You can choose more than one.
- Click Confirm. If you chose Consents, a Consent Forms list opens. Tick the forms needed and click OK.
- The patient’s name now has a green highlight. The tooltip shows the time they checked in, and the clinician may hear an arrival sound.
Good to know
- Made a mistake? Right-click again and choose Patient Has Not Arrived.
- Ask for a medical history update at every course of treatment, or at least once a year. Sending Medical History to the tablet here is the easiest way.
- A patient who checks in at the self check-in kiosk is marked arrived automatically.
More detail: The practice diary.
2. Let patients check themselves in at the kiosk
You understand how the self check-in kiosk works, what patients see, and how staff unlock it.
Why this matters. A self check-in kiosk cuts queues at the desk at busy times. The patient checks in on a tablet in the waiting room, and the diary updates straight away. Reception is free to deal with payments and the phone.
How it works for the patient
- They enter their date of birth (Day, Month, Year) and tap Next.
- They tap the first letter of their surname.
- If an appointment is found, the kiosk shows a short name, the time and the clinician, such as “Sarah J., 9:30am, Dr Patel”. They tap Yes, check me in, or No, that’s not me.
- The diary marks them as arrived, with a green highlight and a check-in time.
What reception needs to know
- Check-in only works from 60 minutes before to 30 minutes after the appointment time. Outside that window, or if no match is found, the patient sees “We couldn’t check you in here. Please speak to reception.”
- After five failed tries in five minutes, the kiosk pauses for two minutes.
- The kiosk signs in as its own Check-in Kiosk user and can do nothing else, so a patient can’t wander into the practice system.
- If the kiosk shows “Check-in isn’t available at the moment”, its session has ended. Press and hold the corner lock to get back to the sign-in page, then sign in again as the kiosk.
- To take the kiosk out of check-in mode, press and hold the corner lock, then enter the Exit PIN (4–6 digits).
Setting the PIN (administrators). Go to Preferences › Diary Settings › Checkin Pad › Exit PIN. It is never shown once saved. Typing a new PIN replaces it.
3. Send forms and questionnaires from the diary
You can send medical history, details, consent and questionnaire forms to the tablet, and print a medical history, from an appointment.
Why this matters. The clinician needs an up-to-date medical history and the right consents before treatment. Under Montgomery, consent has to be informed, recorded and specific to the treatment. Sending forms from the diary means the patient can fill them in on a tablet while they wait.
Where to find it. Right-click an appointment and point at Compliance.
How to
- Patient Details sends the contact details form to the waiting-room tablet.
- Medical History sends the medical history form.
- Consent Forms opens a list of the practice’s consent forms. Tick the ones needed and click OK.
- Questionnaire sends the practice questionnaire.
- Complete Questionnaire fills in a questionnaire the patient has already started. You’ll be asked “Have any of the patients answers changed since filling in the questionnaire”. Click Yes to go through it with them, or No if nothing has changed. If none has been started you’ll see “There is no questionnaire started for this patient”.
- Print Medical History (lower down the main menu) prints the patient’s current medical history form, for patients who prefer paper.
Good to know
- The patient picks up the forms on the tablet by signing in there. The tablet’s registration is managed in Patients › Tablet Registrations.
- You can send the same forms when you mark the patient arrived, using Tablet Options.
- Patients can also complete medical history forms online before their visit. See the Online medical history forms videos.
More detail: Online medical history forms.
4. Open the appointment, record or plan from the diary
You can jump from an appointment to the appointment editor, patient record, treatment plan or photograph.
Why this matters. The diary is where everyone starts. Clinicians and nurses open the chairside appointment from it. Reception jumps to the patient’s record to take a payment or update an address. All of these open in their own tab, so the diary stays open.
Where to find it. Right-click an appointment. The first items on the menu are the navigation ones.
How to
- Goto Appointment opens the appointment editor, titled with the patient’s name and date. This is where clinicians chart, add treatments, write notes and check the patient into the chair.
- Patient Record opens the patient’s full record.
- Patient Photograph shows the patient’s photo, which is useful for checking you have the right person. If there isn’t a photo, you’ll see an outline.
- Show Treatment Plan opens the patient’s treatment plans.
- In the Practice Week Diary, the first item is Practice Day Diary, which opens that day.
For clinicians and nurses
- Keep your Clinician Diary open and use Goto Appointment for each patient as they come in. The highlight tells you who has arrived (green).
- Charting and treatment entry are covered in the appointment editor training.
Good to know
- The patient photograph is a quick identity check, not a replacement for asking name and date of birth.
- If the appointment or patient tab is already open, ChiralCloud takes you to that tab instead of opening another one.
More detail: The practice diary.
5. Check a patient into and out of the chair
As a clinician or nurse, you can record when the patient is in the surgery and when they leave, and hand them back to reception.
Why this matters. Recording when the patient goes into the surgery and when they leave lets reception see where everyone is. It produces the CheckIn – CheckOut compliance reports, and it shows whether the clinician is running to time.
Where to find it. In the appointment editor (Goto Appointment), use the toolbar.
How to
- When you collect the patient from the waiting room, click Check patient into chair. The patient’s highlight in every diary turns yellow.
- When treatment is finished, click Check patient out of chair. The highlight turns light blue, and the button changes to Patient checked out of chair.
- If reception needs to do something, such as take a payment or book the next visit, click Hand patient over to reception. Choose the action, add a message and send it. Reception gets a pop-up and a new entry under Diary Tasks.
Reading the diary as reception
- Green: arrived, waiting.
- Yellow: in the surgery.
- Light blue: finished and checked out. Expect them at the desk.
Good to know
- You can only check a patient in and out once per appointment.
- Nurses often do the check-in when they collect the patient. Agree in your team who does it, so it gets done every time.
- Compliance › CheckIn – CheckOut › Daily / Monthly shows the recorded times.
More detail: The clinician diary.
6. Act on a clinician’s handover
You can pick up a handover task, take payment, book the planned appointments and close the task.
Why this matters. At the end of a visit the clinician hands the patient back to you with instructions such as “Charge & Book Treatment Plan Appointments”. Doing these before the patient leaves means the visit is paid for and the next one is booked, which keeps the treatment plan moving.
Where to find it. A blue pop-up appears in the diary when a handover arrives. The task waits under Diary Tasks in the palette.
How to
- Open Diary Tasks and double-click the task, or right-click it and choose Reception Action Task.
- The window is titled Required Action : (action), for example Charge & Book Treatment Plan Appointments. Read the Message To Receptionist and check any Consent(s) Required.
- If a charge is due, click Charge for this appointment. Take the payment or raise the invoice in the sales window, then close it to come back to the task.
- If appointments are needed, click Book treatment plan appointments. The palette changes to Plan Appointments for : (patient). Click each planned appointment and place it in the planned clinician’s column.
- Click Return from handover to get back to the task.
- Click Close Task when everything is done.
Good to know
- You can also right-click a task and choose Close Task (“Are you sure you want to close this diary task?”). Only do this if nothing more is needed.
- Cancel leaves the task open for later.
- Possible actions include Charge, Create Next Appointment, Book Treatment Plan Appointments and the combined Charge & … versions.
More detail: The practice diary.
7. Deal with patients who arrive late
You can apply your late arrival policy and flag patients who are regularly late.
Why this matters. One late patient can make every appointment after them late too. A clear policy, applied the same way every time, protects the clinician’s list. For example: “If you are more than 10 minutes late we may need to rebook.”
How to handle a late arrival
- Mark the patient arrived as normal, so the check-in time is recorded.
- Tell the clinician straight away. They decide whether there is enough time to treat safely. A shortened appointment might mean an exam only.
- If it’s too late, rebook them with Move Appointment or a new booking. Record what happened with Edit Type / Comment, for example “Arrived 25 mins late – rebooked per policy”.
Patients who are always late
- Open the patient’s record and click Mark Late Arriver on the toolbar. It changes to Clear Late Arriver when it is set.
- The practice can set Late Arrivers Pre-appointment Adjustment (mins) in Preferences › Recalls & Reminders. Patients flagged as late arrivers are given an earlier time in their reminder, so they turn up on time for the real appointment.
Good to know
- Late arrival is not the same as failed to attend. If the patient comes in at all, mark them arrived.
- Be careful with the late arriver flag. Use it for a pattern of lateness, not a one-off.
- Changing the reminder adjustment needs the Recalls & Reminders preferences permission.
More detail: The practice diary.
8. Raise and track lab work from the diary
You can raise a lab request from an appointment and record work collected by and returned from the lab.
Why this matters. If a crown, denture or appliance isn’t back on the day of the fit, the appointment is wasted and the patient is let down. Tracking lab work from the diary helps you spot missing work days before the patient is due.
Where to find it. Right-click an appointment and choose Work Required. Lab Work Pickup and Mark Lab Work Returned are on the diary toolbar.
Raise a request
- Right-click the appointment where the impressions or scans were taken and choose Work Required.
- Fill in the Laboratory Work Required form: laboratory, work needed, return date and any linked appointment. Click OK.
When the courier collects
- Click Lab Work Pickup. In Lab Work For Pickup, type at least three letters of the patient’s name in Search, or scan the barcode into Barcode.
- Select the item from the table (Laboratory, Patient), set the Date and any Return Note, then click OK.
When work comes back
- Click Mark Lab Work Returned. Search by name or barcode in the same way.
- Select the item, set the Date, choose who received it under By and add a Return Note. Click OK.
Good to know
- Appointments flagged for external work show a lab icon. Check those a few days ahead.
- Laboratories › Lab Work Reports › Due lists work that is due back.
- The same pickup and return windows are on the Laboratories menu.
9. Create a follow-up task from an appointment
You can create a task linked to an appointment, so a follow-up doesn’t get forgotten.
Why this matters. “Chase the referral letter”, “Call to check how the extraction site is healing”, “Order the shade guide”. Follow-ups like these get forgotten unless someone owns them. A task linked to the appointment keeps the reminder with the patient and the visit it came from.
Where to find it. Right-click an appointment and choose Create Task….
How to
- Right-click the appointment and choose Create Task…. A New Task window opens, already linked to this appointment and patient.
- Give it a Title, for example “Post-op call – LL6 extraction”.
- Choose the List it belongs to. You need at least one task list.
- Add Notes, a Due date (or tick All day) and a Due time if needed.
- Choose a Reminder if you want a nudge, set the Priority and pick an Assignee if someone else should do it.
- Click Save.
Good to know
- Tasks appear in Users › Tasks & Reminders and on the patient’s Tasks tab.
- Assign tasks to a named person rather than leaving them Unassigned, so it’s clear who owns them.
- Keep task text factual and professional. The patient can ask to see it.