
Coming soon: this update has not reached your practice yet. We will let you know the date, and the What’s new message will appear in Chiral Cloud once it is live.
This release covers all changes since 2.0.74, including the NHS claim fixes released in 2.0.75. It brings a new diary with a magnifier for appointment details, a new dental chart charted with the Tooth Dial, charting rules that check what can go on each tooth, a Tooth history for every tooth, images linked to teeth on the chart, a redesigned perio chart, IOTN recording on the orthodontic assessment, a History tab on the patient record, and Archive instead of Delete for patient documents and images and in Housekeeping.
New Features
New diary
The Practice Diary, Clinician Diary and Practice Week Diary are now drawn by a new diary, and so are Booking zones and Week overview in Housekeeping › Diary Schedules. Appointments, the toolbar, the palette, the right-click menus and the dialogs work as before.
For a step-by-step guide with pictures, from the basics to Snap to zones and placing a treatment plan, see Using the new diary: step by step.
To book a treatment plan’s appointments from the diary, including Find a slot, see Placing a treatment plan in the diary.
What looks different:
- The text on each appointment is black or white, whichever is easier to read on the appointment’s colour.
- When more appointments overlap than can be read side by side, the diary shows as many as fit and a +N button for the rest. Click it for a list: click a row to select that appointment, double-click to open it, or right-click for its menu.
- In the Practice Week Diary, a clinician who is not in on a day is shown as a narrow column in their colour, marked with their initials and Not in or Off, so the working days have more room. Click it to open it full width; the button in its heading makes it narrow again. Appointments can’t be dropped into a narrow column.
- Time outside a clinician’s working hours is shaded and labelled Not working or Outside working hours, beside Lunch.
- A clock button in the top corner of the time column opens Time columns. Choose whether the Main time column is on the left or the right, and tick Between the clinicians to add a time column after every clinician or every two. Your choice is remembered in your browser.
- If you switch to another tab and come back, the diary returns to the time you were looking at instead of the start of the day.
Click an appointment to select it, drag it to move it, or drag its top or bottom edge to change its length. Drag it into another clinician’s column to move it to that clinician. You are asked to confirm as before, and the question names both clinicians. If a move or a change of length can’t be saved, a message says so, such as Appointment not moved, and the appointment goes back to where it was. If you drag near the edge of the diary, it scrolls. A selected appointment has an i button (or press I) that shows its details. From the keyboard, the arrow keys move between appointments, Enter opens one, Shift+F10 opens its menu and Escape clears the selection.
On a tablet, tap an appointment to select it, then drag it to move it. You can also press and hold any appointment to pick it up and move it, or hold a little longer for its menu. A selected appointment has a handle for changing its length. Scrolling never moves an appointment, and you can pinch to zoom.
You can now book straight from an empty slot in the Practice Diary and Clinician Diary. With Show Zoning on, click an empty slot inside a booking zone to book an appointment for that zone, with its appointment type already chosen. You can also drag across empty slots, in a zone or not, to book that time. Before, clicking an empty slot did nothing. You can also right-click an empty slot for Book appointment here or Add diary note. When an item is selected in the palette, the palette works as before.
With the new diary, Print day view prints the day lists as text, as when Use Template Format is ticked in Preferences › Diary Settings › Diary Printout Format, instead of a picture of the diary.
Magnify appointments
The new diary has a Magnify appointments button (a magnifying glass) on the diary toolbar. Click it, or press M, then move the pointer over the diary: each appointment you pass over is shown enlarged beside it, with the details the diary has no room for. Press M or Escape, or click the button again, to stop. On a tablet, with magnify on, press and hold an appointment and slide your finger; lift it to hide the view.
Depending on the appointment, the magnified view shows:
- the times the patient was checked in, went into the chair and left;
- the patient’s age and known-as name, and whether they are a new patient or an NHS patient;
- lab work, whether the appointment is part of a treatment plan or linked, and the journey stage;
- the account balance when money is owed or in credit, late payer and late arriver, missed appointments, a medical alert and when a medical history form is due;
- the patient’s mobile and email;
- who booked the appointment and when, whether it was booked online or imported, and the latest changes to it, with who made them;
- the appointment notes in full.
Long notes and longer change lists end with a pointer to Details (select the appointment, then click the i button), which shows everything. Booking zones show their name, appointment type and comment, and a narrow week column says who is not in on which day. Privacy mode hides the same details as on the appointment, and all notes. Magnify stays on until you turn it off or close the browser tab.
Switching back to the old diary
The new diary is on by default. To go back to the old diary for everyone in the practice, untick Use new diary in Preferences › Diary Settings › New Diary and click Save. Open diaries change straight away. If the new diary can’t be shown for some reason, a message says so, with Try again, and reminds you where to switch back.
New dental chart
The dental chart has been redrawn. Each tooth has a realistic crown and the correct number of roots, and the chart grows or shrinks to fit the screen. A midline, quadrant lines and R / L markers show the patient’s right and left. Existing work is drawn with a solid outline and planned work with a red dashed outline.
For a step-by-step guide with pictures, from charting with the Tooth Dial to planning a bridge and the Tooth history, see Getting started with the dental chart.
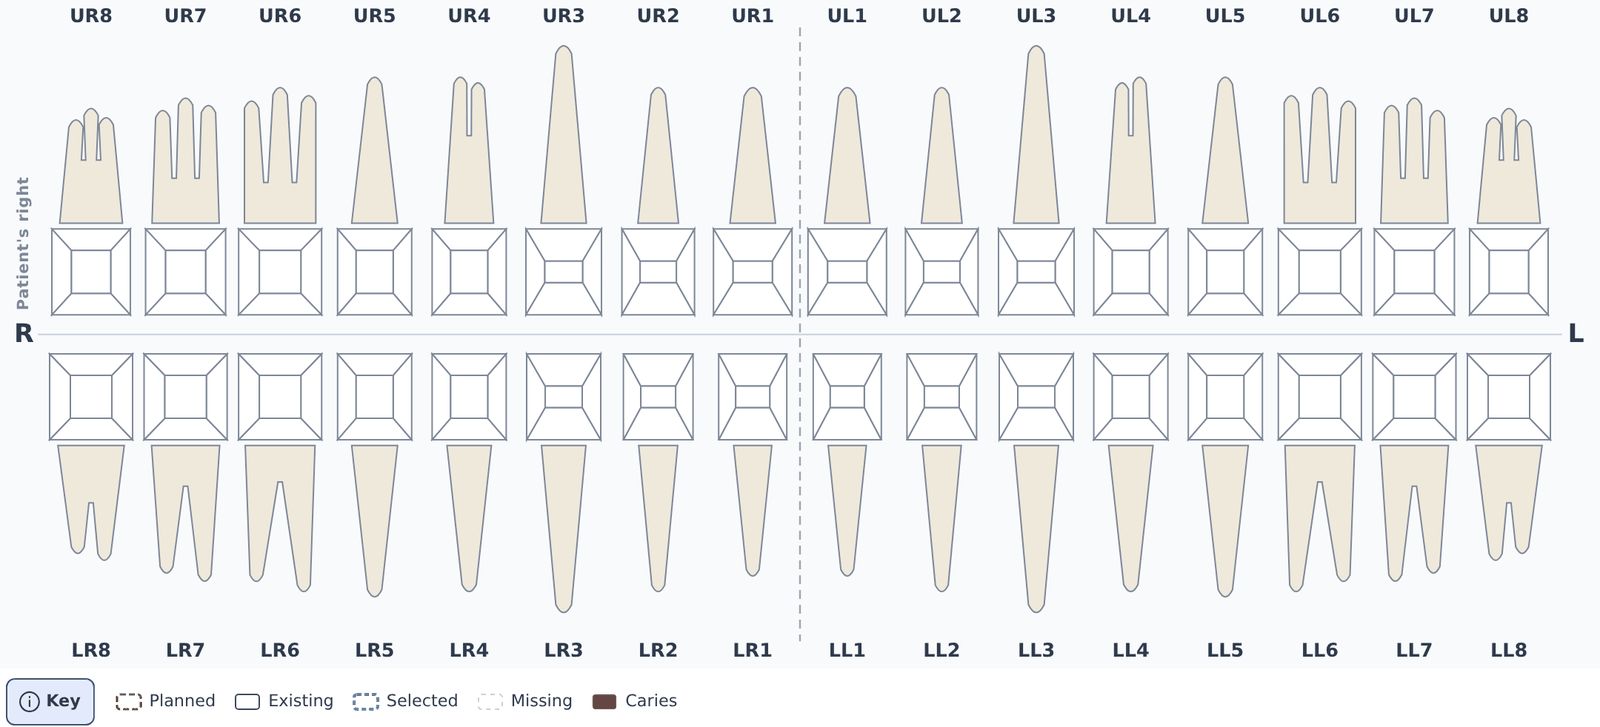
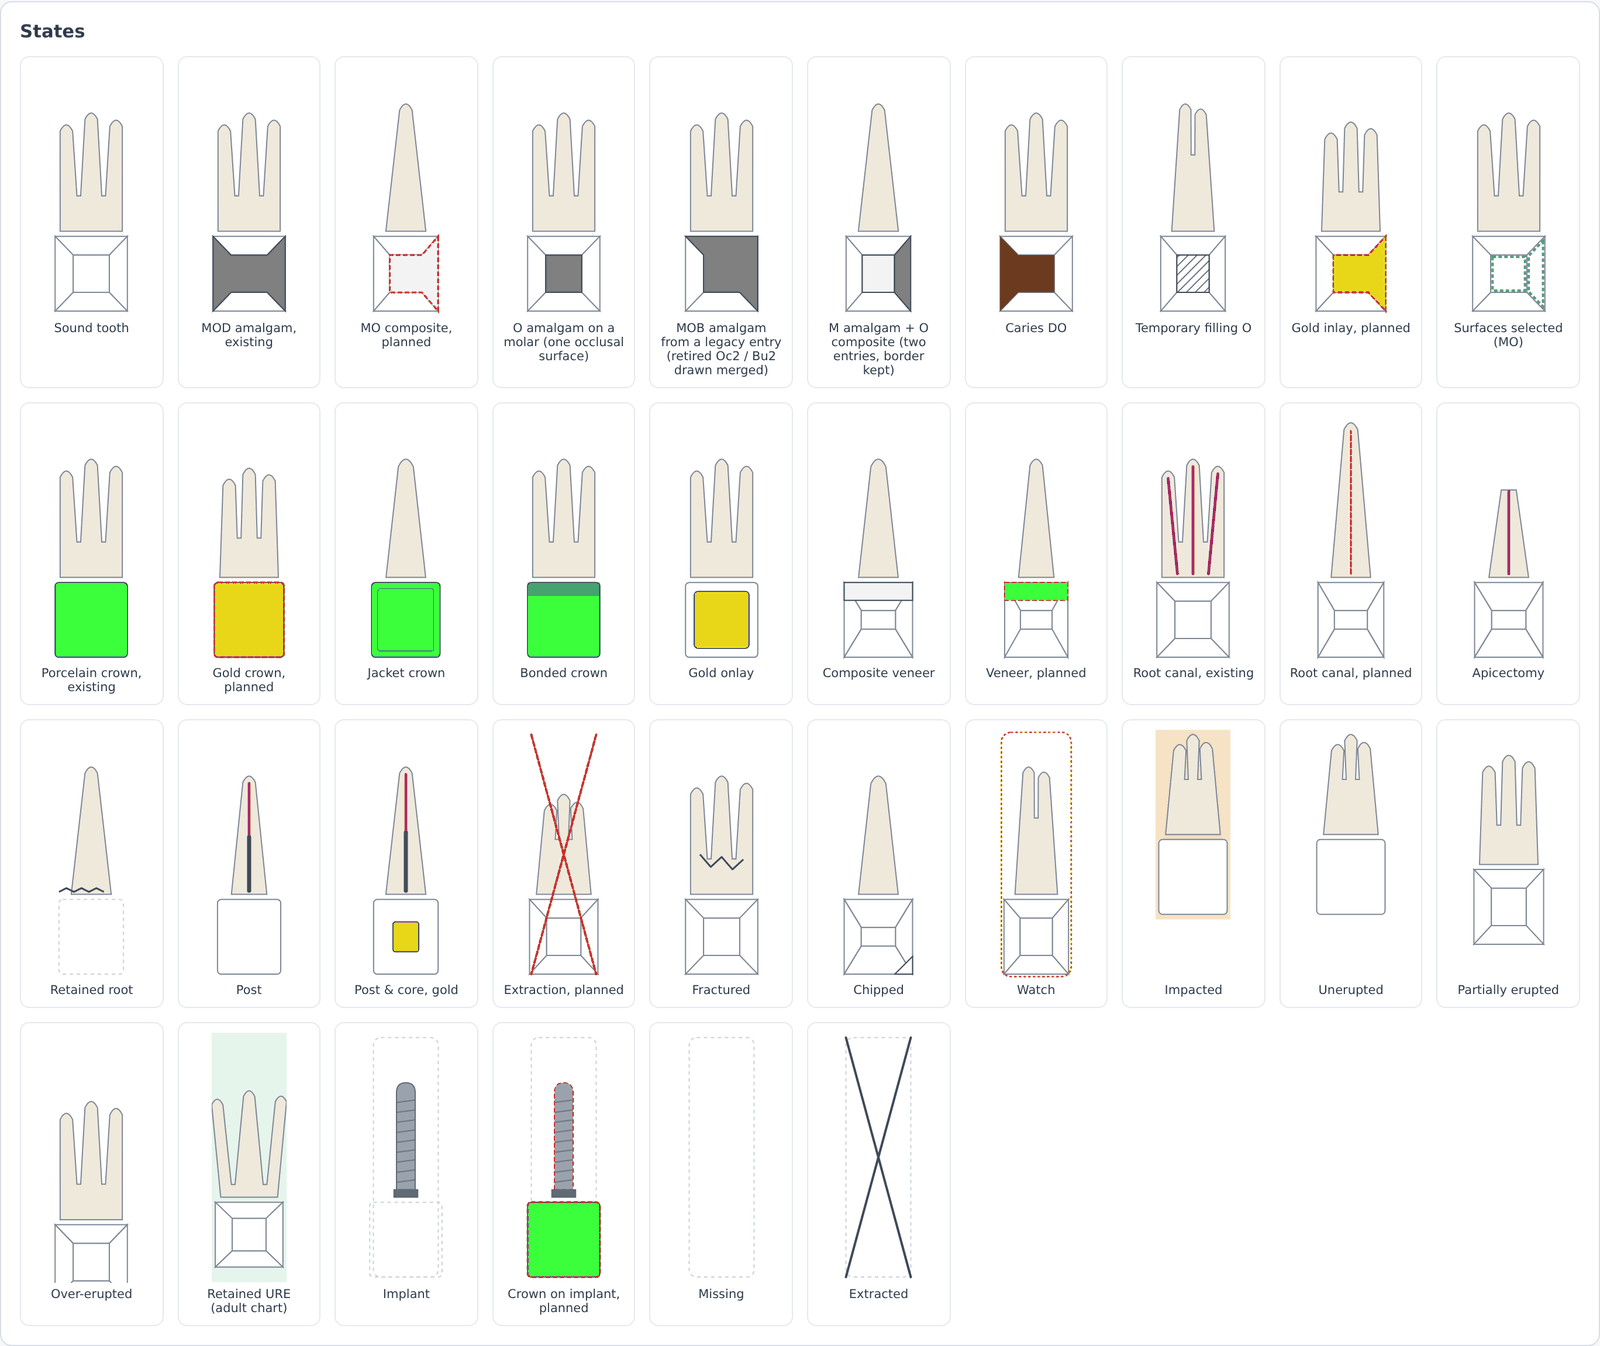
A Key under the chart explains the drawing: planned, existing, selected, missing and caries, and how a planned extraction, an implant, a root canal filling, an apicectomy, a retained root, a bridge and Check this entry are marked. It also shows the materials in use. It is shown by default; hide it with the Key button and it stays hidden for you.
With the new chart, you chart with the Tooth Dial (see below) and the palette is no longer shown beside the chart. If you turn your own dial off with the Dial button on the chart toolbar, the palette comes back. When the palette is in use, teeth the selected item cannot be used on are dimmed.
The new dental chart and the redesigned perio chart are on by default. To go back to the old charts for everyone in the practice, untick Use new charting in Preferences › Charting Systems › New Charting and click Save. Open charts change straight away.
The Tooth Dial
Click a tooth (or right-click it) and the Tooth Dial opens beside it when you let go, above or below the tooth so it stays in view. On a tablet, tap the tooth. Choose the item on the inner ring, then the material on the next ring. If a material has more than one treatment code, a third ring shows the codes with their descriptions. The item is charted straight away, with no dialog, and Undo on the chart toolbar (or Ctrl+Z, Cmd+Z on a Mac) takes it back if you chose the wrong thing. It steps back up to 50 changes, and pointing at it names the change it will take back. When the palette is shown beside the chart and an item is selected in it, clicking a tooth charts that item as before.
For speed, press on a tooth and flick quickly towards the item you want: the dial opens where you pressed, and letting go on an item charts it. If you go past the edge of the dial, it stays open so you can click instead. A slow click, held for a moment and let go without moving, also opens the dial.
To fill several surfaces at once, press on a surface and drag across the others; the dial opens beside them when you let go. Selected surfaces have a blue dashed outline, so the work underneath stays visible (they used to be filled yellow, which looked like a gold restoration). The centre of the dial offers Again to repeat your last choice. For root canal treatment, apicectomy, retained root and posts on a tooth with more than one root, you are asked which roots, or All.
Practices choose what appears on the dial’s inner ring in Housekeeping › Tooth Dial Layout. Clinicians can arrange their own with My Tooth Dial on the chart toolbar, and go back to the practice layout at any time. The chart can also be used from the keyboard: Tab to the chart, use the arrow keys to move between teeth, the letters M, O, D, B, L and P to pick surfaces, and Space to open the dial. Clicking a tooth number moves the chart’s cursor to that tooth without opening the dial. When the dial closes, the chart keeps the keyboard focus, so the arrow keys carry on from where you were.
To set up the dial for the practice or for yourself, see Setting up the Tooth Dial.
Bridges, dentures and retainers
To chart a bridge, denture or fixed retainer, press and hold on a tooth until a ring fills round it and the tooth lifts, then drag along the teeth it covers. On a tablet, press and hold, then slide. The teeth are highlighted with a label such as UR5–UR3 · 3 positions, and when you let go the dial offers the items that fit. If you let go without moving, the dial opens for that one tooth instead.
There are other ways to mark the teeth: with the cursor on one end, Shift+click the tooth at the other end of the same jaw; use Shift and the arrow keys from the keyboard; or choose Bridge, denture or retainer… under More on the dial and then click the tooth at the other end. Once teeth are marked, everything you chart applies to the whole span: clicking inside it, or pressing Enter or Space, opens the dial with bridge, denture and retainer items only, and the surface letters do nothing. Click another tooth, move the cursor away or press Escape to let the span go.
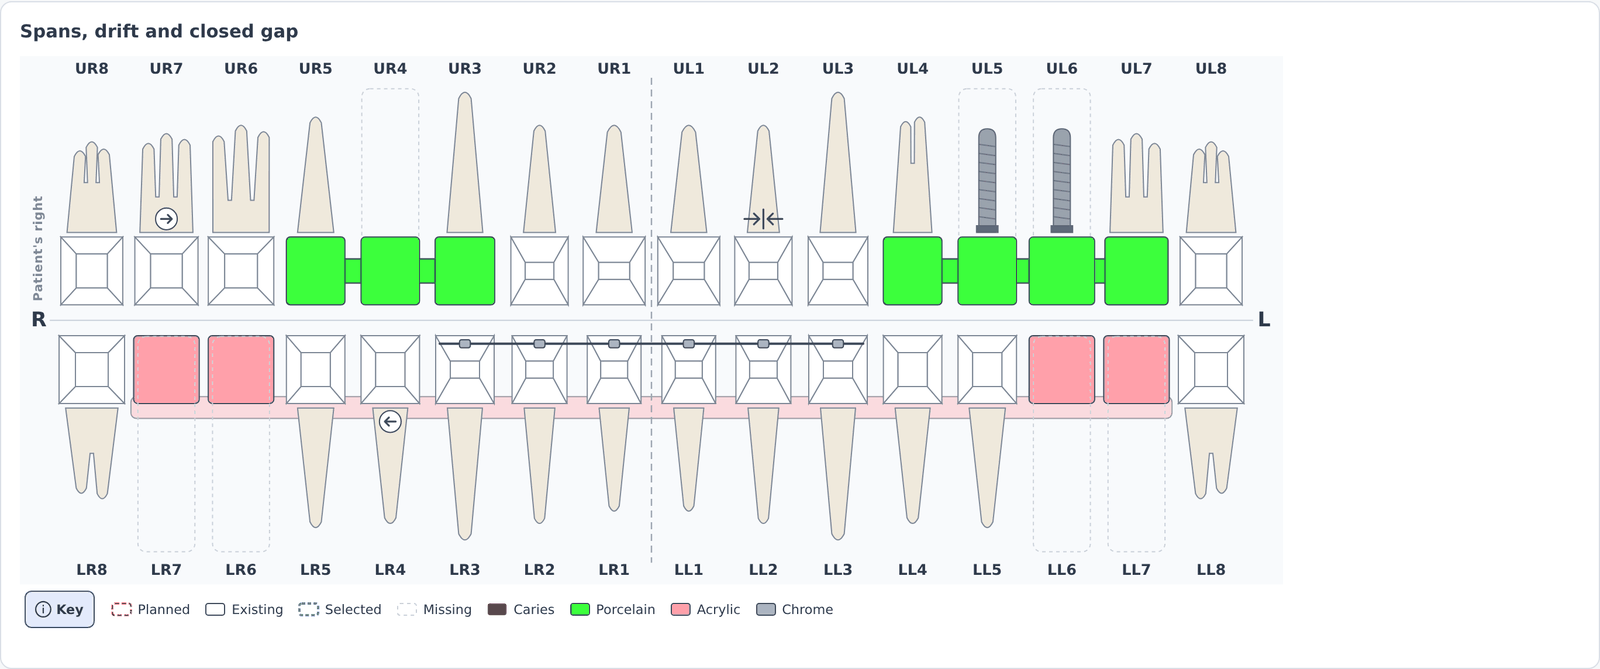
The bridge, implant bridge, denture and retainer dialogs have been redesigned. Tap a tooth in the strip to change its role (abutment, pontic and so on); missing teeth and standing teeth are filled in for you. Materials and the condition are now buttons, and a summary shows what will be charted.
What can go on a tooth
The Tooth Dial now checks each item against what is already on the tooth. An item that can’t go there stays in its usual place but is greyed out; click it to see why, for example “UR6 has no implant, so a crown on implant can’t be planned on it. Plan the implant fixture first.” Under More, these items are listed last with the reason under each. An item that is allowed but unusual has an amber dot and asks Yes or No before it is charted. On the base chart only what is physically impossible is refused; everything else is a warning. An item that can’t go on a tooth can’t be charted there from the palette either.
When planning treatment, the checks take account of work already planned. A tooth planned for extraction counts as gone, so charting on it asks first. An implant can’t be planned on a standing tooth; instead the dial offers Plan extraction and immediate implant, which plans both in one step with one Undo. Crowns and bonded crowns are recognised, so a crowned tooth is not offered fillings, posts or veneers, and a new crown asks before replacing the existing one. In a space with an implant, the dial also offers items for the implant, such as a bonded crown.
Some items ask before they are charted: a veneer on a back tooth, and an implant planned on a tooth that the plan already extracts, which would be an immediate implant. A crown, onlay or veneer can’t be planned on a retained root; on the base chart it asks first.
When planning treatment, an item on the practice’s dial layout that has no treatment code set up, or that only records existing work, stays in its place greyed out, for example “No treatment code is set up for Watch.” A tooth planned for extraction is still checked as the tooth it is, so an item that can’t go on it is refused rather than just asked about. The reason for refusing an implant on a standing tooth ends “Plan its extraction first”, and also points to Plan extraction and immediate implant when the dial offers it.
When you choose which roots, a root that can’t take the item is greyed out with the reason; for example, a post needs root canal treatment on its root. When every root already has root canal treatment, the dial offers Re-treat instead, and Repeat apicectomy after an apicectomy.
An apicectomy is now separate from root canal treatment and no longer needs one. The new chart draws it as a shortened root, with the removed tip shown faintly and a line at the cut. A new item records a root-end filling (retrograde filling) root by root at the cut. When planning treatment, a root-end filling needs an apicectomy on that root; if there isn’t one, the dial offers Apicectomy with root-end filling, which plans both on the roots you choose with one Undo. A root-end filling can’t be charted on a primary tooth.
Bridges, dentures and retainers are checked too. For example, a bonded bridge needs a missing tooth to replace, an implant bridge needs at least one implant, and a fixed retainer can’t be bonded to a missing tooth. In the bridge, denture and retainer dialog, a problem shows beside OK: a refusal stops you charting, and a warning asks Yes or No.
If removing something leaves later work with nothing to sit on, you are asked first, for example “Removing Implant at UR6 leaves Crown on implant at UR6 with nothing to sit on. Remove it too?” Choose Remove it too, or Keep it (flagged). Work that is no longer possible is never deleted: it is flagged with an amber mark beside the tooth number, and a line under its row in the treatment list says “Not possible – … Check this entry.”
The dental chart and the perio chart now work out each tooth from the same record, so they always agree. For example, a tooth replaced by a denture counts as missing on both, and a tooth extracted after an implant was placed is shown as gone.
Tooth history
Each tooth now has a Tooth history: everything charted on it, newest first, with the date, surfaces or roots, the name of the person who charted it (Charted by), and whether it is existing, planned or completed. To open it, press H with the tooth selected on the chart, or choose History… under More on the Tooth Dial. With the new chart you can also click the tooth number.
When later work covers earlier work, for example a crown over a filling, the earlier work has a Retain tick. Leave it ticked if the earlier work is still there underneath: if the later work is ever removed, the earlier work shows on the chart again. Untick it if the earlier work was taken away when the later work was done; it is then marked Taken away – not shown on the chart and does not come back. The change is saved with the chart, and the history shows who made it, by name, and when.
Charting and treatment descriptions
The chart’s mode is an Existing | Treatment switch, and the chart’s title shows (Existing work) or (Treatment). In Housekeeping, Base Charting Favourites is now called Existing Work Favourites. A patient’s first chart opens on the adult chart unless they are under 12.
Molars now have five surfaces, like premolars: mesial, distal, buccal, palatal or lingual, and occlusal. Existing charting is read the same way. Treatment descriptions use the usual notation, for example UR6 MOD, Amalgam, and fillings and inlays are charged per surface, so a molar MO counts as two surfaces.
The Tooth Numbering Scheme in Preferences › Charting Systems is now used on the dental and perio charts and in treatment descriptions: British, American Universal or European (FDI).
Charting a treatment now starts the charge at the treatment code’s price, and only offers the code’s own material. A tooth marked as a retained primary tooth on the adult chart is named and recorded as the primary tooth (for example URE), and treatments a primary tooth cannot have, such as implants and veneers, are no longer offered on it.
Treatment on the other chart is no longer hidden. A note above the chart says, for example, “1 treatment is on the adult chart” with a link to show it, and treatment rows are tagged Adult chart, Child chart or Not on chart. The palette has a clear Adult | Child switch, and Escape puts down the selected palette item.
Reset Tooth now removes planned treatment together with its charges, and asks before removing completed work, whose charge is kept.
Images on teeth
With the new dental chart, you can link a patient’s X-rays and photos to the teeth they show. An Images tray on the left of the chart lists the patient’s images, newest first. Use the dropdown at the top of the tray to choose which image types to show (All types by default); your choice is remembered in your browser for every patient. Rest the pointer on an image, or tap it on a tablet, for a larger preview. The preview stays inside the tray, so it never covers the chart. With a tooth selected, tick Linked to (for example Linked to UR6) to show only that tooth’s images. Newly uploaded images appear in the tray straight away.
To link an image, drag it from the tray onto a tooth; the tooth is highlighted as you go. On a tablet, press and hold the image, then drag. If teeth are marked as a span (see Bridges, dentures and retainers), dropping the image on the span links it to every tooth in it. You can also open the Tooth Dial on the tooth, choose Image On Tooth… under More, pick the image and click Link. From the keyboard, press L on an image in the tray to link it to the tooth at the chart’s cursor. Linking an image doesn’t change the chart, so there is nothing to save.
A tooth with images linked has a small badge showing how many. Click the badge, choose Images under More on the dial, or press I on the chart, to see the tooth’s images: each one with its type and date and when it was linked, with Open to see it full size and Unlink. The same list appears in a new Images section of the tooth’s Tooth history, and the appointment’s Base Charting Entry(s) lists the images linked to each tooth.
Unlink asks first. It only takes the image off the tooth: the image stays in the patient’s Images, and the link is kept on record rather than deleted.
For the Images tab itself, from uploading and opening images to the image editor and composites, see Patient images: upload, edit and composites.
Redesigned perio chart
This release introduces a redesigned perio chart, drawn to match the new dental chart. Like the new dental chart, it is on by default; to switch back, see Use new charting under New dental chart above. The whole mouth is shown in four bands, one column per tooth, with compact rows for mobility, recession, probing depth, bleeding, suppuration and furcation. The gum line and pocket depth are drawn on each tooth, and missing teeth, pontics, implants, bridge abutments, root fillings and planned extractions are marked in words that fit within each tooth’s column, so a long one such as planned extraction never runs into the next tooth.
For a step-by-step guide with pictures, from opening a chart to the probe pad, Nurse mode and the Command box, see Getting started with the perio chart.
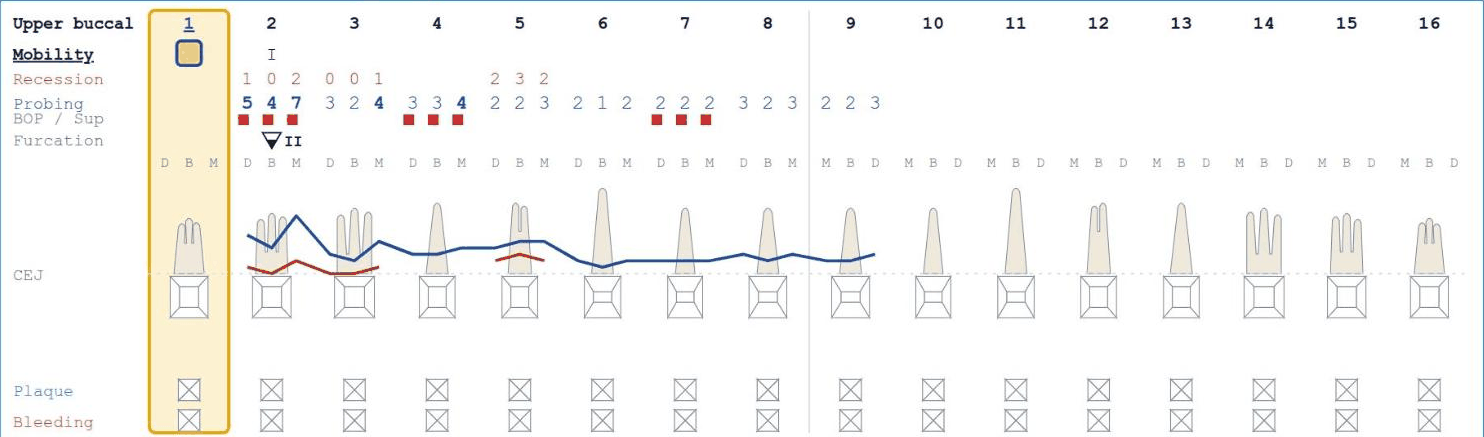
Tap a tooth to start recording at its first site, or a value to start at that exact site. A probe pad with large buttons stays in one corner of the screen; use the corner buttons to move it, and it moves aside if it would cover the tooth you are recording. Recording runs left to right along each row, then on to the next row down, and back to the top after the last. Teeth that are not present are skipped.
On the pad, ‹ and › move one site, « and » a whole tooth, and ▲ and ▼ change row. The keyboard works too, including Page Up / Page Down and Ctrl with the arrow keys. Plaque and bleeding are recorded on the same pad. The chart scrolls so the site you are recording stays in view.
There are more ways to enter readings:
- Press and hold a tooth to enter all six of its probing depths at once, then click OK.
- Nurse mode on the toolbar shows a large banner naming the site being recorded, such as UR6 · Buccal · Mesial, and the value just entered. It is remembered in your browser.
- Type readings into the Command box above the chart, for example UR6 B 3 2 4 bop, and press Enter. The Up arrow brings back the last line.
Each reading is saved as you enter it, and the bar above the chart says All readings saved once they are. A reading not yet saved is marked; if a save fails, the bar says why, with Retry. Undo (or Ctrl+Z) takes back your last entry.
A tooth whose charted work is no longer possible is flagged with an amber dot beside its name, Check main chart. A tooth planned for extraction and an immediate implant is now marked as a planned extraction too.
Perio chart improvements
These changes apply to both the old and the redesigned perio chart.
The perio chart now uses the patient’s dental chart: missing and unerupted teeth, pontics and implants are shown and skipped when recording. If the dental chart has changed since a perio chart was started, a note says what changed, with Update this chart. It also follows the Retain ticks in Tooth history. In an appointment, it takes account of planned work from that appointment’s treatment plan only.
Click anywhere on a tooth to start recording at that tooth. Values outside the normal range are refused with a message (probing depth 0–15 mm, recession −5 to 15 mm, mobility 0–III). Type two digits quickly for a value of 10 or more, and a minus before a recession value. An unrecorded site is now different from a 0. Furcation can only be recorded where the tooth has a furcation, and is shown as I, II or III.
Plaque is now blue, bleeding red and suppuration a yellow dot, with a legend under the chart. Plaque, bleeding and BOP scores only count natural teeth that are present, and Mark unrecorded sites < 4 mm records that sites under 4 mm were not recorded. The chart history shows the date and time, newest first.
BPE
The BPE on the patient and orthodontic assessments is now laid out as six sextants with the index teeth shown. Each sextant starts blank instead of 0, and a separate * marks furcation for codes 3 and 4. For patients under 18 it becomes a simplified BPE, and it is not recorded under 7. Prompts under the grid suggest next steps, such as a full perio chart for a code 4.
For a step-by-step guide, see Recording the BPE.
Showing or hiding the charts
The Dental Charting and Perio Charting tick boxes in Preferences › Charting Systems now work. Untick Dental Charting to hide the dental chart in the appointment and on the treatment plan; treatment can still be added. Untick Perio Charting to hide the Perio tab. Both start ticked, whatever was saved before. Incomplete Visualisation, which did nothing, has been removed.
IOTN on the orthodontic assessment
IOTN can now be recorded on a chart. Click Record IOTN… in the IOTN box on the patient’s Ortho tab to open the recorder. Mark the teeth, overjet, overbite and open bite, the clinical features and the Aesthetic Component (1–10). The Dental Health Component grade, the feature that decides it and NHS eligibility are shown as you go. There are stages for Assessment, Appliance fitted and Completion; at Appliance fitted you can Copy from Assessment if the occlusion hasn’t changed. Tick I confirm these findings and the grade, then click Apply to assessment. Measurements can be recorded to 0.1 mm: the Step selector sets the − and + buttons to 0.5 mm or 0.1 mm, and is remembered in your browser.
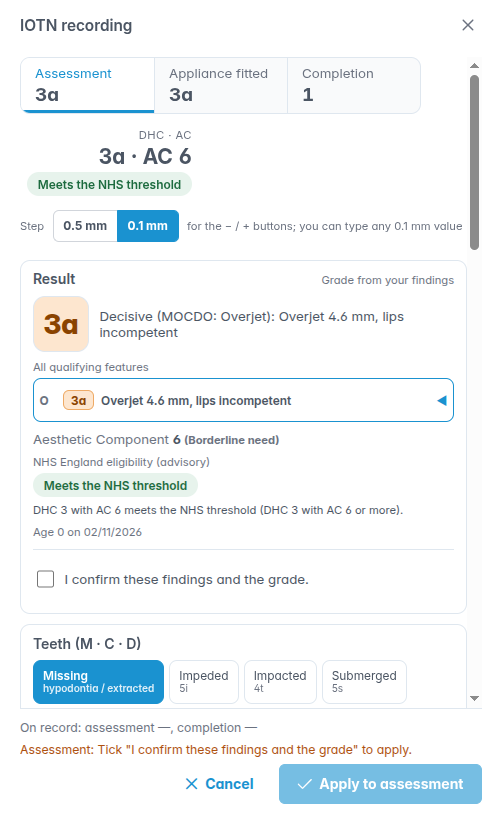
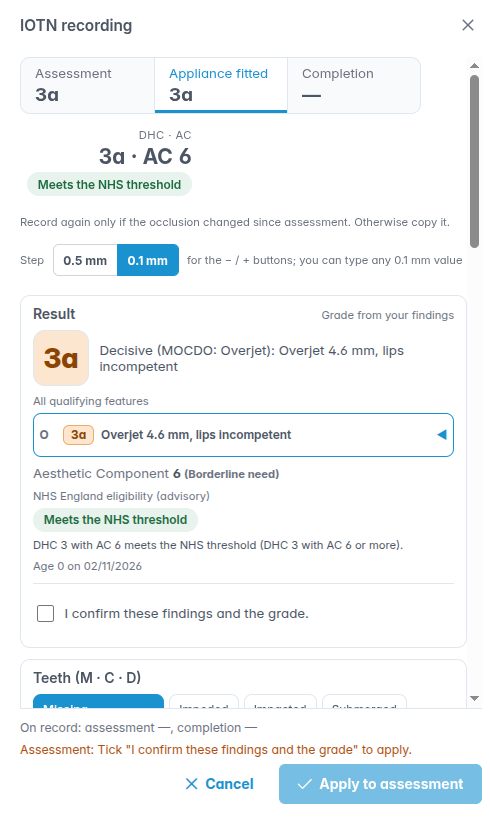
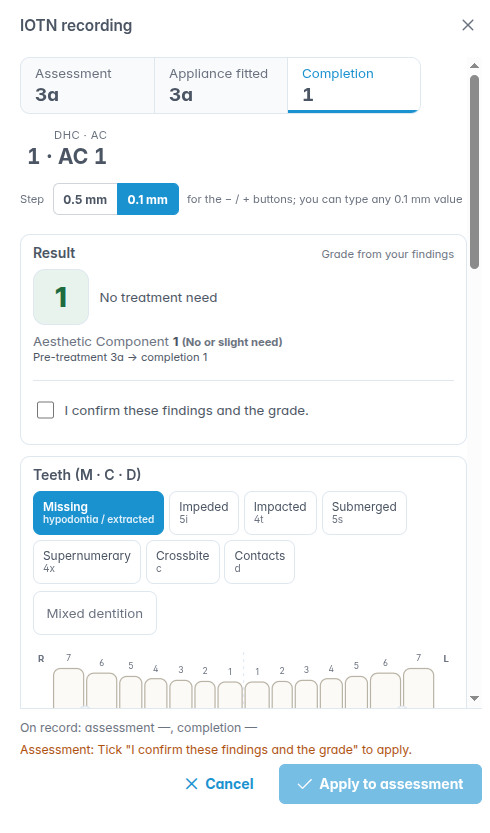
For a step-by-step guide to recording IOTN at each stage, see Recording IOTN with the IOTN recorder.
If the recorder doesn’t suit a case, you can still record IOTN the simple way, from the dropdowns, which replace the old number boxes: DHC 1–5, the sub-letter (only letters that fit the grade), AC 1–10 and the completion IOTN or not applicable. A value entered by hand takes priority and shows Differs from the IOTN recorder. Orthodontic Details on the appointment shows the IOTN used on the FP17O.
Completion FP17O claims now send the completion IOTN. A claim with an IOTN problem is not submitted, and a message says why.
Appointment editor
In the appointment editor, the patient’s photo is now a small picture in the General header, so the panels below use the full width. Tap the picture to see the full photo, which is also shown inside General.
Patient History tab
A new History tab on the patient record shows who changed what and when: the patient’s details, journey stage, NHS details, recall and reminder settings, consents and appointments. Filter by section, and use Load more for older changes. Bulk updates are marked, and an appointment’s time links to the day diary. Changes to notes are listed without their text, and imports are not recorded.
For a step-by-step guide, see Getting started with the patient History tab.
The tab needs the Patients – change history permission, which staff with Housekeeping have. It can be hidden or moved in Utilities › Patient Tabs.
Documents are archived, not deleted
A patient’s documents and images are part of their record, so they are now archived instead of deleted. On the patient’s Documents tab, in either layout, and on the Images tab, Delete has become Archive, for example Archive Patient Document, Archive Xray / Scan or Archive this image. You are asked to confirm, and reminded that the document stays in the patient’s record and can be shown again with Show archived.
Tick Show archived to see archived documents and images too. They are greyed out and tagged Archived, and open view only. To bring one back, right-click it and choose Restore Document.
An archived document sent with an email still opens from the email, marked (archived). Deleting a composite archives the image it produced. An archived image is no longer shown on the teeth it was linked to, and comes back on them if it is restored. Patient and system templates in Utilities › Patient Templates and System Templates are archived in the same way, with Show archived and Restore Template.
Archive instead of delete in Housekeeping
Appointment types, diary event types, recall types, cancellation reasons, treatment codes, journey stages and document classifications are now archived instead of deleted. Delete has become Archive, and an archived item can be brought back with Restore.
For a step-by-step guide to archiving and restoring, see Archive instead of delete.
Tick Show archived to see archived items, which are greyed out. Archived items are no longer offered when you add something new, but existing appointments and records still show them.
Imaging & Scanners
For practices using Chiral Bridge, Preferences › Imaging & Scanners replaces the old X-ray software connection. It lists the practice’s computers and whether they are online, with Add a computer to pair a new one. Image sources lists imaging systems you can search; a watched folder and DTX Studio Clinic can be set up now, and others are marked Coming soon. Recent images shows what has come in.
On a patient’s Images tab, import progress shows in the toolbar and a message sums up the result. Images that could not be matched to a patient go to the Import Inbox, opened from the icon in the top bar, which shows how many are waiting, where you can assign them to the right patient.
Chiral Cloud Update notice
If Chiral Cloud is updated while you have it open, a Chiral Cloud Update message now says so, and that you will need to sign in again. Click Reload when you are ready, or Not now to finish what you are doing first.
What’s new in each release
After a new release, a What’s new in Chiral Cloud message appears on the Practice Control Centre with the release’s main changes in a few lines, and a Read the release notes link to the full notes in the knowledge base. Click × to close it; it won’t show again for that release, on any computer. A release with no new features shows no message.
Resolved Issues
Perio chart
Perio charts recorded in the appointment editor were not saved, although they stayed on screen until you signed out. They are now saved with the appointment, and a message confirms it. A chart that cannot be saved is kept and tried again on the next save.
Saving a new perio chart from the patient record could fail with “patientId is required”. It now saves.
- Suppuration on the lower teeth was recorded on the upper teeth.
- Recording could run past the last tooth. Home and End did nothing; they now go to the first and last tooth.
- The overall plaque and bleeding percentages were wrong when the upper and lower arches had different numbers of teeth, and could show NaN%.
- Lower teeth were drawn one column out of place, and premolars and canines were drawn as the wrong tooth type.
- Furcation could be recorded on the buccal of an upper first premolar.
- A saved chart was drawn faded, and the chart history listed the oldest chart first.
- The Show and Print buttons did nothing and have been removed.
Dental chart
- A planned root canal treatment or apicectomy was drawn as if it had been completed.
- A crown on an implant was recorded but not drawn on the chart.
- Charging a molar MO with both halves of the occlusal surface clicked counted, and claimed, three surfaces.
- A charge made by charting a tooth started at £0.00.
- An amalgam filling code could be charted as composite.
- Treatment on a child chart tooth was described with the adult tooth (URE as UR5), and every bridge, denture and retainer was described as UL1.
- The Tooth Numbering Scheme preference was saved but not used.
- Reset Tooth on the adult chart also removed the child chart’s entries on that tooth, and could leave charges with nothing on the chart.
- Implants, bridges, veneers and posts could be charted on primary teeth, and a post or veneer on a crowned tooth, including a bonded crown.
- A tooth with several items on it could be drawn differently from one opening of the chart to the next, for example showing a different crown. It is now always drawn the same way.
- The denture and implant bridge dialogs offered the bonded bridge’s materials, so a denture could not be charted as acrylic or chrome.
- The Partial Chrome Denture treatment code (PCD) did not appear on the chart. It now charts as a chrome denture.
- A treatment code linked to Closed Gap changed the existing charting and charged nothing. It is now planned and charged.
- Treatment on the other chart (adult or child) was listed but not drawn anywhere, and existing work on the other chart was not listed.
- Denture tooth labels were missing.
- Right-clicking a tooth with nothing selected could open an empty menu or an error. Image On Tooth and Tooth History, which did nothing, have been removed from the menu. Tooth history and images on teeth are now opened as described above.
Orthodontics and NHS claims
- Some NHS claims, such as claims with other services, were not stacked after the receipt or invoice was issued, and no message was shown. They are now stacked. (Fixed in 2.0.75.)
- If an NHS claim can’t be stacked, a message now says “The receipt was issued but the NHS claim could not be stacked. Please check the claim.” This now covers NHS invoices too. (Fixed in 2.0.75.)
- An orthodontic FP17O could fail to be stacked when the receipt was issued, and an Assess and Review for a paying patient could produce a £0.00 receipt. The completion reason is now taken from the treatment codes charged. (Fixed in 2.0.75.)
- A 17-year-old was counted as 18 at referral and flagged as needing commissioner approval. Ages now count completed years.
- FP17O claims could send the wrong IOTN and Aesthetic Component, or 0 when none was recorded.
- Saving a change to an orthodontic assessment could fail with an error.
Other fixes
- Appointment History on the patient record: By now shows who booked each appointment, and lengths show as hours and minutes (for example 1:15).
- After an update, a screen could show “Something went wrong … Please contact Chiral System Ltd”. It now shows the Chiral Cloud Update message with a Reload button.
- The browser’s own right-click menu could appear over the dental and perio charts. It no longer appears anywhere in Chiral Cloud, except in text boxes, where you still need it for copy and paste.
- Housekeeping: saving an appointment type or diary event type could drop recall types, templates or report texts from the lists, and saving a document classification or cancellation reason could update the wrong list.
- Many help (?) buttons opened a “page not found” page, and some opened the wrong article, for example on the later Housekeeping and Preferences tabs and in the appointment editor. Each now opens the right article or getting-started guide for the screen or tab you are on, and screens that had no ? button now have one. The Knowledge Base is now at docs.chiralcloud.com.
- Housekeeping › Questionnaires showed an error instead of opening. It now opens.
- With Outstanding Accounts open, closing Account Groups emptied the list of account groups the other tabs use, so Outstanding Accounts showed “Something went wrong in the selected tab” until you reloaded. The patient’s account could fail in the same way. Closing Account Groups no longer affects other tabs.
- Payment, receipt and other account notes showed a garbled character (�) instead of £. They show £ again.
- The recall Duration on the patient’s Recalls tab showed the time of day instead of the length of the recall, and Recalls Due showed “-” or a wrong value. Both now show the duration in minutes.
- Find Laboratories: searching by name or address found nothing, and the Telephone column was always blank. Searches now work, show the phone number and list only your practice’s laboratories. The work phone box on Add Laboratory and Add Referrer stayed red for a valid number; it now accepts any UK number, such as 01632 960123.
- A new appointment booked in the diary showed today’s date as the patient’s date of birth (age 0), and not who it was assigned to, until the diary was refreshed. It now shows the patient’s details straight away.
- Images uploaded, scanned or dropped in during a session could disappear from the Images tab after the image editor or another tab was closed, until you reloaded. They now stay.
- Delete Assessment in the Ortho tab’s assessment history deleted the assessment at once, without asking. It is no longer offered.