Build online patient forms, including medical history and PDF-based forms, publish and test them, copy them between practices, and brand the patient portal.
Who it is for: practice managers and administrators.
In this guide:
- Build an online form in the Form Designer
- Put the medical history form online
- Turn an existing PDF into an online form
- Publish, test and copy forms
- Copy forms from another practice in your group
- Brand and lay out the patient portal
1. Build an online form in the Form Designer
You can create a standard form, add and arrange fields, and set each field’s properties.
Why this matters Online forms let patients complete medical history, new patient details, consent and questionnaires at home on their phone, before they arrive. That means fewer clipboards, faster check-in and answers that go straight into the record.
Where to find it Utilities › Form Designer. It has two tabs: Forms (the list) and Designer.
How to
- On Forms, click New Form and choose Standard form (fields stacked down the page).
- On Designer, enter the Form Name and Description.
- Drag fields from the palette onto the canvas: Text Field, Text Area, Dropdown, Checkbox Group, Checkbox, Medical condition, GDPR consent, Radio Buttons, Date Picker, File Upload, Rating, Signature, Section Header, Image, Text Block, Row Container, Fieldset.
- Drag fields up and down to reorder. In a Row Container column, right-click to add a field there.
- Click a field and set its properties on the right: label, required, options (Add Option), and for File Upload the file category.
- Use Form Styling for background colour or image.
- Click Preview to try it, then Save.
Good to know
- GDPR consent can only be added once per form and starts unticked, as UK GDPR requires.
- A form needs a name before it can be saved.
- The red Save & Exit asks about unsaved changes.
2. Put the medical history form online
You can build an online medical history form from your Housekeeping conditions and import answers into the record.
Why this matters Medical history must be updated before every course of treatment. Letting patients complete it online before the visit gives the clinician time to read it, flags warnings early and saves chair time.
Where to find it Utilities › Form Designer, in a standard form. Watch the Online medical history forms videos for the full process.
How to
- Check your list in Housekeeping › Medical Conditions first; the online form uses the conditions on the medical history form, in that order.
- Create a Standard form called, for example, “Medical history update”.
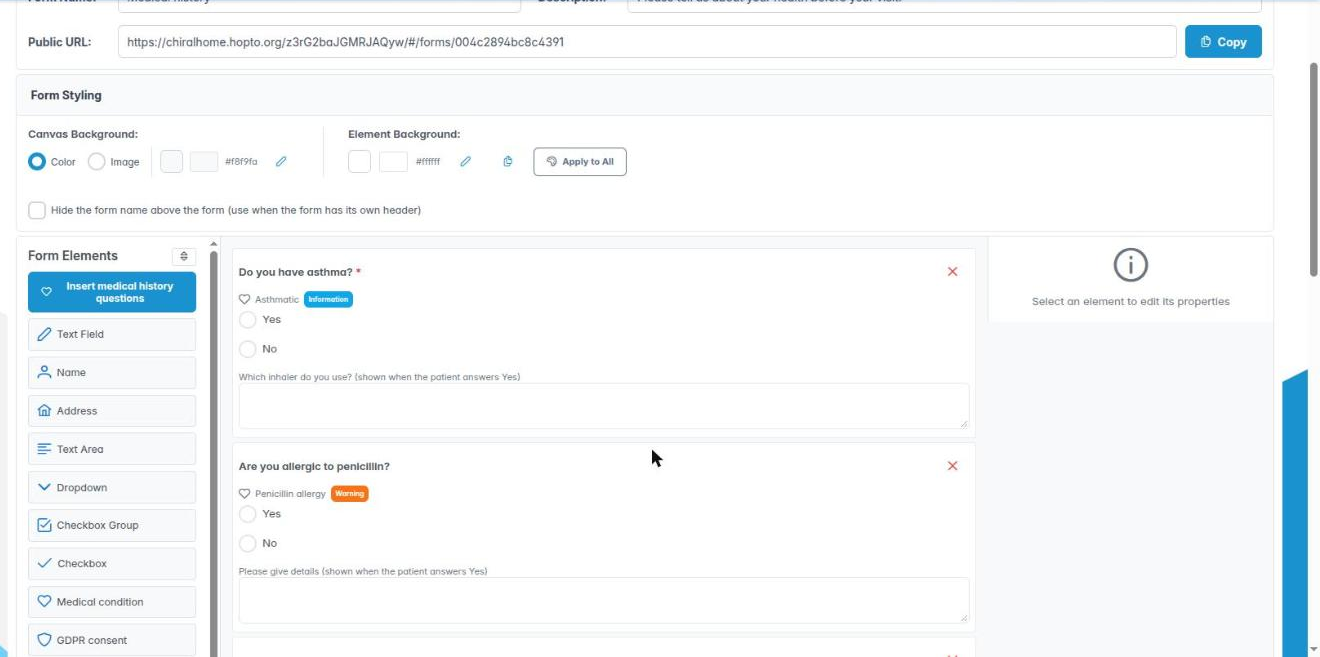
- Click Insert medical history questions. Each condition is added as a Yes/No Medical condition question with a details box when the answer is Yes; section headers come across too.
- Add a Signature field and, if you wish, a GDPR consent tick.
- Save and Publish.
- Send it to patients before appointments, using Preferences › Recalls & Reminders (Medical History On Booking) or a Patient Forms mail shot.
- When a response comes back, open it and click Add to medical history. Yes answers to Warning and Hazard conditions are ticked to add as active conditions.
Good to know
- The clinician must still review and confirm the history with the patient.
- Insert medical history questions is not offered on a PDF form.
More detail: Online medical history forms.
3. Turn an existing PDF into an online form
You can build a form on top of your own PDF and place fields over it.
Why this matters Many practices already have approved consent forms or questionnaires as PDFs, for example from their indemnity provider or a specialist supplier. A PDF form keeps that exact layout and wording while letting patients fill it in online.
Where to find it Utilities › Form Designer, New Form › PDF form.
How to
- Click New Form, choose PDF form, then Import PDF and pick your file. Each page becomes the background.
- Drag fields from the palette onto the page where the printed boxes are. Only fields that make sense on a PDF are offered.
- Drag a field to move it and pull its handles to resize. The Position values in the properties can be typed in for precision.
- Labels are not printed on the page, because the PDF’s own wording is the label.
- Preview, then Save and Publish.
- To swap in a new version of the PDF, use Replace the PDF behind this form. If the new PDF has fewer pages, Replace the PDF? warns which fields would be removed.
Good to know
- A PDF form needs at least one page before it can be saved or published.
- Make sure you have the right to reuse a third-party PDF.
4. Publish, test and copy forms
You can publish a form, send yourself a test, share its link and copy forms.
Why this matters Patients only see published forms. Testing the form end to end on your own phone first catches confusing questions before a patient does.
How to
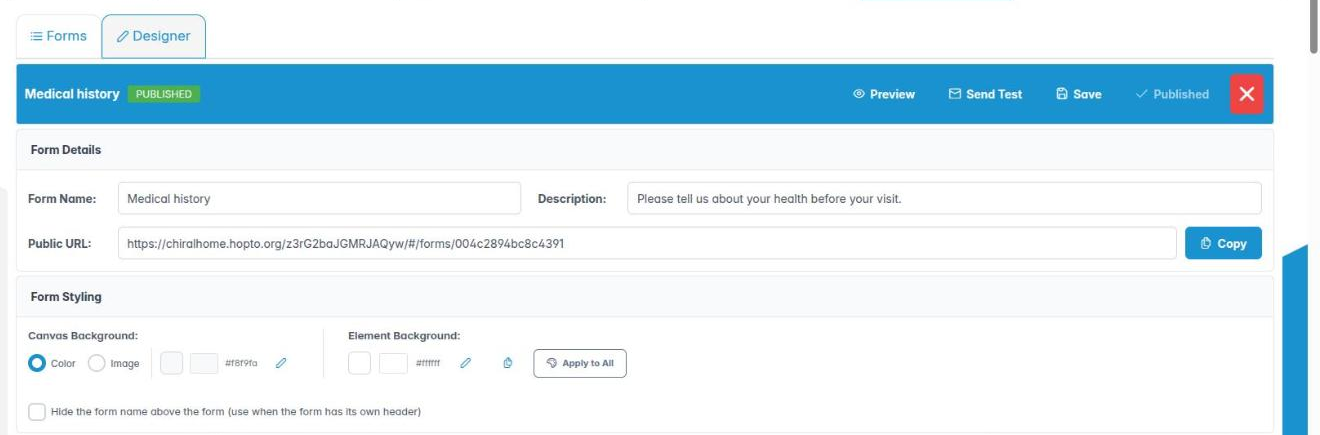
- On Designer, click Publish. Form Published Successfully shows the public link; click Copy to copy it. The link also appears as Public URL above the canvas.
- Click Send Test to email the link to your own staff email address. It saves the form first. It only works once the form is published.
- Open the email on your phone and fill in the form as a patient would.
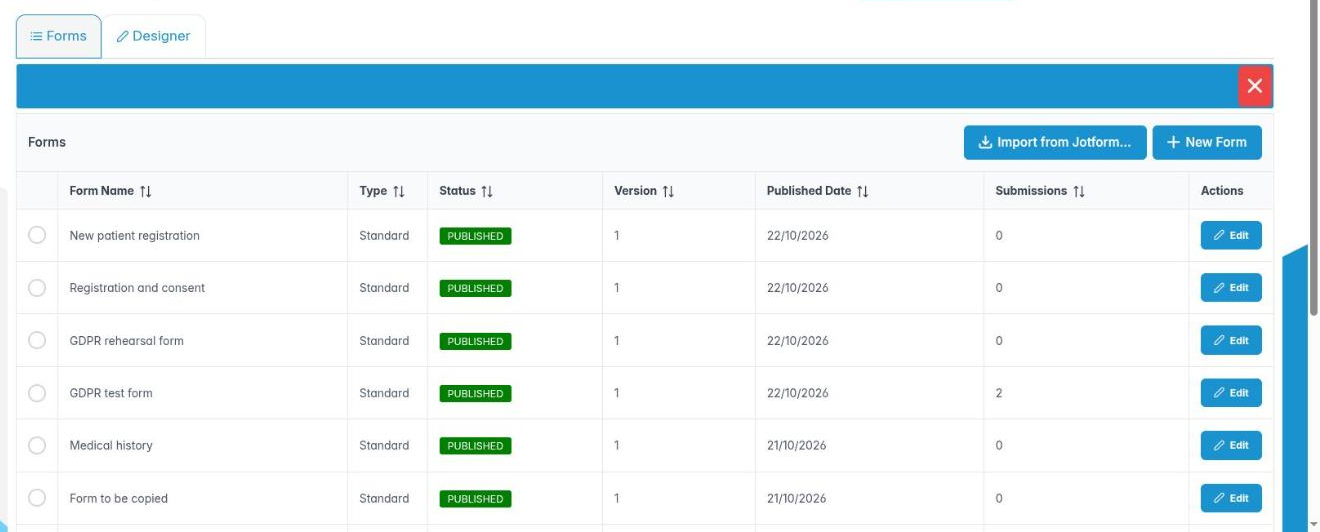
- On Forms, the table shows Form Name, Type, Status, Version, Published Date and Submissions. Use the paginator to see more.
- To start a new form from an existing one, right-click it and choose Copy Form. The copy is a draft called “(copy)”.
Good to know
- The public link is for general use (for example on your website). Links sent to a patient by mail shot or from their record are personal and single use.
- Editing a published form and saving creates a new version.
- Copies never bring responses with them.
5. Copy forms from another practice in your group
You can bring forms across from a sister practice instead of rebuilding them.
Why this matters Groups of practices usually want the same medical history, consent and new patient forms everywhere. Copying keeps them consistent and saves rebuilding each one.
Where to find it Utilities › Form Designer, Forms tab, Copy from another practice…. It is only offered if you can switch practices (Clinic switching) and your practice shares with at least one other.
How to
- Click Copy from another practice….
- Choose the Practice to copy from.
- Tick the forms you want. The list shows Name, Type, Status and Last updated.
- Click the copy button. Each copy arrives in your list as a Draft.
- Open each copy, check it and Publish it.
Good to know
- Copies are independent: later changes at the other practice do not affect yours.
- If a copied Medical condition question has no matching condition in your Housekeeping list, a warning tells you; fix it in the property editor.
- If anything fails it stays ticked so you can Try again.
More detail: Form copy between practices.
6. Brand and lay out the patient portal
You can set the portal theme and design each portal page, then publish it.
Why this matters The patient portal is where patients register, book, see appointments and fill in forms. Branding it with your logo and colours, and adding practice information and notices, makes it feel like part of your practice and builds trust.
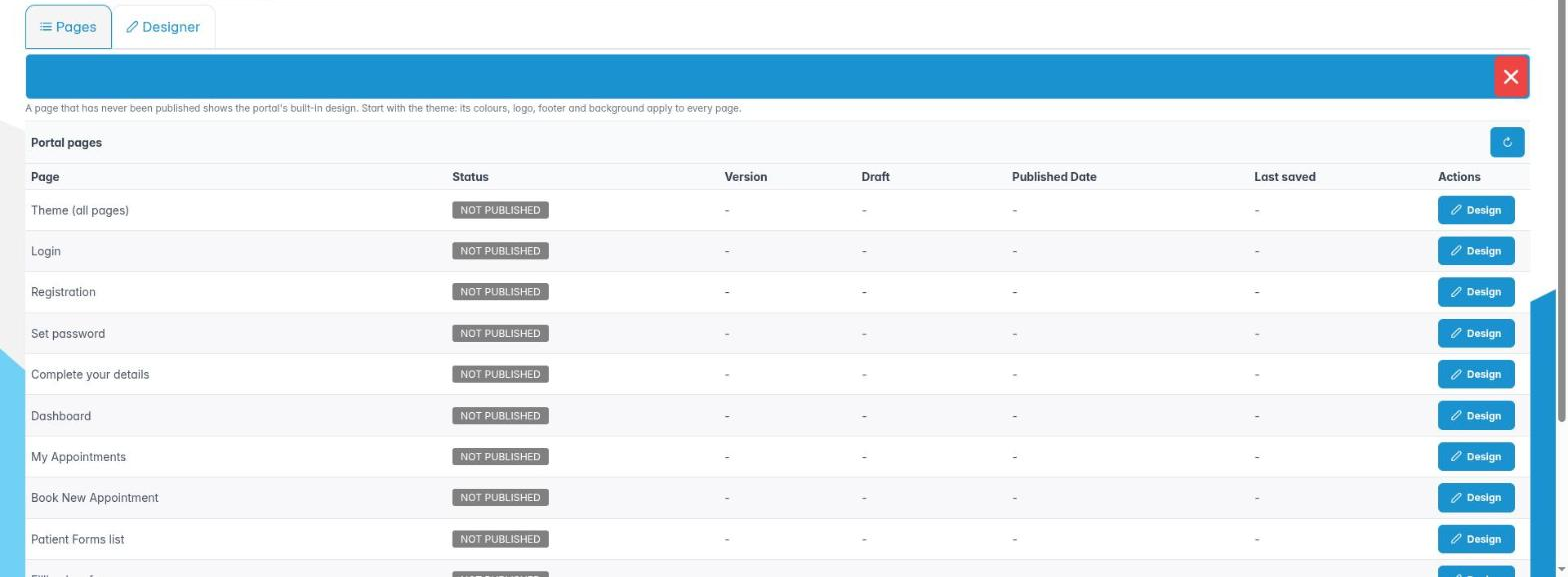
Where to find it Utilities › Portal Designer. Needs Portal Designer (AID_PortalDesigner). Tabs: Pages and Designer.
How to
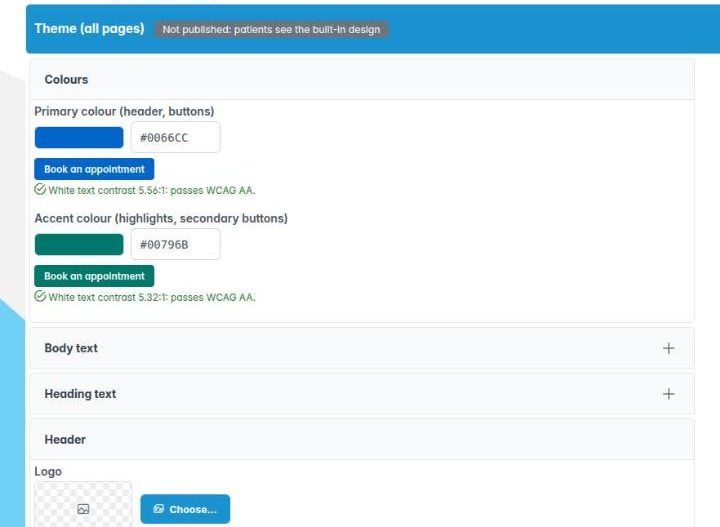
- On Pages, double-click Theme (all pages) (or click Design).
- Set Colours (primary and accent), the Header Logo, footer links (Add link) and the Default background. Upload images with Upload image.
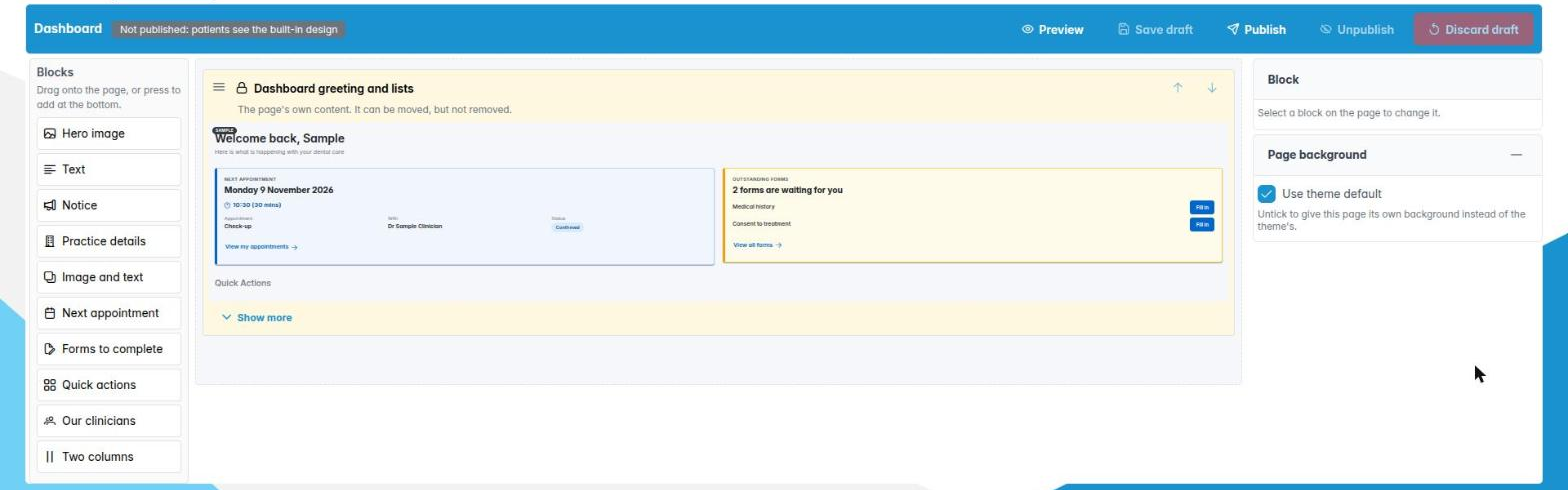
- Back on Pages, open a page such as Login, Dashboard or Book New Appointment.
- Drag blocks from Blocks you can add: Hero image, Text, Notice, Practice details, Image and text, Next appointment, Forms to complete, Quick actions, Our clinicians, Two columns. Use Move up, Move down and Remove to arrange them, and set each block’s properties on the right.
- Click Preview, then Save draft while you work and Publish when ready.
- Unpublish returns a page to the standard design; Discard draft throws away unsaved draft changes.
Good to know
- The Page content block is the page’s working part and cannot be removed.
- A Notice can be set to show only between two dates, for example for Christmas opening hours.