
Create a login for every member of staff with the right role, keep their details current, set up NHS performers and two-step sign-in, and switch accounts off when people leave.
Who it is for: practice managers and administrators.
In this guide:
- Find a member of staff
- Choose the right role for a new login
- Add a new member of staff
- Update a colleague’s details and online profile
- Check a clinician’s appointments and patient list
- Set up a performer for NHS claiming
- Switch a login on, off or lock it
- Set up and reset two-step sign-in
1. Find a member of staff
You can look up any staff login, include inactive accounts and open their details.
Why this matters Every person who signs in to ChiralCloud has their own login. Shared logins break the audit trail that the GDC, the CQC and UK GDPR expect: you must always be able to say who looked at or changed a patient’s record. Find Users is where you check who has an account, what role they hold and whether it is still in use.
Where to find it Users › Find Users
How to
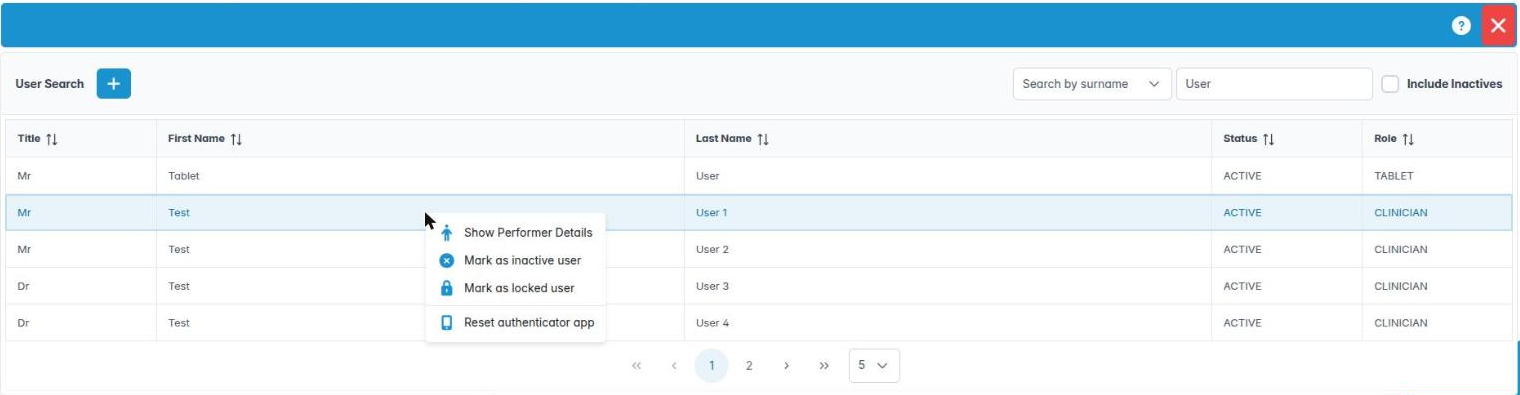
- Open Users › Find Users. The panel is headed User Search.
- Leave the drop-down on Search by surname and type at least three letters of the surname. Results appear as you type.
- To list everybody instead, choose Show all in the drop-down.
- Tick Include Inactives to see accounts that have been switched off (for example, staff who have left).
- The table shows Title, First Name, Last Name, Status and Role. Click a column heading to sort.
- Double-click a row, or right-click it and choose Show Performer Details, to open that person’s details page.
- Use the + button beside User Search to jump straight to Add User.
Good to know
- Fewer than three letters clears the list; that is normal, not an error.
- The right-click menu also holds the status and two-step sign-in actions, covered in later steps. You only see those if you have the right permissions.
- Save & Exit on the toolbar simply closes the page; nothing on this screen needs saving.
More detail: Find user.
2. Choose the right role for a new login
You can pick the correct role for each person, and know which roles are for devices rather than people.
Why this matters A role does two jobs. It decides how ChiralCloud treats the person (for example, only clinicians appear as diary columns and NHS performers), and it hands the new login a starting set of permissions, called capabilities. Picking the wrong role gives someone too much or too little access from day one.
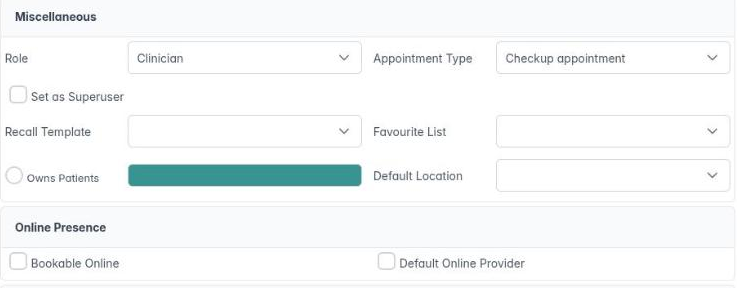
Where to find it The Role drop-down in the Miscellaneous panel of Users › Add User (and on the Personal tab of an existing user).
The people roles
- Administrator – practice owner, practice manager or office manager. There is no separate “practice manager” role; give managers this one and trim their capabilities if needed.
- Clinician – dentists, orthodontists, hygienists and therapists. Their job type is set by Speciality (General, Periodontics, Orthodontics, Hygiene and so on), not by a different role.
- Nurse – dental nurses, including lead and sedation nurses.
- Receptionist – front desk and treatment co-ordinators. This is the default when you open Add User.
The device roles These are not for people. Use them for a single shared device and never for a member of staff.
- Tablet Only User – the waiting-room or chairside tablet that patients use for medical history, consent and sign-off.
- Check-in Kiosk – the self check-in screen. A note appears under Role: it can only open the patient self check-in screen.
- Online Booking User – the account the patient portal books through.
Good to know
- Device accounts are left out of staff pick-lists and never use authenticator apps.
- Changing someone’s role later resets their capabilities to that role’s defaults, so recheck them afterwards.
More detail: Add a new user.
3. Add a new member of staff
You can create a working login with the right name, role, speciality and password.
Why this matters New starters need their own login before their first day, so they can be trained and so every action they take is recorded against their name. Clinicians also need the correct speciality and GDC number for letters and NHS claims.
Where to find it Users › Add User (or the + button on Find Users). You need the Add New System User permission (AID_AddUser).
How to
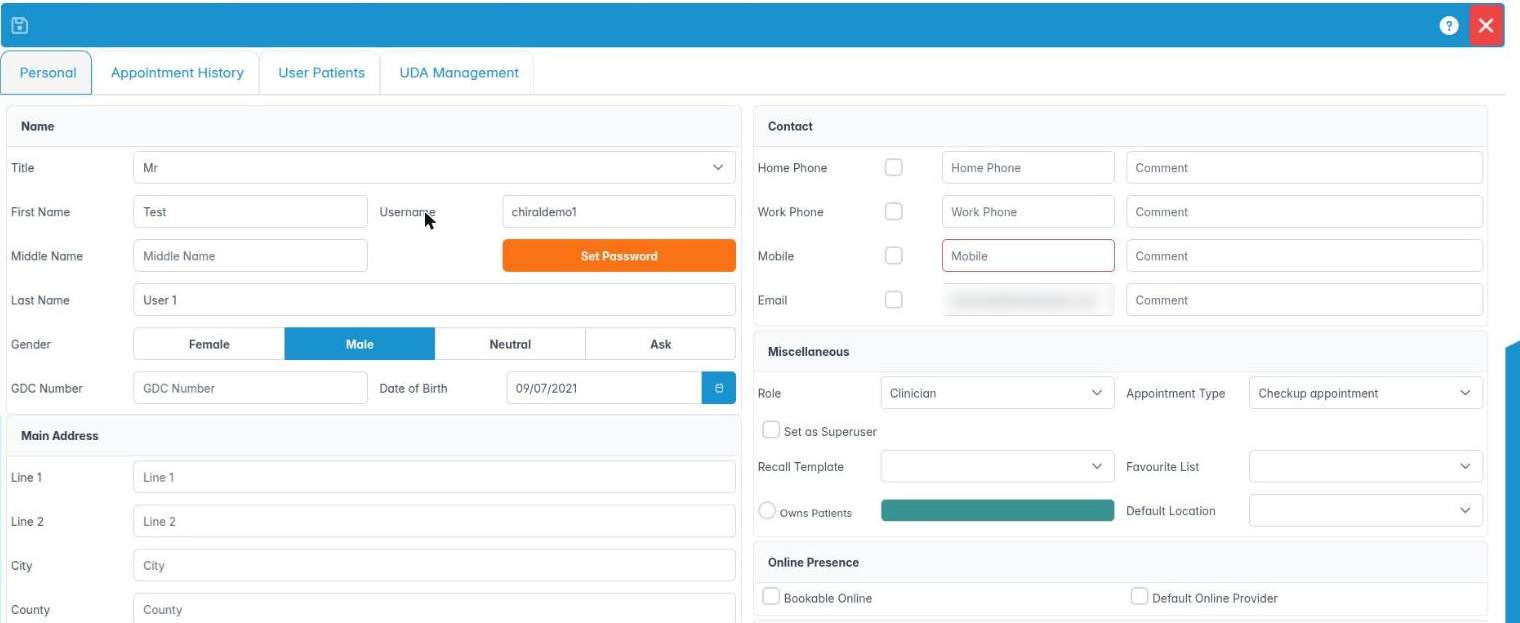
- In the Name panel choose a Title, then enter First Name, Last Name and a Username. Add Middle Name, GDC Number and Date of Birth where relevant. Choosing a title fills in Gender for you.
- Complete the Main Address and phone numbers.
- In Miscellaneous set the Role, the default Appointment Type, the Favourite List (their treatment favourites), Owns Patients (tick for clinicians who hold a patient list), a diary colour and the Default Location.
- In Speciality move at least one entry from Possible to Actual.
- Click Add new user on the toolbar. It stays greyed out until title, first name, last name, username and a speciality are filled in.
- Type a password of at least six characters in the User Creation (Min 6 characters) box and click OK.
- User Successfully Created confirms it. Click OK to close the tab.
Good to know
- Duplicate user name or User name already exists means you need a different username.
- The new login is put in the practice’s default account group and given its role’s default capabilities. Review them in Utilities › User Capabilities.
- Ask the person to set up two-step sign-in on their first login.
More detail: Add a new user.
4. Update a colleague’s details and online profile
You can change a user’s details, password, diary colour, online booking settings and specialities.
Why this matters People change surnames, move to another site, gain a specialist qualification or start taking online bookings. Keeping their details right keeps letters, diaries and the patient portal correct.
Where to find it Open the user from Users › Find Users (double-click). The Personal tab opens first.
How to
- Edit the Name, address and contact panels as needed.
- To set a new password for them, use the password button in the Name panel and enter at least six characters in User Password (Min 6 characters).
- In Miscellaneous change the default Appointment Type, Favourite List, Owns Patients, diary colour or Default Location.
- The Role drop-down can only be changed by someone with Change User Capabilities (
AID_AlterActivites), and never on your own account. - In Online Presence, tick Bookable Online for clinicians patients may book through the portal. Portal bio (up to the shown character limit) and Portal photo then appear; the photo uploads as soon as you choose it.
- Tick Default Online Provider on the one user that new portal registrations should be assigned to. Ticking it here moves it from whoever had it before.
- Adjust Speciality if needed, then click Save (or Save & Exit) on the toolbar.
Good to know
- A changed role resets the person’s capabilities to the new role’s defaults.
- If you close with unsaved changes, ChiralCloud asks whether to save them.
- The Recall Template drop-down currently has no entries to choose.
More detail: User details personal.
5. Check a clinician’s appointments and patient list
You can review the appointments booked with a user and the patients they own.
Why this matters When a clinician leaves, goes on long-term leave or reduces their days, you need to see which appointments are booked with them and which patients they hold, so that care can be handed over safely and patients are not left without a named dentist.
Where to find it Open the user from Users › Find Users, then choose the Appointment History or User Patients tab.
How to
- On Appointment History, read the Date, Time, Patient and Comments columns to see the clinician’s bookings.
- On User Patients, scan the list of patients who have this user as their provider.
- Right-click a patient on User Patients and choose Patient Details, or double-click the row, to open the patient record.
- From the patient record you can reassign the patient or move appointments using the normal patient and diary tools.
Good to know
- The screen and print icons on these two tabs are not available yet and show a “not yet implemented” message.
- For moving many patients at once, use Patients › Patient Transfer rather than opening each record.
- Before marking a leaver as inactive, use these tabs to make sure no future appointments remain in their name.
More detail: Users patients.
6. Set up a performer for NHS claiming
You can place an NHS performer under UDA management with their contract, performer number and PIN.
Why this matters Every NHS course of treatment is claimed on an FP17 (or FP17O for orthodontics) against a performer, their six-digit performer number and the contract it counts towards. ChiralCloud can only stack and submit claims for a clinician who is set up here, and UDAs or UOAs then count against the right contract.
Where to find it Open the clinician from Users › Find Users, then the UDA Management tab. Set up the practice’s contracts first in Preferences › NHS Registration.
How to
- In the UDA Registration Details header, tick Place under UDA Management.
- Choose the Contract this performer works under.
- Enter the six-digit Performer Number.
- Enter the six-digit Performer PIN used to sign claims.
- Click Save on the toolbar.
Good to know
- If the box is ticked but the performer number or PIN is not exactly six characters, Save does nothing until you correct it.
- A performer who works under two contracts needs the right contract selected here; ask your NHS commissioner or the NHSBSA if you are unsure.
- Private-only clinicians should be left unticked.
More detail: User uda management.
7. Switch a login on, off or lock it
You can mark a user active, inactive or locked and know when to use each.
Why this matters When someone leaves, their access must stop on their last day: an open login for a former employee is a data protection risk. Staff records cannot be deleted because their name sits on years of clinical notes, so you change the account’s status instead.
Where to find it Right-click a user in Users › Find Users. You need Change User Capabilities (AID_AlterActivites).
How to
- Find the user (tick Include Inactives if they are already inactive).
- Right-click their row. You see the two statuses they are not currently in:
– Mark as active user – a normal working login.
– Mark as inactive user – switched off; they cannot sign in and drop out of most lists.
– Mark as locked user – blocked from signing in, but still listed. Use it for a short suspension or a suspected compromised password. - Choose the status. The Status column changes once the server has confirmed it.
Good to know
- You can never change your own status (or role). Ask another administrator.
- If you do not have permission, a message explains why the change was refused.
- Before making a clinician inactive, check their Appointment History and User Patients tabs.
- Lock first, then investigate, if you think someone else knows a colleague’s password; reset their password and authenticator app before unlocking.
More detail: Find user.

8. Set up and reset two-step sign-in
You can set up your own authenticator app and reset a colleague’s when they change phone.
Why this matters Patient records are special category data under UK GDPR. A password alone is easy to guess or steal; two-step sign-in means a stolen password is not enough. The practice-wide rule is set in Preferences › Practice Details; each person sets up their own app.
Where to find it Your own: My account, then the Two-step sign-in tab (it only appears on your own account). A colleague’s reset: right-click them in Users › Find Users.
How to – your own app
- On Two-step sign-in, click Set up authenticator app.
- Scan the code with Microsoft Authenticator, Google Authenticator or similar (or use Copy key), confirm with your password and the 6-digit code.
- Save your recovery codes with Copy or Download, then click I’ve saved these.
- Later you can Replace app, get New recovery codes, or Remove the app (Remove is not offered when the practice requires an app).
How to – reset a colleague
- Right-click them in Find Users and choose Reset authenticator app.
- Confirm. They will be asked to set up again next time they sign in. Their old recovery codes stop working.
Good to know
- Reset needs Reset another user’s authenticator app (
AID_RESET_TWO_FACTOR), is not offered on your own row, and never appears for tablets or kiosks. - “Recovery codes left” warns you when you are running low.
More detail: Two step sign in guide.