
Open clinicians’ diaries with working patterns, time off and booking zones, set up appointment and diary event types, risk-based recall types, cancellation reasons and patient journey stages.
Who it is for: practice managers and administrators.
In this guide:
- Set a clinician’s working pattern
- Add time off and booking zones
- Create appointment types and diary events
- Set recall types with risk-based intervals
- Record why appointments are cancelled
- Define patient journey stages
1. Set a clinician’s working pattern
You can give a clinician their working days, hours and lunch, including rotating four-week rotas.
Why this matters A clinician’s diary column only opens for booking during their working pattern. Without one, reception sees a closed diary. Patterns also handle part-timers, alternate Saturdays and four-week rotas common in UK practices.
Where to find it Utilities › Housekeeping › Diary Schedules. Needs Clinician Schedules (AID_HK_CLINICIANS_SCHEDULES). Watch the Diary Schedules video series for a full walk-through.
How to
- Choose a clinician from Clinicians on the left (use Search clinicians, Show inactive staff or Show one-off changes to filter). A No pattern badge shows anyone not yet set up.
- Open the Working pattern tab and click Add (Add working pattern).
- Tick each working day and set start, finish and Lunch times. Copy Monday to weekdays saves typing.
- Set Applies from and until, or tick No start date / No end date.
- Under Advanced, tick Rotating 4-week pattern for rotas and fill each Rota week, or One-off change for a single changed day. Same every week is the normal case.
- Click Save. Problems such as a finish time before the start are listed so you can fix them.
- Select a pattern to view it below; double-click or right-click to Edit working pattern or Delete working pattern.
Good to know
- Week overview shows the result for any week, with Previous week, Today and Next week, and lets you jump to edit a day.
- Copy from… copies another clinician’s pattern.
More detail: Housekeeping clinicians schedules.
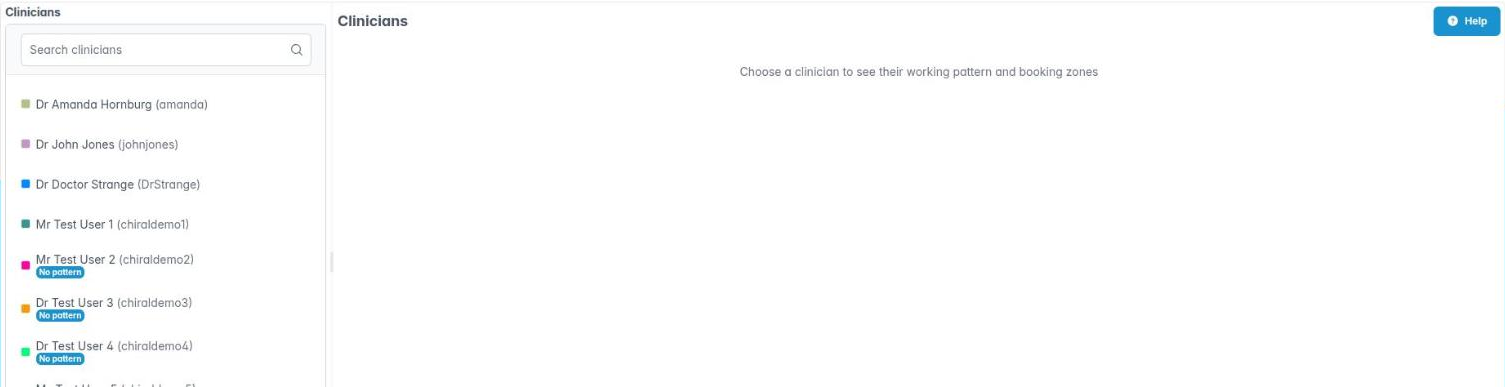
2. Add time off and booking zones
You can close a clinician’s diary for holidays and colour times for preferred appointment types.
Why this matters Holidays and training days must close the diary so nobody books into them. Booking zones keep the best times free for the right work, for example new-patient exams first thing or long treatments after lunch, which helps clinicians hit their targets and patients get the right slot.
Where to find it Utilities › Housekeeping › Diary Schedules, the Time off and Booking zones tabs.
How to – time off
- Choose the clinician and open Time off.
- Click Add (Add time off). Choose the Dates, and either tick All day or set Away from and Back at.
- Click Save. Right-click or double-click a row to Edit time off or Delete time off.
How to – booking zones
- On Working pattern, select the pattern, then open Booking zones.
- Pick the Rota week, then choose an Appointment type to paint.
- Drag across the times you want that type to be preferred for.
- Right-click a zone to Edit booking zone… or Delete booking zone. Copy week… and Clear week speed things up.
- Save the zones. An Unsaved zones badge warns you if you forget.
Good to know
- Zones are guidance: reception can still book other types in them.
- Copy from… can copy another clinician’s booking zones as well as their pattern.
More detail: Housekeeping clinicians schedules.
3. Create appointment types and diary events
You can set up appointment types with their length, colour and reminders, and non-patient diary events.
Why this matters Appointment types (Exam, Hygiene 30, Root canal, Ortho adjust) set the default length, colour and reminder for each booking, and decide what patients can book online. Diary events cover non-patient time such as meetings, lunch cover or emergency slots.
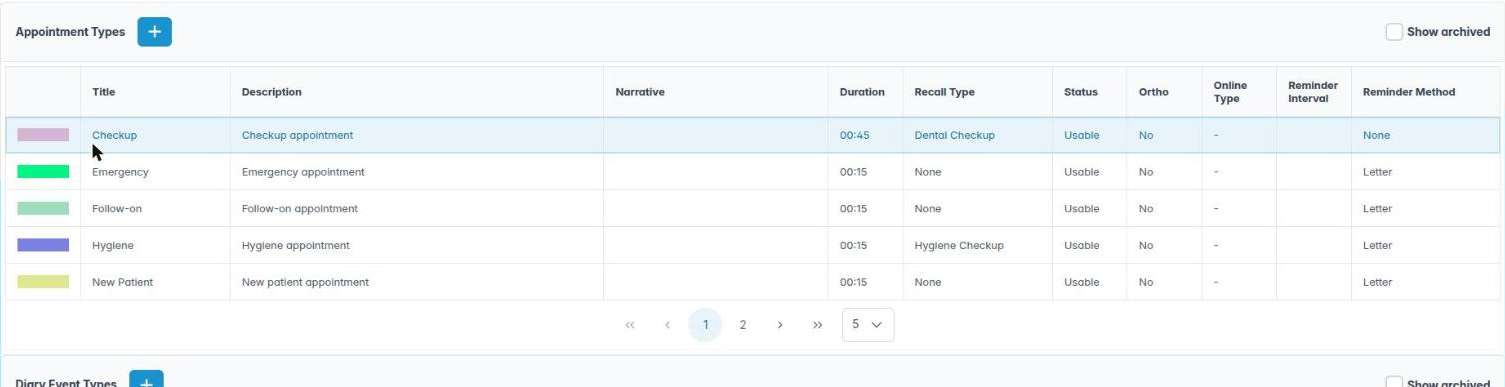
Where to find it Utilities › Housekeeping › Diary Types. Needs Add New Diary Event Types (AID_HK_AddDiaryEventTypes). The page has Appointment Types above and Diary Event Types below.
How to – appointment types
- Click + (Create New Appointment Type).
- Enter Title, Description and Narrative, choose a Color and Duration.
- Choose a Recall Type if the visit should set one, tick Ortho for orthodontic visits, and set Online Type to Online Booking or Video Conference if patients may book it online.
- Set Reminder(Days) and Contact By (for example SMS or Email).
- Click OK, then Save. Right-click to Edit Appointment Type or Delete Appointment Type.
How to – diary event types
- Click + (Create New Diary Event Type). Enter a Code and Title, a Color and the Event Type (–, Online Booking or Video Conference) with its Appointment Type where relevant.
- Click OK, then Save. Right-click to edit or delete.
Good to know
- Use Archived to retire a type.
- Durations are in multiples of the diary slot size.
More detail: Housekeeping diary types.
4. Set recall types with risk-based intervals
You can create recall types with the right interval, contact method and message templates.
Why this matters NICE guideline CG19 says recall intervals should be set by each patient’s risk, from 3 months up to 24 months for adults (12 months maximum for under-18s), not a fixed six months for everyone. Recall types let clinicians pick the right interval quickly and let the system send recalls on time.
Where to find it Utilities › Housekeeping › Recall Types. Needs Add New Recall Types (AID_HK_AddRecallTypes).
How to
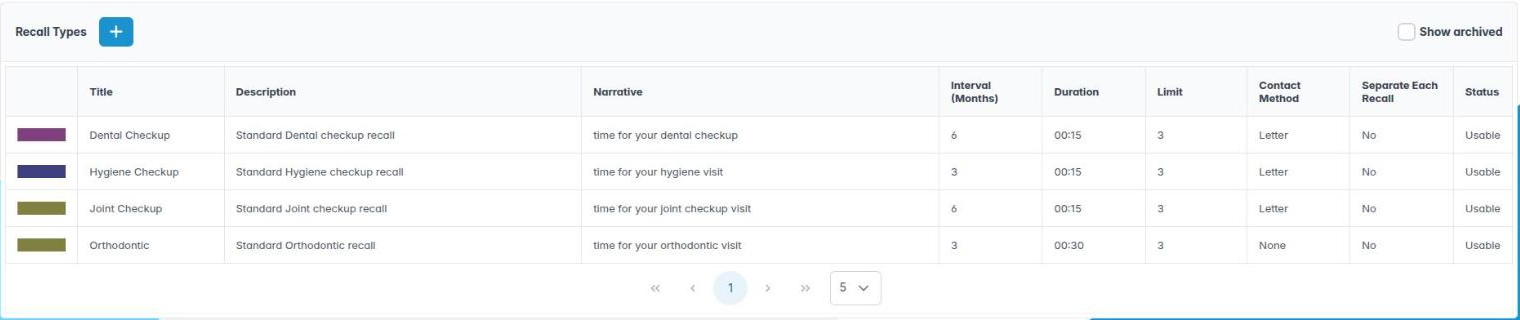
- Click + (Create New Recall Type).
- Enter a Code, Title, Description and Narrative, for example “EX12 – Exam 12 months, low risk”.
- Set Interval(Months) and Max Count (how many times to send before stopping).
- Choose Contact By: Email, SMS, Letter, Home Phone, Work Phone, Other Phone, Mobile Phone or None.
- Choose the Letter Template, Email Template and SMS Template (or leave Default).
- Set the Duration (Hrs, Mins) of the appointment it books and a Color. Tick Separate Each Recall to keep, say, an exam and a hygiene recall apart.
- Click OK, then Save. Right-click to Edit Recall Type or Delete Recall Type.
Suggested set Exam at 3, 6, 9, 12, 18 and 24 months; hygiene at 3, 4 and 6 months; orthodontic retention checks.
Good to know
- Tick Archived instead of deleting a used type.
More detail: Housekeeping recall types.
5. Record why appointments are cancelled
You can set up cancellation reasons as practice or patient reasons.
Why this matters Knowing why appointments are cancelled helps you cut wasted surgery time. Splitting practice reasons (clinician sick, equipment failure) from patient reasons (illness, work, late cancellation) matters: many practices charge for late cancellations or failed appointments under their policy, and NHS practices may record repeated FTAs before deciding whether to continue a course of treatment.
Where to find it Utilities › Housekeeping › Cancellation Reasons.
How to
- Click + (Create Cancellation Reason).
- Enter the Reason, for example “Patient unwell” or “Clinician absent”.
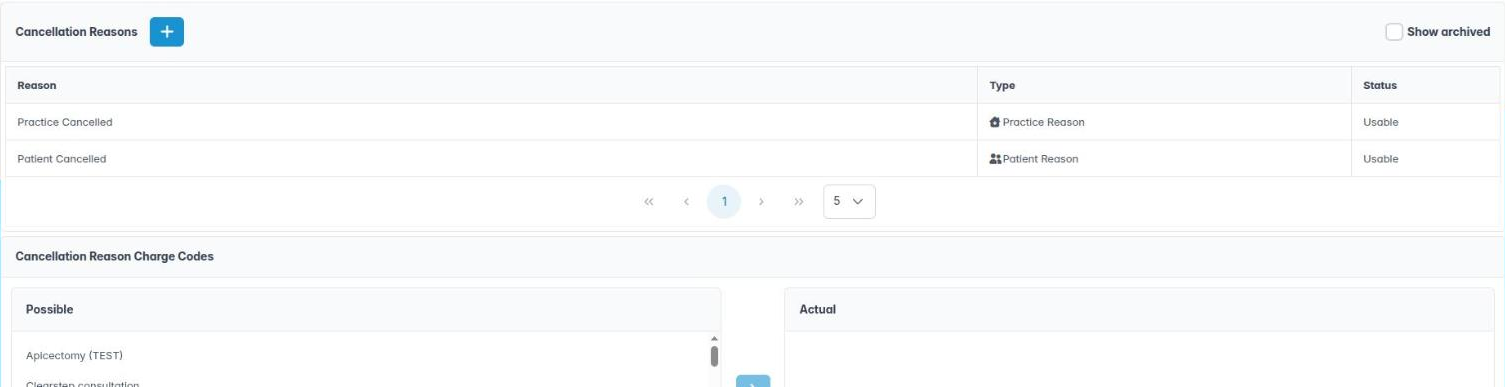
- Choose Reason Type: Practice Reason or Patient Reason.
- Click OK, then Save.
- Right-click to Edit Cancellation Reason, or Delete Cancellation Reason and confirm. Tick Archived in the edit dialog to stop offering a reason.
Good to know
- The table shows Reason, Type and Status.
- Reports › Cancellations groups by these reasons, so keep the list short and clear.
- Include a “Late cancellation (under 24 hours)” patient reason if you have a charging policy.
More detail: Housekeeping cancellation reasons.
6. Define patient journey stages
You can create the stages patients move through and what each stage does.
Why this matters Journey stages track where a patient is: new enquiry, assessment, in treatment, in retention, completed. They are especially useful for orthodontic and implant pathways. A stage can also set a review or retention recall, or deactivate the patient, so the next step is never forgotten.
Where to find it Utilities › Housekeeping › Patient Journey Stages. Needs Patient Journeys (AID_HK_PATIENTJOURNEYSTAGE).
How to
- Click + (Create New Journey Stage).
- Enter a Code and Description.
- Choose an Action, for example Review in 12 Months, Retention Check 6 Months, Set Recall or Deactivate Patient, and the Recall Type it should use.
- Pick a Color. Tick Inform Keap if you use Keap marketing.
- Click OK, then Save.
- Use Up and Down to put stages in order, and Search to find one.
- Right-click to Edit Journey Stage or Delete Journey Stage.
- Download Journey Stages saves the list as a spreadsheet.
Good to know
- Stages are updated in bulk from Patients › Journey Stage Bulk Update or from NHS claims.
- Tick Archived to retire a stage that has been used.
More detail: Housekeeping patient journey stages.
