
Open a patient’s appointment, check history and alerts, use the General and Check Lists panels, manage plan appointments, commit or charge, and hand over to reception.
Who it is for: clinicians, dental nurses.
In this guide:
- Open a patient’s appointment from the diary
- Check medical history and alerts before you start
- Check the patient into and out of the chair
- Record the general notes for the course of treatment
- Tick off the patient’s check lists
- Manage the appointments in this course of treatment
- Commit an NHS appointment and stack the claim
- Charge a private patient at the end of the visit
- Create documents and hand the patient over to reception
- Hold a video consultation from the appointment
1. Open a patient’s appointment from the diary
You can open the appointment editor for the patient in your chair and find your way around its tabs.
Why this matters: the appointment editor is where the clinical work for a visit is recorded: charting, treatments, notes, x-rays, sedation, lab work and charges. Opening the right appointment (not just the patient record) means everything you record is tied to today’s visit, which matters for NHS claims, audit and medico-legal record keeping.
Where to find it: the Practice Diary or Clinician Diary.
How to
- Find the appointment in the diary.
- Double-click it, or right-click it and choose Goto Appointment.
- A new tab opens, named with the patient’s name and the appointment date (for example Jane Smith : Tue, 14 Oct 2026).
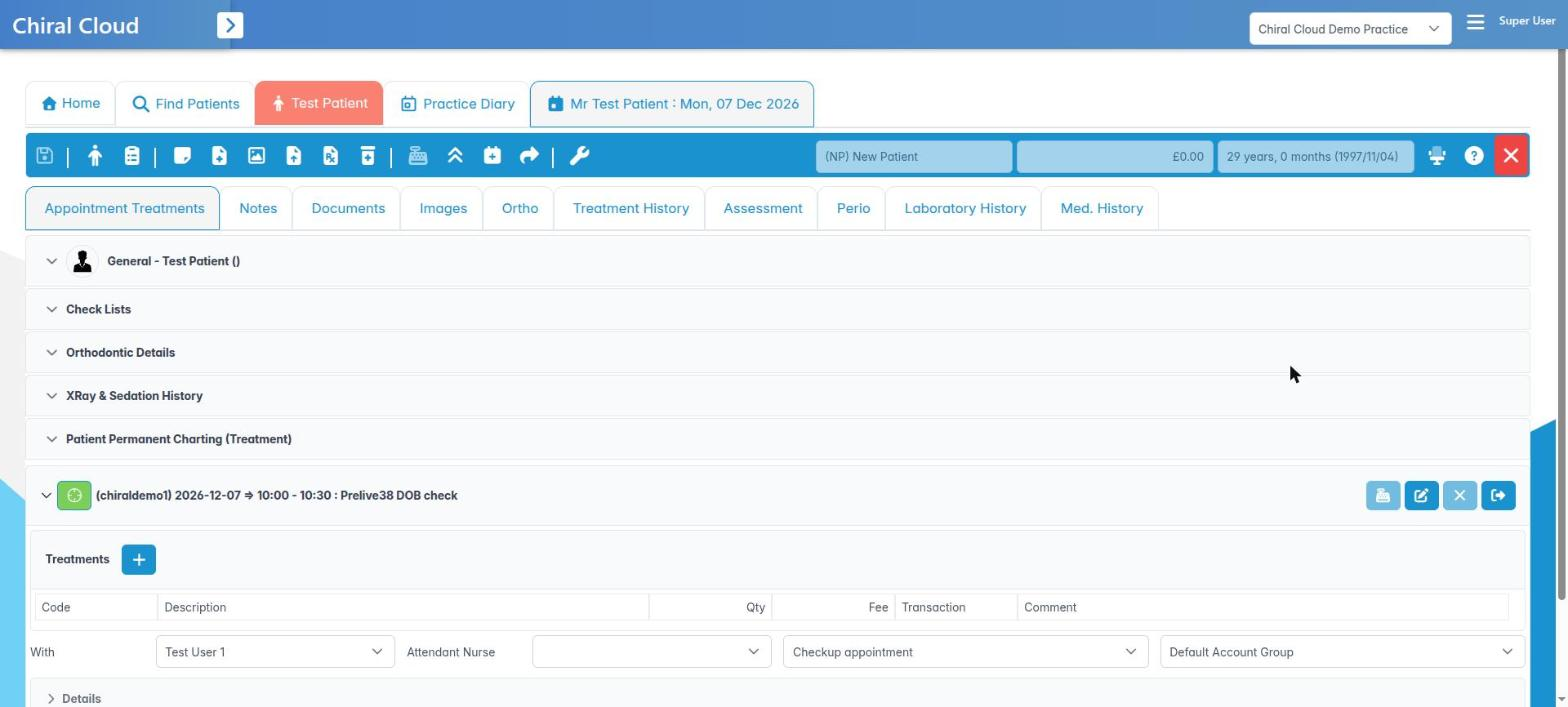
- Along the top you will see the tabs: Appointment Treatments, Notes, Documents, Images, Ortho, Treatment History, Assessment, Perio and Laboratory History.
- Some tabs only appear in certain cases:
– NHS Claims History – NHS patients only.
– Video – only if your practice has video conferencing switched on.
– Med. History – only if Show Medical History in Appointment is ticked in Preferences › Practice Details. - Most of your work happens on Appointment Treatments, which holds the collapsible panels: General, Check Lists, Orthodontic Details, XRay & Sedation History and the charting panel.
Good to know
- In the Practice Week Diary, double-clicking jumps to that day’s diary instead; use Goto Appointment from the right-click menu.
- You can have several appointment tabs open at once. Check the tab name before you chart, so you never record on the wrong patient.
- The Knowledge Base button on the right of the toolbar opens the help article for whichever tab you are on.
More detail: Patient summary.
2. Check medical history and alerts before you start
You check the patient’s medical history and any pop-up alerts before treatment begins.
Why this matters: you must confirm the medical history is current before treating. GDC standards and CQC expect a history that is checked and updated at every course of treatment (most practices re-confirm at every visit) and signed off by the clinician. A missed anticoagulant, bisphosphonate or allergy is a patient-safety event.
Where to find it: when the appointment editor opens, and on the Med. History tab.
How to
- When the appointment opens, pop-up alerts appear in the corner of the screen. These come from the patient’s notes marked Informational, Warning or Action. Read every one.
- Close each alert with Close popup. Use Close all popups to clear them together.
- Only use Close popup and never show again when the alert is no longer relevant (for example a one-off message that has been dealt with). It stops that alert appearing on future appointments for everyone.
- If your practice shows it, open the Med. History tab. Review the latest medical history form and the patient’s medical conditions.
- If the patient reports a change, record it there (or ask the patient to complete an updated form), and note any change in your clinical notes.
- If anything affects treatment today, record your decision in the notes before you start.
Good to know
- The Med. History tab only appears when Show Medical History in Appointment is ticked in Preferences › Practice Details. Without it, use Patient Details on the toolbar and the patient record’s Med. History tab.
- Online and tablet medical history forms are covered in the medical history modules.
- Editing or deleting medical conditions and forms needs separate permissions.
More detail: Patient medical history.
3. Check the patient into and out of the chair
You record when the patient sits down and leaves the surgery.
Why this matters: chair times show how long treatment really took. They feed the practice’s waiting-time and utilisation figures, help reception know you are running late, and give an accurate timeline in the record (useful for sedation and complaints).
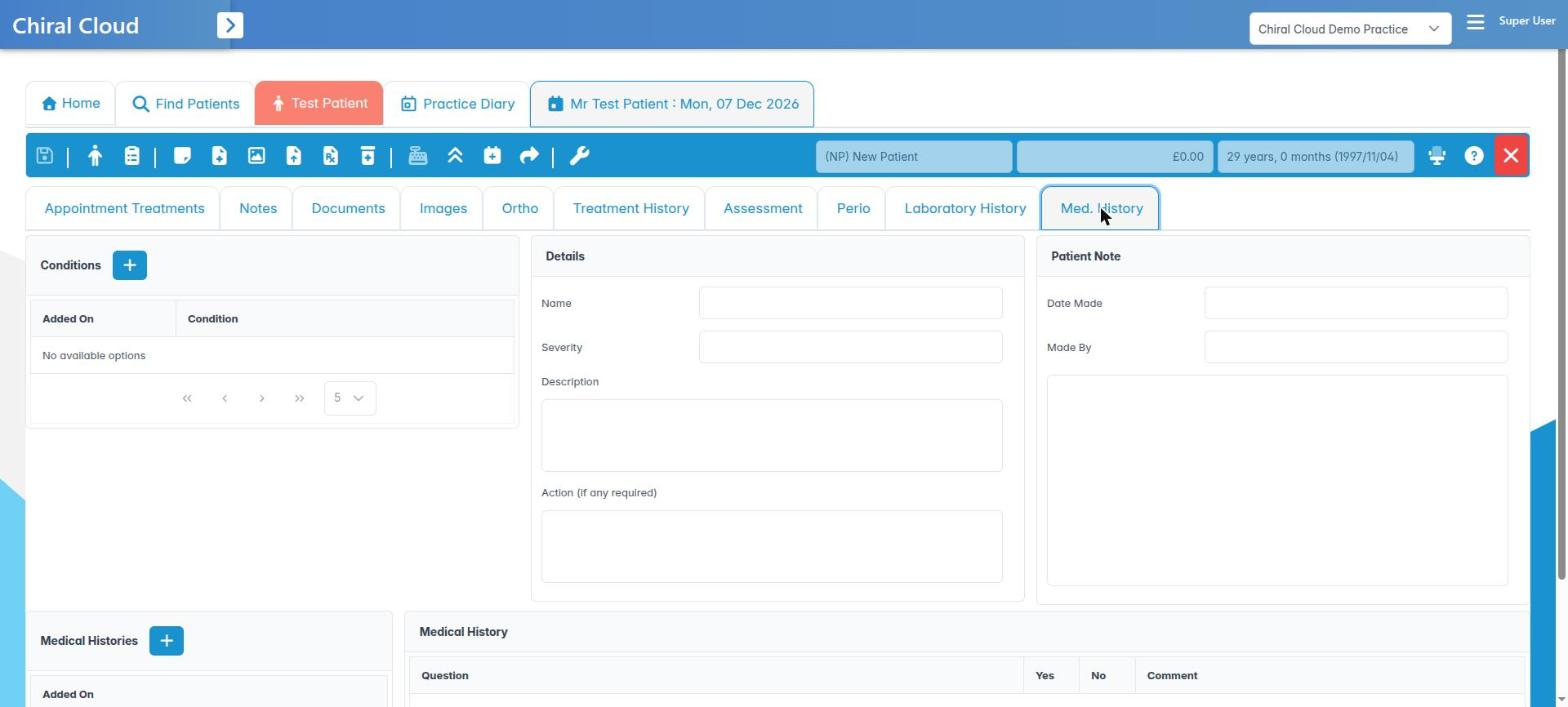
Where to find it: the right-hand end of the appointment editor toolbar, next to the patient’s age and balance.
How to
- When the patient sits in the chair, click Check patient into chair.
- The button changes to Check patient out of chair.
- When treatment is finished and the patient leaves the chair, click Check patient out of chair.
- The button now shows Patient checked out of chair and is greyed out. The times are stored against the appointment.
Good to know
- Arrival at reception is recorded separately in the diary (Patient Has Arrived). Chair times are a different, clinical timestamp.
- The toolbar also shows the patient’s journey stage, the value of today’s sales and the patient’s age. Check the age before charting a child, so you choose deciduous charting.
- Chair times appear in the CheckIn – CheckOut compliance reports.
More detail: Patient summary.
4. Record the general notes for the course of treatment
You can use the General panel to see plan details and write the general notes.
Why this matters: each appointment belongs to a treatment plan (an NHS course of treatment or a private plan). The General panel holds plan-level information that applies to the whole course, not just today: its title, status, the patient’s journey stage and general notes such as the agreed treatment rationale.
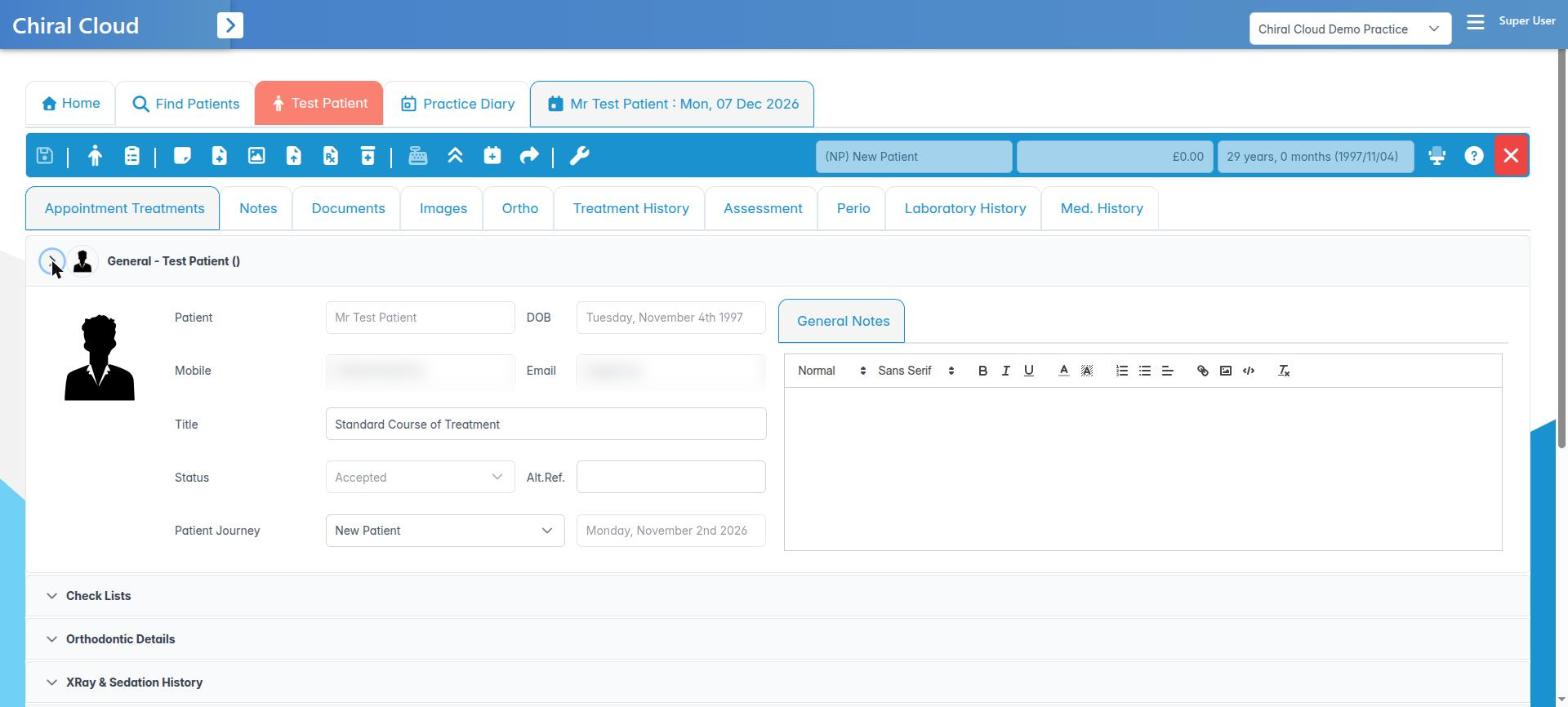
Where to find it: Appointment Treatments tab › the General panel (its header reads General (NHS) – patient name for NHS patients). Click the arrow to expand it.
How to
- Expand General. The left side shows the Patient, DOB, Mobile, Email, plan Title, Status, Alt.Ref. and Patient Journey.
- On the General Notes tab, type straight into the editor. These notes belong to the plan and show wherever the plan is opened.
- For NHS patients, open the NHS KPIs tab. Tick the items you delivered, for example Basic Periodontal Exam, Tooth Decay Assessment, Soft Tissue Assessment, Health Promotion (smoking status), Toothbrushing Advice, Continuity of Care (written care plan). Record NICE Guidance (No of Months) for the recall interval you chose, and whether best-practice prevention from Delivering Better Oral Health was offered.
- Save with Save on the toolbar.
Good to know
- The NHS KPIs feed the clinical data set on the FP17, so complete them before the claim is sent.
- The recall interval should follow NICE CG19: 3 to 24 months for adults, 3 to 12 months for under-18s, based on risk.
- Treatment-specific notes belong in clinical notes (Create a patient note), not here.
More detail: Patient treatment history 2.
5. Tick off the patient’s check lists
You can tick check-list items (such as consents) from inside the appointment.
Why this matters: check lists make sure routine steps are not missed: consent forms signed, GDPR consent recorded, pre-sedation instructions given, photographs taken. Your practice decides what goes on them. Ticking them during the visit gives a dated audit trail of who did what.
Where to find it: Appointment Treatments tab › Check Lists panel (click the arrow to expand).
How to
- Expand Check Lists.
- Choose the list you need. ChiralCloud remembers the list you last used for this patient.
- Each item shows its Description, Status, Completed On and By.
- Tick an item when it is done. Your name and the date are recorded.
- Untick an item only if it was ticked in error, or (for GDPR consent) the patient withdraws consent.
Good to know
- Ticks are per patient, not per appointment. The same ticks show on the patient record’s Check Lists tab.
- Some items are ticked automatically. The By column then says Form or Upload, or Patient portal for GDPR consent the patient gave online.
- Every practice has a built-in GDPR list with one item, GDPR consent given.
- Check lists are created by your administrator in Housekeeping › Check Lists.
6. Manage the appointments in this course of treatment
You can add, select, edit and place the appointments that belong to the patient’s plan.
Why this matters: a course often needs several visits, for example scale and polish, then fillings, then a crown fit. Setting them up in the plan, with the right time and interval, lets reception book them correctly and keeps charges linked to the visit where the work is done.
Where to find it: the appointment list below the charting panel on Appointment Treatments, plus the toolbar.
How to
- Click Add new Appointment on the toolbar to add a visit to the plan.
- On each appointment header use the buttons:
– Select appointment – makes it the target for new treatments.
– Edit appointment title – opens Appointment Comment to change the type and comment.
– Place appointment in diary – books it. If it shows The appointment is not fully specified, set the clinician, type and time first.
– Goto this treatment plan appointment in the diary – jumps to it once booked.
– Delete this treatment plan appointment – removes an unbooked visit. - Expand Details to set With, Attendant Nurse, Time Required (hr/min), Interval (min days / max) and Work Required (lab work needed).
- Use Comments for notes to reception.
- Open Appointments / Close Appointments expands or collapses them all.
Good to know
- An appointment already in the diary cannot be deleted here. You’ll see The appointment is in the diary so cannot be deleted from here. Cancel it in the diary.
- If you are asked Please save before continuing, click Save first.
More detail: Patient treatment history 2.
7. Commit an NHS appointment and stack the claim
You can commit today’s NHS treatment so the charge is raised and the claim is stacked.
Why this matters: for NHS patients the visit is not finished until it is committed. Committing raises the NHS patient charge (unless the patient is exempt) and, at the end of a course, stacks the FP17 claim for the NHS Business Services Authority. An uncommitted course means no UDAs and no patient charge collected.
Where to find it: the Commit Appointment button on the appointment editor toolbar (NHS patients only).
How to
- Make sure the treatments done today are ticked as complete (the tick box beside each code).
- Click Commit Appointment. It is greyed out when there is nothing payable.
- If asked, choose the performer in Performers (double-click a row or select and click OK). This is the dentist whose performer number goes on the claim.
- Follow the payment pages: Issue Receipt, Issue Invoice or Issue Print Invoice. For a receipt, enter the Type, Amount (£), Taken By and Date Taken, then card, cheque or narrative details, and Finish.
- When the claim is stacked you’ll see Claim Stacked – Claim successfully stacked.
Good to know
- Exemptions and remissions are checked on the claim’s Part 3. Confirm evidence before committing.
- Under the 2026 contract changes, check your band and UDA settings with your practice manager. Claims are managed in NHS Management.
- Usually reception takes the payment. Use Hand patient over to reception if you want them to do it.
More detail: Patient nhs claim history.
8. Charge a private patient at the end of the visit
You can raise an invoice or take payment for today’s private treatment.
Why this matters: private fees should be charged on the day the work is done, matching the estimate the patient agreed. Charging from the appointment links each payment to the treatment, so the patient’s account and the practice’s cash book stay accurate.
Where to find it: the Patient Sales, Credit and Cash Sales button on the appointment editor toolbar (private patients).
How to
- Tick the treatments completed today.
- Click Patient Sales, Credit and Cash Sales. It is greyed out if nothing is payable.
- Check Total Due and This Sale. Add a Comment if needed.
- Choose:
– Issue Receipt – the patient pays now. Pick the Type (cash, card, cheque…), Amount (£), Allocated To (Account Group), Taken By and Date Taken, click Next for card (Transaction No.) or cheque (Cheque No., Sort Code), add a narrative, then Finish.
– Issue Invoice / Issue Print Invoice – the patient will pay later. - If the plan includes a discount code, ChiralCloud applies it. A discount cannot be charged on its own.
Good to know
- Membership or payment-plan patients may have treatment covered. Check the account before charging.
- If reception handles payment, use Hand patient over to reception instead.
- Receipts and invoices appear on the patient’s Account tab.
More detail: Account history.
9. Create documents and hand the patient over to reception
You can create documents and prescriptions from the appointment, then hand the patient over to reception.
Why this matters: letters, prescriptions and post-op instructions should be produced while the patient is with you, from the correct record. The handover tells reception exactly what to book and charge, so nothing is lost between surgery and front desk.
Where to find it: the appointment editor toolbar.
How to
- Create new patient document – choose a template (for example post-extraction advice) to make a letter.
- Create Patient Prescription – choose the prescriber under Providers, add Medications, give a Document Name and Notes, then OK. Prescriptions must be signed by the prescriber and checked against the medical history.
- Upload Patient Document – attach an existing file such as a hospital letter.
- Other buttons: Patient Details opens the patient record; Patient Treatment Plans opens the plans.
- When you have finished, click Hand patient over to reception. In Treatment Plan Handover write a Message To Receptionist, tick Add Planned Appointments or Charge for this Appointment as needed, and list any Consent(s) Required. Click OK.
- Click Save & Exit (or Exit if nothing changed).
Good to know
- Imaging buttons are covered in the x-ray module, referral letters in the referrals module, notes in the notes module, lab work in the lab module.
- When a document is emailed, Email Preview shows the content before it is sent.
- If you close an unsaved image or composite you’ll be asked to discard it (Edit Image / Composite Image).
More detail: Patient documents.
10. Hold a video consultation from the appointment
You can start or answer a video call with the patient from the appointment.
Why this matters: some reviews do not need the patient in the chair, for example a post-op check, an aligner progress review or initial triage. A video appointment saves the patient a journey while still being part of the clinical record. Remember a remote consultation cannot replace a clinical examination where one is needed, and you must record it like any other contact.
Where to find it: the Video tab in the appointment editor. It only appears when your practice has video conferencing enabled. Video appointments are listed under Online › Video Appointments.
How to
- Open the patient’s video appointment from the diary.
- Click the Video tab. The Video Call panel shows who the appointment is with.
- Click Make Call to call the patient, or Answer Call if the patient has joined from the patient portal.
- Confirm the patient’s identity at the start of the call, and check who else is in the room.
- Click End Call when finished.
- Write your clinical note straight away using Create a patient note, including that it was a remote consultation and any advice given.
Good to know
- Allow your browser to use the camera and microphone when asked.
- Patients book and join video calls from the patient portal.
- Don’t take screenshots of the call unless the patient has consented and you store them in the record.