
Take receipts at the desk, payments on account and deposits, fix payment types, and import bank payments.
Who it is for: practice managers and administrators, receptionists.
In this guide:
- Take payment for today’s treatment
- Take a payment on account or a deposit
- Correct the payment method on a receipt or payment
- Import bank or finance payments from a spreadsheet
1. Take payment for today’s treatment
You can complete the receipt pages for cash, card, cheque and other methods and print the receipt.
Why this matters Most money comes in at the desk straight after treatment. A receipt records exactly what was paid, how, and who took it, which is what you will be asked about when the till does not balance at the end of the day or when a patient disputes a card charge.
Where to find it After Issue Receipt in Patient Sales, Credit and Cash Sales (private) or in Make an NHS Receipt Payment (NHS).
How to
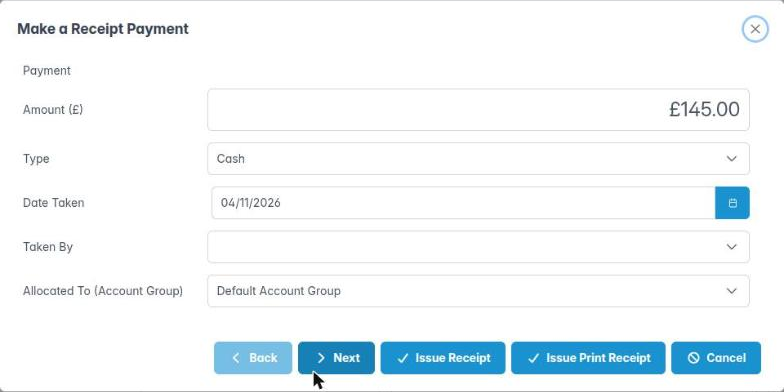
- On Make a Receipt Payment, check the Amount (£). Change it if the patient is paying only part (the rest stays on the account).
- Choose the payment Type: Cash, Cheque, Credit Card, Debit Card, BACS, EFT, Direct Debit, Standing Order, Apple Pay, Android Pay, Online, TABEO or Stripe.
- Check Date Taken, Taken By (you) and Allocated To (Account Group).
- Click Next:
– Card: on Make a Card Payment choose the card Type and enter the terminal’s Transaction No.
– Cheque: on Make a Cheque Payment fill in all three boxes of the Sort Code (e.g. 12-34-56) and Cheque No.
– Anything else: add a note on Payment Narrative. - Click Finish (or Issue Receipt / Issue Print Receipt on the first page if no extra details are needed).
Good to know
- Use the card machine’s transaction number — it is how you match ChiralCloud to the merchant statement.
- TABEO is a dental finance provider; record finance payouts with that type so they are reported separately.
- Never write full card numbers anywhere in ChiralCloud. PCI rules forbid storing them.
More detail: Account history.

2. Take a payment on account or a deposit
You can record a payment against an outstanding balance or in advance from the Account tab.
Why this matters Patients pay off invoices, pay instalments by phone, or pay a deposit before a long private course — for example 50% before crown preparation, or a lab fee before an implant. A payment taken on the Account tab is credited to the balance of the account group you choose, rather than to a single sale.
Where to find it Patient record › Account tab › choose the account group › Make a payment.
How to
- Select the right account group tab, then click Make a payment.
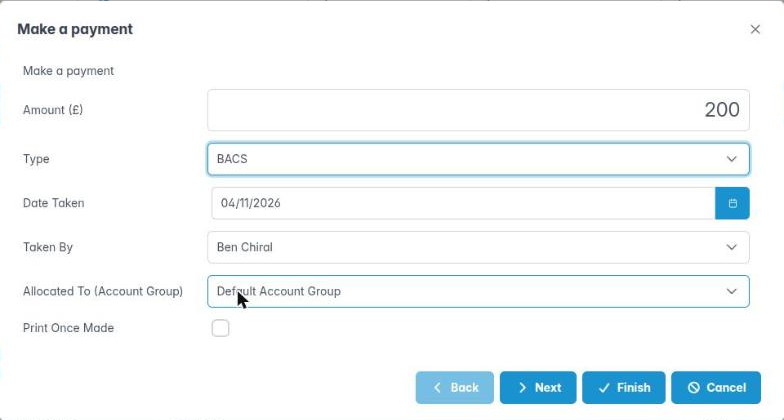
- Enter the Amount (£) and choose the Type.
- Check Date Taken, Taken By, and Allocated To (Account Group). It defaults to the group you are viewing.
- Tick Print Once Made if the patient wants a printed copy.
- Click Next and complete the card, cheque or narrative page, then Finish.
- The payment appears in the history as a credit and the balance updates.
Good to know
- A deposit taken before the treatment is invoiced will show the account in credit until the invoice is raised. That is normal — it will show on the Accounts In Credit report meanwhile.
- If the patient belongs to a family billing group, the payment is recorded as paid by the Family Principle.
- For a payment plan deposit use Issue Deposit Invoice on the plan instead (see the payment plans module), so the deposit is linked to the plan.
- Took it as the wrong type (say cash instead of card)? Right-click the payment and use Change payment type — see the next step.
More detail: Account history.
3. Correct the payment method on a receipt or payment
You can change the recorded payment type when the wrong method was chosen.
Why this matters At the end of the day, cash in the drawer and card totals on the terminal must match what ChiralCloud says. The most common reason they do not is a payment recorded under the wrong type — card keyed as cash, or debit as credit. Fixing the type is far better than voiding and re-taking the payment, because the receipt number and date stay the same.
Where to find it Patient record › Account tab › right-click the receipt or payment › Change payment type. Also reachable from the Daily Cash Book by opening the patient’s account.
How to
- Right-click the receipt or payment row.
- Choose Change payment type.
- Choose the correct Type, then Next.
- Fill in the card, cheque or narrative page for the new type.
- Click Finish. The history and the day’s cash report update.
Good to know
- The amount and the account group cannot be changed here. If the amount was wrong, an administrator must void or refund it (see the corrections module).
- Do this the same day if you can, before the day’s banking is reconciled.
More detail: Account history.
4. Import bank or finance payments from a spreadsheet
You can upload a payment spreadsheet, match each line to a patient, approve it and create the payments.
Why this matters Membership plans and some finance providers pay the practice in a single bank transfer covering many patients, and standing orders arrive in the bank without touching the desk. Typing each one in is slow and error-prone. Upload Payments reads the bank or accounts export (for example from QuickBooks) and creates the patient payments for you.
Where to find it Utilities › Upload Payments. You need the Upload Payment Reconcilliations permission.
How to
- First time: set the spreadsheet password and column positions in Preferences › Accounting › Quick Books Payment Import (Spreadsheet Password, Starting Row and the date, amount, name, memo and account columns).
- Choose the account group the payments belong to when asked.
- Click Choose payment upload file and pick the .xls or .xlsx file.
- Each line shows Approved, Date, Patient ID, Payee Name, Patient Name and Amount.
- If a line has no patient, click its Patient ID cell and type the patient number. The name fills in when it matches, and the line is approved.
- Use Set All Approvals or Clear All Approvals, or tick lines one by one.
- Click Create Patient Payments and confirm Are you sure you want to create these patient payments.
Good to know
- Payments are created with type EFT and the payee name in the narrative.
- Update spreadsheet password changes the stored password if your export’s password changes.
- The second toolbar button labelled Create Patient Payments actually clears the list — it is mislabelled. Use it only to start again.