
Understand risk-based recall intervals, manage recalls on the patient record, send recalls and reminders in bulk, and follow up patients who don’t respond.
Who it is for: practice managers and administrators, clinicians, dental nurses, receptionists.
In this guide:
- Understand recalls and recall intervals
- Add, view and close a patient’s recalls
- Send the month’s recalls
- Follow up patients who haven’t responded to recalls
- Check and send a patient’s appointment reminders
- Send tomorrow’s appointment reminders
1. Understand recalls and recall intervals
You understand what a recall is, how NICE CG19 sets intervals and how ChiralCloud’s recall settings work.
Why this matters. A recall invites a patient back for their next examination or hygiene visit. NICE guideline CG19 says the interval between dental check-ups should be set by the dentist from the patient’s risk of oral disease: between 3 and 24 months for adults and 3 and 12 months for under-18s, rather than a blanket six months. Recalls are a major part of how a practice keeps patients healthy, keeps the diary full and, for NHS practices, delivers its contracted activity.
Where to find it. Patient record, Recalls tab.
How to read it
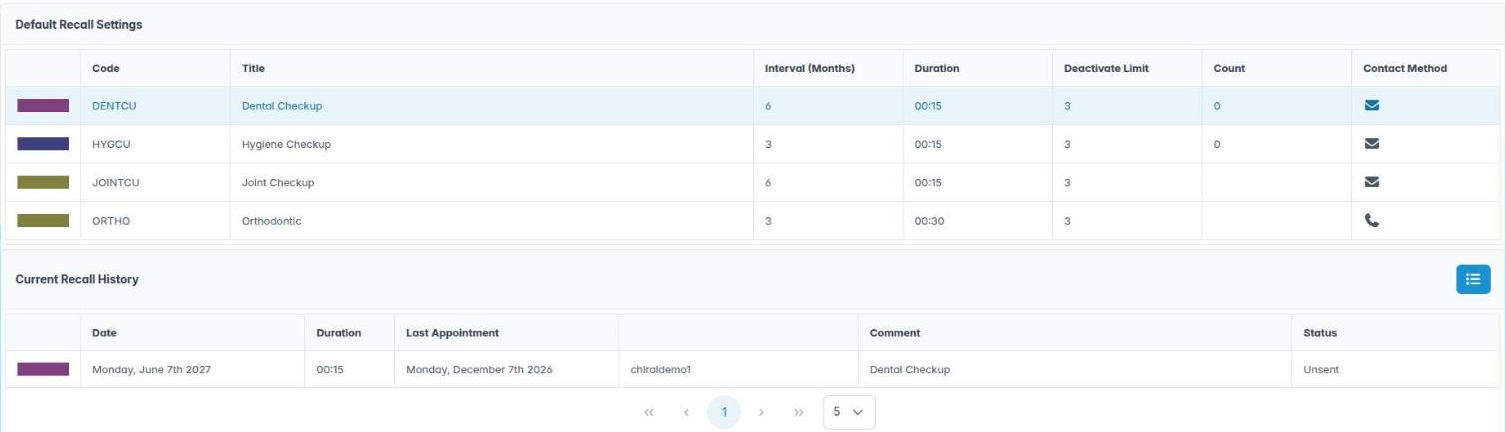
- Default Recall Settings lists each recall type for this patient: colour, Code, Title, Interval (Months), Duration (Mins), Deactivate Limit, Count and Contact Method.
- Interval (Months) is when the next recall falls due after the last one. The clinician sets this from the risk assessment.
- Count is how many times this recall has been sent without the patient booking. When it reaches the Deactivate Limit, the patient moves to Recall Management for follow-up.
- Contact Method is how the recall is sent: Email, SMS, Letter or a phone number.
- The lower table lists the patient’s recalls: Date, Duration, Last Appointment, the clinician, Comment and Status.
Good to know
- Practice-wide recall types and defaults are set in Housekeeping › Recall Types and Preferences › Recalls & Reminders.
- Recalls are part of a patient’s care, so they are not blocked by GDPR mail shot consent. They do stop if the patient’s status is, for example, Deceased or Non Communication.
- Discuss and record the chosen interval with the patient; it is part of their treatment plan.
More detail: Recall settings.
2. Add, view and close a patient’s recalls
You can create a recall for a patient, switch between current and full history and close a recall.
Why this matters. Clinicians often say “see me again in three months” or “hygienist in six”. Putting that straight in as a recall means the patient is invited at the right time even if they don’t book before they leave.
Where to find it. Patient toolbar Create patient recall, and the Recalls tab.
How to
- Click Create patient recall on the toolbar. Add Recall Follow On opens.
- Choose the Recall Type, the Clinician, the Date it falls due and add a Comment if useful. Click OK.
- On the Recalls tab, the list shows current recalls. Click Show full recall history to include closed ones; the button then reads Show current recall history.
- To close a recall that is no longer needed (for example the patient booked by phone or has left), right-click it, choose Close This Recall and confirm Are you sure you want to close this recall?
Good to know
- You can also tick Create Recall when creating an appointment, or add a recall from the appointment editor and treatment plan.
- Print Recall and Send Email / SMS Recall in this right-click menu are not yet working. Send recalls from Patients › Recalls Due.
- Closing a recall doesn’t delete it. It stays in the full history for audit.
More detail: Recall settings.
3. Send the month’s recalls
You can work through Recalls Due for a month and clinician, send email and SMS recalls and close or review individual ones.
Why this matters. Sending recalls regularly (weekly or monthly) is one of the most important admin jobs in a practice. Missed recalls mean patients drift away and their oral health goes unchecked.
Where to find it. Patients › Recalls Due.
How to
- Pick the month with the month picker, or Back a month / Forward a month on the toolbar.
- Select a clinician in the Clinicians panel. Their recalls due appear below.
- Individual Recalls are for patients on their own. Group / Joint Recalls are for family members and joint appointments, so a family can be invited together.
- In each panel, click Send Email / SMS Recall(s) to send all the electronic recalls in that panel. Confirm Are you sure you want to send these individual recall? (or group / joint).
- Right-click a single recall for:
– Show Patient Recall Settings (opens the patient record),
– Send This Recall (only for email or SMS recalls),
– Close This Recall. - Each row shows Date, Last Appointment, Patient, Comment, Status, Count and Limit.
- Download the recalls due Excel file exports the list, for example to phone patients who have no mobile or email.
Good to know
- Print Recall(s) (for letter recalls) and Make Appointment are not yet working. Use the Excel download to prepare letters, and book from the diary.
- Each send increases the recall’s Count. When it reaches Limit, the patient moves to Recall Management.
More detail: Recalls due.
4. Follow up patients who haven’t responded to recalls
You can move unresponsive patients through the communication stages and deactivate their recalls.
Why this matters. Some patients ignore several recalls. Rather than recalling them forever, a structured follow-up (a couple of escalating messages, then deactivation) keeps your active patient list honest and gives the patient a fair chance to return. Many practices make the last message a polite “we’ll assume you’ve moved on” letter.
Where to find it. Patients › Recall Management.
How to
- The screen has five tabs: Limit Reached, Communication 1 Sent, Communication 2 Sent, Communication 3 Sent and Deactivated Recalls.
- On Limit Reached, review the patients (Patient, Last App. Date, Status Changed On, Provider, Type, Days on List). Click Provider or Days on List to sort.
- Use Select All / Deselect All or tick individual patients.
- Click the stage button to send the next message and move them on: Send Communication 1, then on the next tab Send Communication 2, then Send Communication 3, then Send Account Deactivation.
- Deactivated Recalls lists patients whose recalls have been switched off.
- Download Recalls exports the current tab to Excel. Double-click a row (or right-click › Patient Details) to open the patient.
Good to know
- Before sending, look at the record: a patient may have booked by phone, moved away or died. Update their status first.
- Deactivating recalls doesn’t delete the patient. They can be reactivated if they return.
- This screen is an admin task; agree the wording of each communication with your practice manager.
5. Check and send a patient’s appointment reminders
You can read the Reminders tab, see default reminder settings and resend a reminder.
Why this matters. Appointment reminders are the single most effective way to cut failed appointments. When a patient says “I never got a reminder”, the Reminders tab shows exactly what was sent, how and when.
Where to find it. Patient record, Reminders tab.
How to
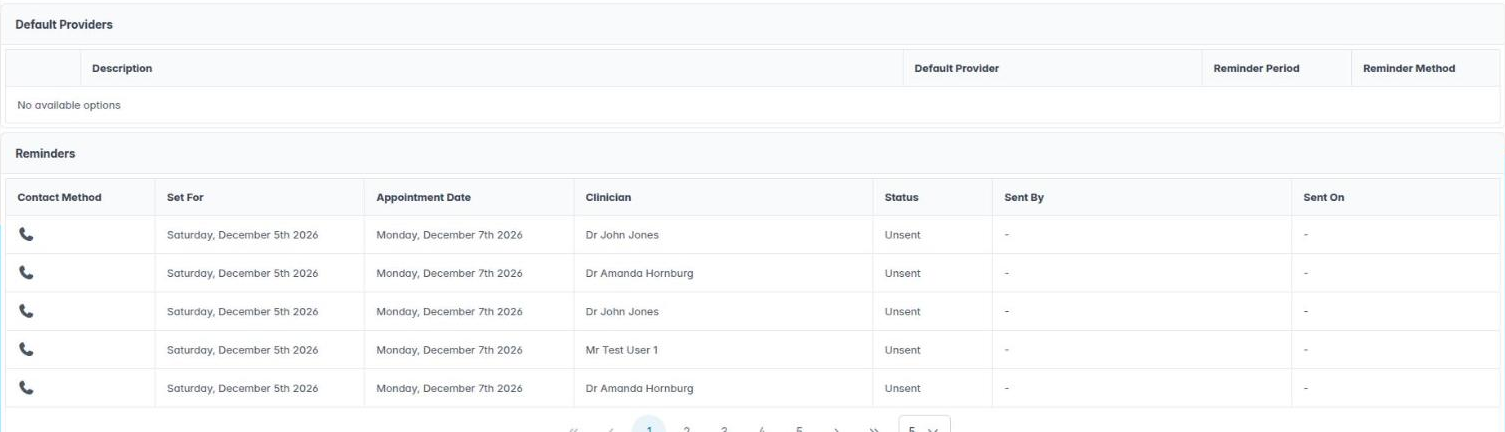
- Default Providers shows, for each appointment type, the patient’s Default Provider, Reminder Period and Reminder Method.
- Reminders lists each reminder: Contact Method, Set For, Appointment Date, Clinician, Status, Sent By and Sent On.
- To resend one, right-click it and choose Send Email / SMS Reminder.
- To change the method for one appointment’s reminder, use the Summary tab: right-click the appointment and choose Set the Communication Type.
Good to know
- Close Reminder in this right-click menu is not yet working. Close reminders from Patients › Reminders Due instead.
- A reminder can’t go by SMS or email if the patient has no mobile number or email address. Keep contact details current on the Personal tab.
- Check the Documents tab, SMS & Emails section, for the delivery status of each message.
More detail: Reminder settings.
6. Send tomorrow’s appointment reminders
You can use Reminders Due to send, review and close appointment reminders for a day.
Why this matters. Most practices send reminders a day or two before each appointment. If your practice sends them by hand rather than automatically, this is the daily job that keeps the diary full.
Where to find it. Patients › Reminders Due.
How to
- The date is shown on the toolbar. Use Back a day and Forward a day to choose the day whose appointments you want to remind.
- Individual Reminders lists single appointments: Appointment Date, Patient, Clinician and Status. Group / Joint Reminders lists family and joint appointments.
- Click Send Email / SMS Reminder(s) in a panel to send all its electronic reminders. Confirm Are you sure you want to send these individual reminders? (or group / joint).
- Right-click a single reminder for:
– Show Patient’s Reminders (opens the patient record),
– Send This Reminder (only for email or SMS reminders), confirm Are you sure you want to send this reminder?,
– Close This Reminder, for example when the patient has already confirmed by phone.
Good to know
- Patients whose reminder method is a phone number need a call. Work through those rows by hand and close each one when done.
- A patient asking not to receive reminders should have their Reminder Method changed, not their GDPR consent removed.
- Reminders are part of care, not marketing, so GDPR mail shot consent does not apply to them.
More detail: Reminders due.