Go beyond the basics: tidy and label clinical photographs in the image editor without touching the original, then build, adjust, save and export composite montages from a practice layout.
Who it is for: practice managers and administrators, clinicians, dental nurses.
In this guide:
- Open a clinical photo in the image editor
- Adjust brightness, contrast and colour
- Crop, straighten and orient a photo
- Stamp the patient’s details on a photo
- Save an edited copy and keep the original
- Start a composite and auto-place a photo set
- Place images by hand and fine-tune each cell
- Save, export and find a composite
- Shape a composite layout’s grid and cells
1. Open a clinical photo in the image editor
You can open the right image in its own editor tab, recognise the three columns and arrange the tools palette the way you like.
Why this matters. Clinical photographs are part of the patient’s clinical record. GDC standards and good photography practice expect you to have the patient’s consent for the photographs and their intended use (records, referral, teaching), and to keep the original exactly as taken. The ChiralCloud editor is built around that: it always works from the original and saves any changes as a separate, labelled copy.
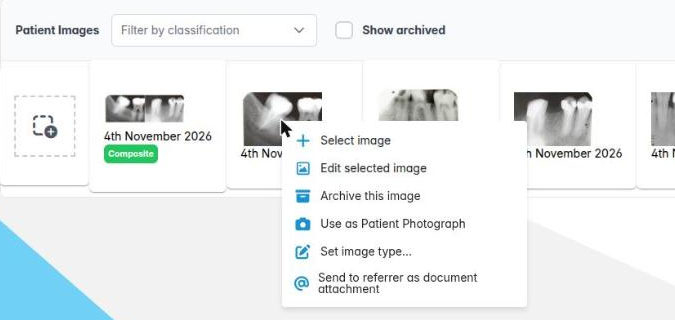
Where to find it. On the Images tab of the patient record, or the Images tab of the appointment editor, right-click a photo and choose Edit selected image.
How to
- Right-click the image you want and choose Edit selected image.
- A new tab opens at the end of the tab strip, named after the image and the date it was taken, for example 29th September 2026 : Upper occlusal. An edited copy shows (edited copy) after the date.
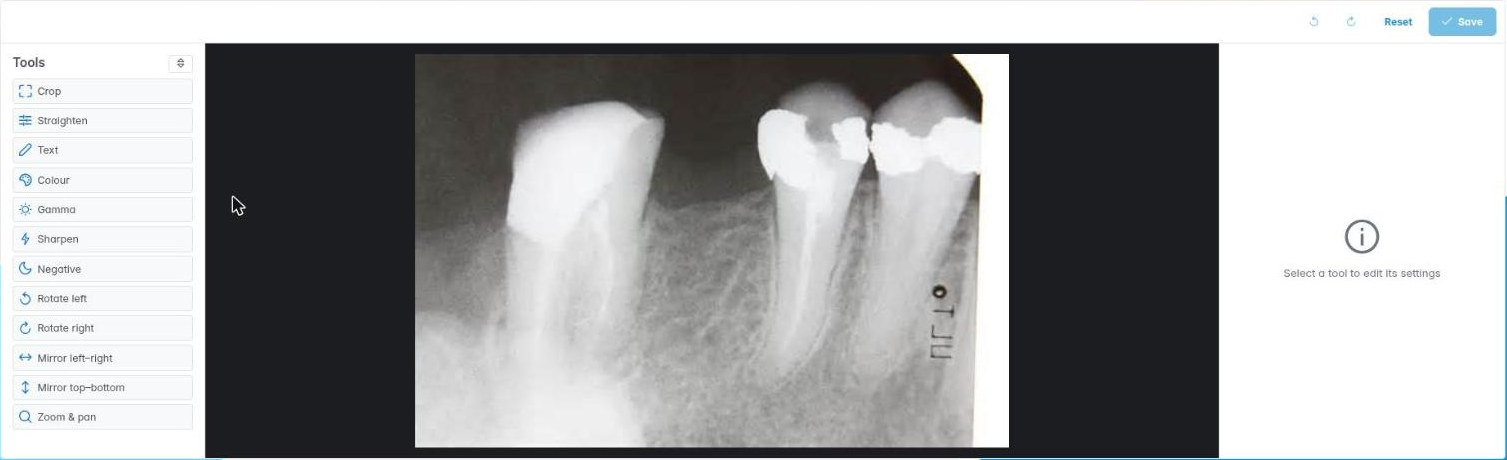
- The editor has three columns: Tools on the left, the picture in the middle and the selected tool’s Properties on the right (Select a tool to edit its settings until you pick one).
- To reorder the palette, click the sort button beside Tools (Reorder palette items), drag the tiles into your preferred order, then click it again (Exit reorder mode). Your order is remembered.
Good to know
- You can have several images open, each in its own tab. Only the tab you are looking at holds the full picture in memory, so switching tabs is safe and your edits wait for you.
- Only JPEG and PNG images open. Anything else shows … is not a JPEG or PNG, so it cannot be opened in the image editor.
- Opening an edited copy reopens the original with its edits still adjustable, rather than editing the copy on top of itself.
- A small blue dot on a tool tile means that tool has changed the picture.
More detail: Patient images.
2. Adjust brightness, contrast and colour
You can correct exposure and colour, sharpen or invert an image, and put any setting back to its default.
Why this matters. Intraoral shots taken with a flash or under the surgery light can come out too dark, too warm or slightly soft. A small correction makes shade, soft tissue and margins easier to see for referrals and patient discussions. Keep corrections modest. The aim is a true picture of the mouth, not a flattering one, and the untouched original stays in the record whatever you do.
Where to find it. In the image editor’s Tools palette: Colour, Gamma, Sharpen and Negative.
How to
- Click Colour. The Colour Properties panel shows sliders for Brightness, Contrast, Saturation, Warmth and Tint (each -100 to 100).
- Drag a slider and watch the picture update. One drag counts as one undo step.
- Click Gamma to lift or deepen the mid-tones without blowing out highlights. This is often better than brightness for a dark posterior shot.
- Click Sharpen and raise Amount a little if the image is slightly soft.
- Click Negative and turn on Show as negative to invert the image. This is sometimes useful for reading a scanned radiograph.
- To undo one setting, double-click its slider label (Double-click to reset). To undo the whole tool, click Reset at the top of its properties panel.
- Click the active tile again to close its properties.
Good to know
- A blue dot on a tile shows that tool is changing the picture, so you can see at a glance where the edits are.
- Don’t use these tools to make a diagnostic radiograph look better than it is. Grade and report the original.
More detail: Patient images.
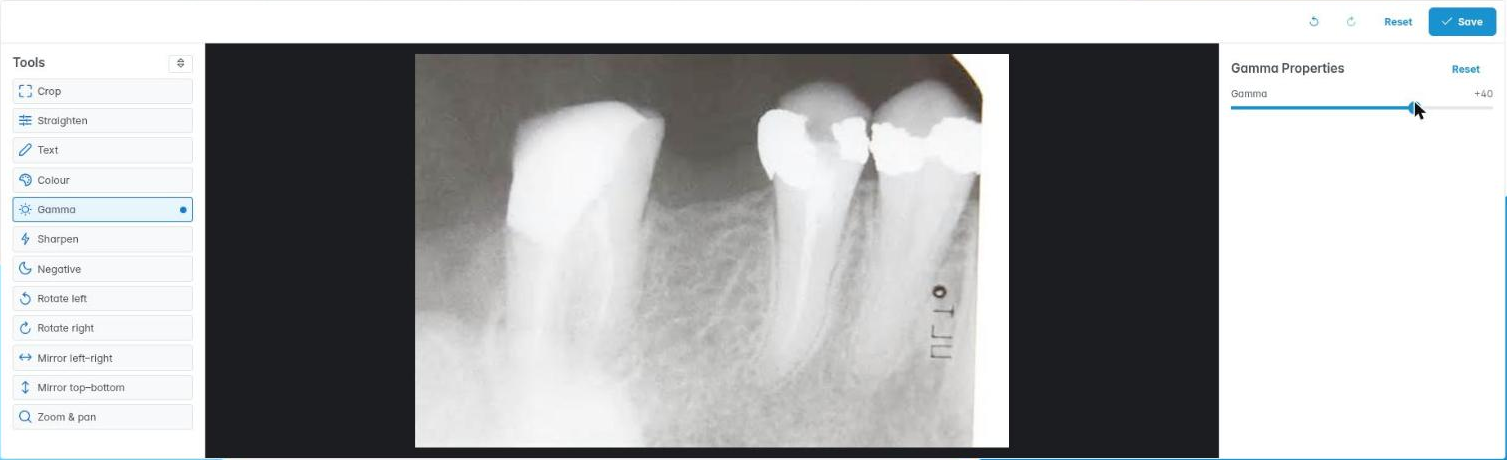
3. Crop, straighten and orient a photo
You can crop to the area of interest, level a tilted shot, fix mirror images and zoom in to inspect detail.
Why this matters. Occlusal and buccal views are usually taken with a mirror, so they come out reversed. Hand-held shots are often tilted, with retractors in the frame. Standard orientation (patient’s right on the viewer’s left, as if facing the patient) makes before-and-after comparisons and referral images easy to read.
Where to find it. The geometry tiles in the image editor’s Tools palette.
How to
- Straighten: click the tile and drag the Straighten slider (-45° to 45°, in half degrees). Straightening shows black corners, so crop afterwards.
- Crop: click Crop (Crop the picture to what you see), drag the frame, then click Apply (or press Enter). Cancel (or Esc) leaves the crop unchanged. Clear crop gives you back the whole picture.
- Rotate left and Rotate right turn the picture a quarter turn straight away.
- Mirror left–right and Mirror top–bottom flip it. Use these to correct mirror shots. Click again to flip back.
- Zoom & pan: use Zoom out, Zoom in and Fit, or drag to pan and use the wheel or a pinch to zoom. Double-click the picture to fit it again. On the keyboard, + and − zoom and 0 fits.
Good to know
- Zooming only changes your view. It is not an edit, cannot be undone and is never saved.
- A crop is kept relative to the rotated picture, so nudging Straighten after cropping keeps the same framing.
- Text you add stays upright and readable whatever the rotation or mirroring.
More detail: Patient images.
4. Stamp the patient’s details on a photo
You can add, style, position and remove text labels such as the patient’s name, date of birth and today’s date.
Why this matters. A photo sent to a lab or referred to a specialist can get separated from its covering letter. Labelling it with the patient’s name, date of birth and the date makes sure it is always matched to the right person. Only add what the recipient needs. A patient identifier on an image is personal data under UK GDPR, so share labelled images securely.
Where to find it. Click the Text tile in the image editor.
How to
- Click Add text. Choose a preset: Patient name, Date of birth, Patient ID, Name, DOB & ID or Today’s date. A preset only appears when the record holds that detail.
- For your own wording, choose Custom text… and type in the Text box.
- Drag the label on the image to place it (Drag the text on the image to place it).
- Set Size, pick a colour (White, Black, Yellow, Red, or any colour from the picker) and turn on Background for a dark box that keeps text readable over pale teeth.
- To change a label later, tap it on the image (Tap a label on the image to change it).
- To delete the selected label, click Remove, or press Delete.
Good to know
- Labels sit in the same place on screen and in the saved full-resolution copy.
- Typing in the Text box counts as one undo step when you leave the box, not one per letter.
More detail: Patient images.
5. Save an edited copy and keep the original
You know exactly what Save does, how to undo or reset edits, and how to find the edited copy alongside the untouched original.
Why this matters. The original photo is your contemporaneous evidence. If a complaint, a GDC case or an indemnity claim ever comes up, you must be able to show the image as it was taken. The editor never overwrites the original. Hover over Save and the tooltip says Saves the edited copy – the original is never changed.
Where to find it. The toolbar across the top of the image editor tab.
How to
- Use Undo (Ctrl+Z) and Redo (Ctrl+Shift+Z) to step through your edits.
- Reset puts the picture back to how it was captured and fits it on screen again. You can still undo a Reset.
- Click Save. It shows Saving… while the copy uploads. Save is greyed out until you have made a change.
- The first save creates a new image called, for example, Upper occlusal (edited).jpg and shows Saved as …. Each save after that updates the same copy (Saved …), so adjusting a crop three times doesn’t leave three copies.
- Back on Images, the copy carries an Edited tag and its rollover reads Edited copy of ….
- Close the tab with its ×. If there are unsaved changes, you are asked Discard the unsaved edits?
Good to know
- Your edits are kept with the copy, so reopening the copy lets you fine-tune them again. If they can’t be read you’ll see Edit the original image instead.
- Opening the original again always starts fresh, even if it has been edited before.
- Use edited copies for referrals and presentations, and keep the original for the record.
More detail: Patient images.
6. Start a composite and auto-place a photo set
You can start a composite, choose a layout, and fill it automatically from the right visit’s photos, knowing how image types drive the placement.
Why this matters. A standard montage, such as the orthodontic records set or a before-and-after pair, takes minutes to arrange by hand. ChiralCloud fills one for you, but only if your photos have image types. It helps to know the difference between the two labels a photo can have:
- Image type (for example Extraoral – frontal, Upper occlusal) says what the view is. Layout cells ask for an image type, and Auto-place matches on it.
- Category is the document classification (for example Clinical photograph, Radiograph). It is only used for filtering.
Where to find it. Click New composite on the Images tab. A new closable tab opens. (See Build a composite of clinical photos for the overview.)
How to
- In the Layout column, pick a layout. Each one shows a small grid preview, and the practice’s standard ones are marked (built in). Layouts come from Housekeeping › Composite Layouts.
- To use a particular visit’s photos, set the date in Use images from…. Leave it empty to use the newest images. The × beside it (Use every image, whatever its date) clears the date.
- Click Auto-place (Fill the cells by matching image type). A message such as Placed 7 of 9 cells. tells you how it went, and cells it couldn’t fill are highlighted.
- If you choose a different layout after placing images, any that won’t fit trigger Change layout?. Choose Yes or No. Undo will bring them back.
Good to know
- With a date set, a cell with no image from that day takes the nearest earlier day’s image.
- Auto-place never overwrites cells you have already filled.
- Untyped photos are never auto-placed. Tag them first (next step).
More detail: Patient images.
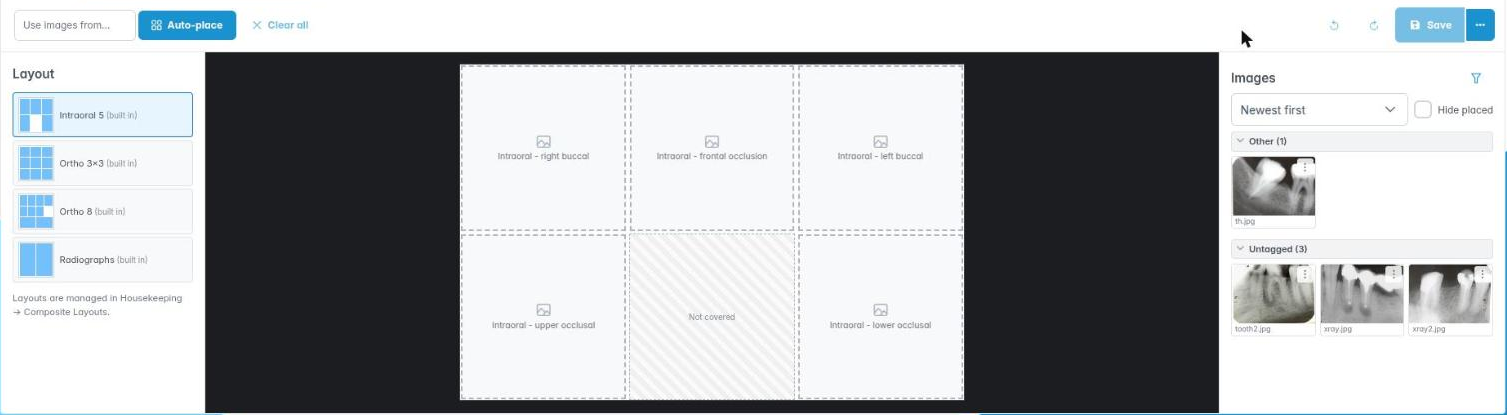
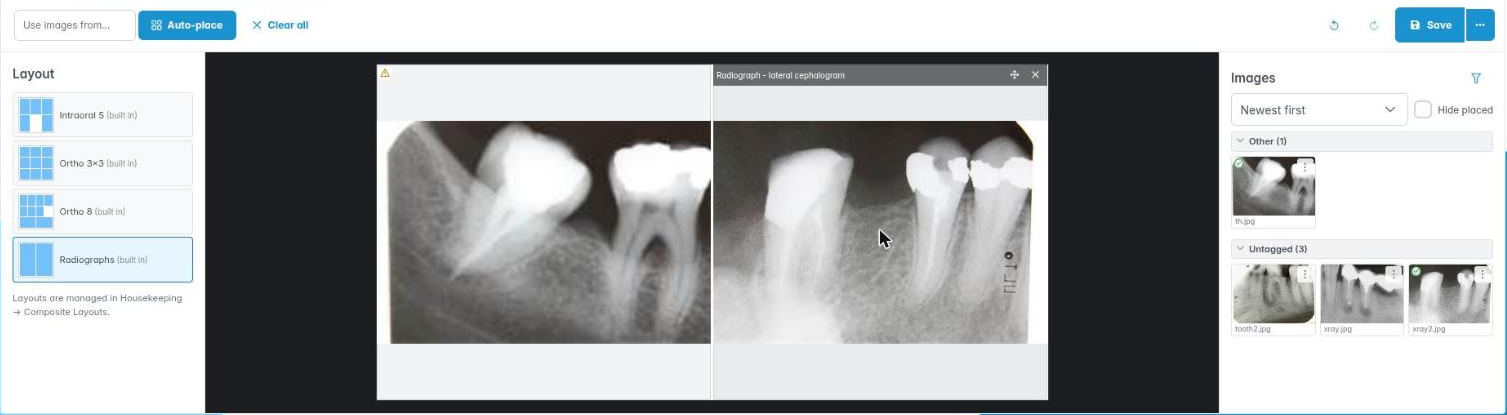
7. Place images by hand and fine-tune each cell
You can find and tag photos in the image tray, drag them into cells, and adjust each cell’s framing, rotation and caption.
Why this matters. Auto-place gets you most of the way. Getting a montage right for a case presentation or a specialist referral usually means swapping in a better shot, centring the arch and keeping the framing consistent.
Where to find it. The right-hand column of the composite tab: Cell Properties at the top and the Images tray below.
How to
- Find a photo. The tray groups photos by image type, with Untagged last. Change the order with the sort list (Newest first / Oldest first) and tick Hide placed to hide images already used (marked Already on the grid). Click Filter the images to filter by Image type, Category, From / To date or Include composites.
- Tag a photo. Open the ⋯ menu on a thumbnail and choose Set image type…. The tray regroups straight away, and Auto-place can now use it.
- Place it. Drag a thumbnail onto a cell. Drag a placed image by its grip onto another cell to swap the two.
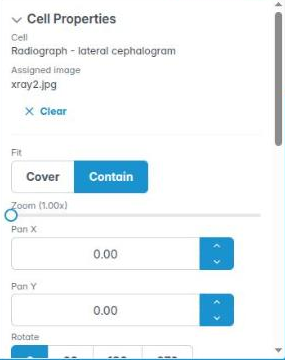
- Adjust the cell. Click a cell. Cell Properties shows the Cell and Assigned image. Set Fit (Cover fills the cell, Contain shows the whole photo), Zoom, Pan X, Pan Y, Rotate (0/90/180/270) and Mirror horizontally. You can also scroll to zoom and drag inside the selected cell. Reset puts the framing back.
- Caption overrides the layout’s caption for this cell only.
- Empty a cell with Clear in the panel, by right-clicking it and choosing Clear cell, or with the Delete key. Clear all empties every cell after Clear every cell? (No / Yes). The layout itself isn’t changed.
- Use Undo (Ctrl+Z) and Redo (Ctrl+Y) freely.
Good to know
- Shift- or Ctrl-click selects several cells.
- Tagging a photo here is the same as Set image type… on the Images tab, and it saves straight away.
More detail: Patient images.
8. Save, export and find a composite
You can name and save a composite to the record, save a variant, download it, and find or remove it later.
Why this matters. A saved composite is filed against the patient as an ordinary image, so it can be sent to a referrer, shown at the next appointment or used in a case presentation. Like the image editor, saving never alters the photographs it was built from.
Where to find it. The Save split button at the right of the composite toolbar.
How to
- Click Save. The first time, the Composite Image dialog asks you to Name this composite. It is what the image is called in the patient’s records. It suggests Composite plus today’s date. Edit the name and click OK (or Cancel).
- You’ll see Saved as …. Later saves update the same composite (Saved …).
- To keep this version and start a variant, open the arrow and choose Save as new. It appears once the composite has been saved.
- For a file to attach elsewhere, choose Download JPEG or Download PNG. Nothing is added to the record when you download.
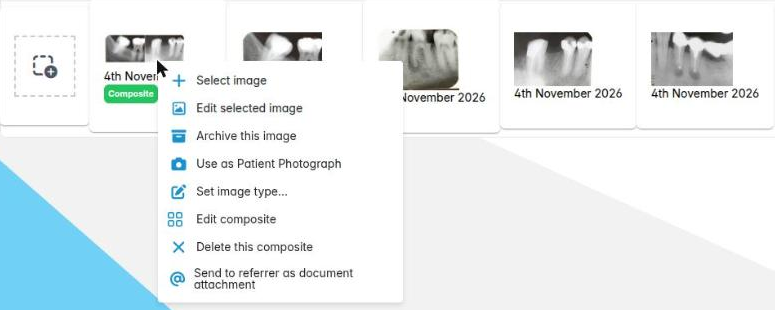
- Back on Images, the composite appears as a new image. Right-click it for Edit composite to reopen the editable montage, or Delete this composite. The montage image it produced is archived, so it stays in the record, and the photographs it was built from are not affected.
- Closing the tab with unsaved changes asks Discard the unsaved composite?
Good to know
- Save and Download refuse an empty grid: Place at least one image in the grid first.
- If one photo can’t be loaded, nothing is saved, and the message names the photo so you can replace that cell.
- Downloaded files are patient data on your computer. Store them securely and delete them when you’ve finished.
- Because the output is a normal image, you can also open it in the image editor to add a label.
More detail: Patient images.
9. Shape a composite layout’s grid and cells
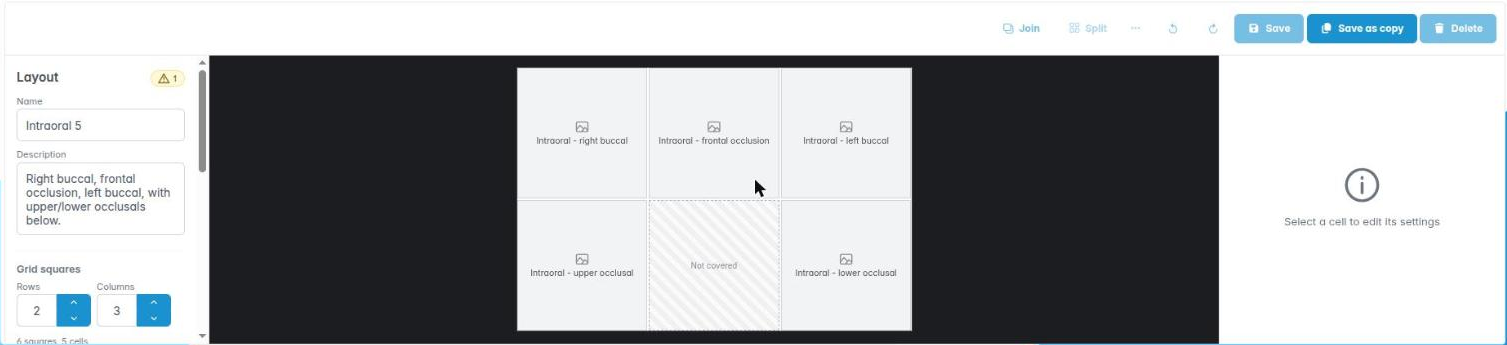
You can join and split cells, resize the grid, assign each cell an image type and set the layout’s output and captions.
Why this matters. A good layout makes every montage consistent. For example, an orthodontic records layout puts the extraoral views across the top and the intraoral views below. The image type you give each cell is what Auto-place matches, so the layout and your image types work as a pair.
Where to find it. Housekeeping › Composite Layouts. The same editor opens in layout mode. (Creating, copying and deleting layouts is covered in Set image types and composite layouts.)
How to
- In the Layout column, set Name and Description, then Rows and Columns under Grid squares. If the change would remove cells, Change the grid size lists them. Choose Yes or No.
- Under Output, set Width (px), Height (px), Gap (px), Border (px) and Background.
- Under Caption, tick Print a caption under each image and edit the Template. {imageType} is the type’s label, {date} the image’s date and {name} its name. Set Font size (px).
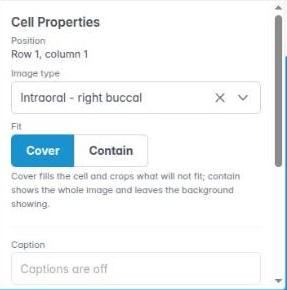
- Click a cell, or pick it from the Cells list. In Cell Properties, set its Image type (Unassigned if none), Fit (Cover / Contain) and an optional Caption.
- To make a big cell, Shift- or Ctrl-click neighbouring cells that form a rectangle and click Join (Ctrl+J).
- To divide a cell, use Split top / bottom, Split left / right or Split into squares. These are in Cell Properties, in the toolbar Split button (Ctrl+Shift+J runs its main action) and in the right-click menu, which also has Clear image type.
- Use Undo (Ctrl+Z) and Redo (Ctrl+Y), then save the layout.
Good to know
- A greyed-out Split means the cell can’t be divided that way within the current grid.
- Grid squares that no cell covers show Not covered. The problems counter in the Layout column lists anything to fix.
- Patients’ saved composites keep their own copy of the layout, so later changes don’t alter them.