
Read the record header and alerts, use every toolbar action, read appointment and treatment history, keep personal details current and use the Family Group, Tasks, Check Lists and Patient Forms tabs.
Who it is for: practice managers and administrators, clinicians, dental nurses, receptionists.
In this guide:
- Open a patient record and read its alerts
- Message a patient, raise a task or add a recall from the toolbar
- Book, charge and create documents from the toolbar
- Read a patient’s appointment history
- Read a patient’s treatment history
- Keep a patient’s personal details up to date
- Use the Family Group, Tasks and Check Lists tabs
- See a patient’s forms and arrange your tabs
1. Open a patient record and read its alerts
You can read the record header and deal correctly with pop-up alerts when a record opens.
Why this matters. Pop-up alerts are how the team warns each other about things that must not be missed: an allergy to latex, a safeguarding concern, a patient who must be seen by a particular dentist, or a balance owing. Reading them every time is part of safe care.
Where to find it. Open any patient (for example from Find Patients). The record opens in its own tab, on the Summary tab by default.
How to
- Look at the right-hand end of the toolbar. It shows the patient’s journey stage, their age and ID : (patient number), then Knowledge Base and Save & Exit.
- Read any pop-up alerts in the corner of the screen. Colours show their type: blue for informational, amber for warnings, red for action notes.
- For each alert choose one of three buttons:
– Close popup hides it for now. It will appear again next time the record opens.
– Close popup and never show again retires the alert for everyone. Only use this when the issue is truly resolved.
– Close all popups hides them all for now. - Two automatic alerts may also appear: NHS Number Missing (an NHS patient with no NHS number) and Account Balance (the patient owes money, shown as a negative balance).
Good to know
- Alerts come from patient notes saved with a type other than Informational. See the Notes module to create them.
- Knowledge Base opens the help article for the tab you are on.
- Save & Exit saves any changes and closes the record tab. If you have unsaved changes on another tab you’ll be asked to save.
More detail: Patient summary.
2. Message a patient, raise a task or add a recall from the toolbar
You can use the first toolbar group to email, text, create a task and add a recall, and know which flag buttons work.
Why this matters. The left of the patient toolbar is where you act on the patient without leaving the record: send a quick text, flag a job for a colleague, or set a recall the clinician asked for.
Where to find it. Any open patient record, the toolbar along the top. Hover over an icon to see its name.
How to
- Create patient task opens Send Email headed Send Task Email to Practice, so you can email the practice inbox about this patient (for example “call back about lab work”).
- Send this patient an SMS opens Send SMS with the patient’s Mobile Number. Type the Message (or insert a template) and Send. With no mobile on file you’ll see No Mobile Number.
- Send this patient an Email opens Send Email to the patient. Choose Email type (Text Email or Patient Form Email), check the Subject and Message, then Send. With no email on file you’ll see No Email Address.
- Create patient recall opens Add Recall Follow On: pick the Recall Type, Clinician, Date and an optional Comment, then OK.
- Write Off Account asks for a Write Off Narrative and sets the patient’s status to Written Off. On a written-off patient the same button reads Reactivate Account and sets them back to Active. Only do this with your practice manager’s agreement.
Good to know
- Mark Late Arriver / Clear Late Arriver and the late payer button are not yet working. They show This feature is not yet implemented.
- Known bug: the late payer button’s tooltip is blank when the patient is not flagged (it should read Mark Late Payer). It reads Clear Late Payer when they are.
- Every SMS and email you send is kept on the Documents tab under SMS & Emails.
More detail: Patient summary.

3. Book, charge and create documents from the toolbar
You know which toolbar buttons create an appointment, a sale, a note, documents, a prescription or open plans.
Why this matters. The rest of the toolbar is a set of shortcuts for creating things for this patient. Knowing what each icon does saves you hunting through tabs.
Where to find it. Any open patient record, toolbar. Hover over each icon for its name.
How to
- Create a patient appointment opens Patient Appointment: choose the clinician, then the Type, Duration, Summary and Comment. Tick Create Recall if needed and, for NHS patients, Treatment On Referral with a Referral Date. The appointment is created unplaced, ready to drop into the diary.
- Patient Sales, Credit and Cash Sales opens the sales window to take a payment or sell a product (see the Accounts training).
- Create a patient note opens Add Patient Note (see the Notes module).
- Create new patient document creates a letter or form from a practice template.
- Upload Patient Image / XRay / PDF and Upload Patient Document upload files from your computer (see the Documents and images module).
- Create Referrer / Patient Document writes a letter to a referrer or GP from a template.
- Create Patient Prescription opens Patient Prescription for a clinician to issue a prescription.
- Patient Treatment Plans and Patient Payment Plans open the plan screens for this patient.
Good to know
- Prescriptions are clinical documents. Only prescribers should create them, and they appear on the Documents tab under Prescriptions.
- Letters and documents you create are locked against editing once filed, unless someone with the right permission unlocks them.
More detail: Patient summary.
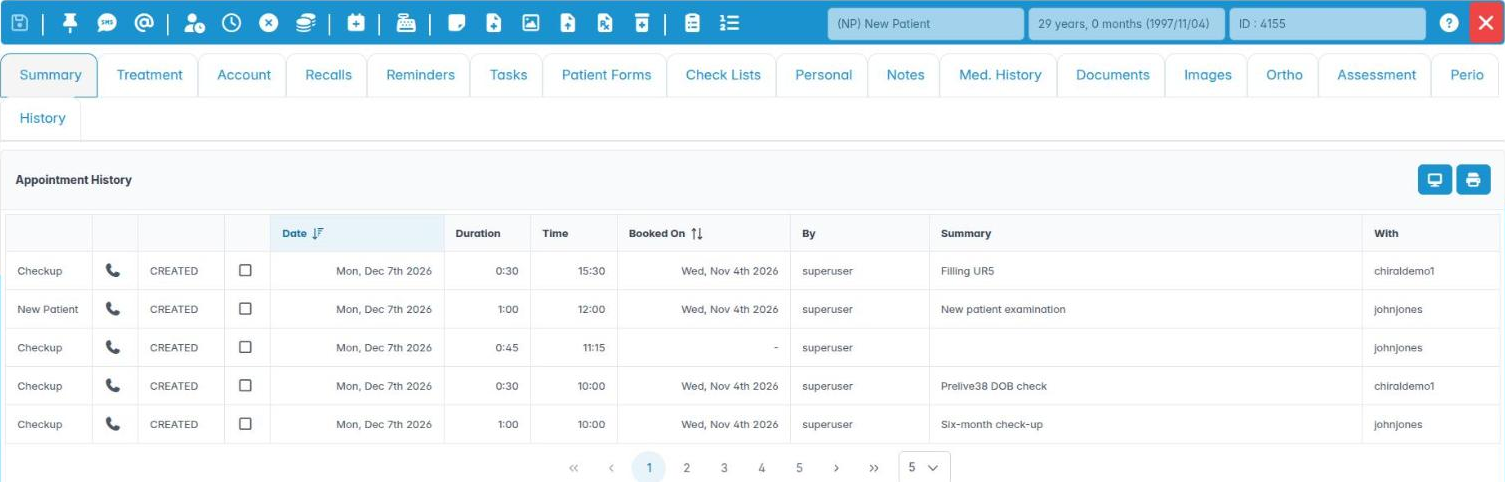
4. Read a patient’s appointment history
You can read the Summary tab, jump to an appointment and resend or change a reminder for it.
Why this matters. The Summary tab answers the questions patients ask most at the desk: “When is my next appointment?”, “When did I last see the hygienist?”, “Did you send me a reminder?”. It also shows patterns, such as repeated failures to attend.
Where to find it. Open a patient record; Summary is the first tab.
How to
- Read the appointment list: appointment type, reminder method icon, status, attended mark, Date, Duration, Time, Booked On, By, Summary and With. Click Date to sort.
- Double-click an appointment to open it in the appointment editor.
- Right-click an appointment for:
– Practice Day Diary to open the diary on that day,
– Goto Appointment to open the appointment itself,
– Send This Reminder to resend the appointment reminder now (confirm Are you sure you want to send this reminder?),
– Set the Communication Type to change how this reminder goes out (for example SMS instead of email). - Use Show the patient appointment history to preview a printable report, or Print the patient appointment history to print it.
Good to know
- A reminder can only be sent by email or SMS if the patient has that contact detail and has not opted out.
- Failed-to-attend appointments stay in the history. Practices usually discuss repeated FTAs with the patient and may decline further NHS courses of treatment in line with practice policy.
More detail: Patient summary.
5. Read a patient’s treatment history
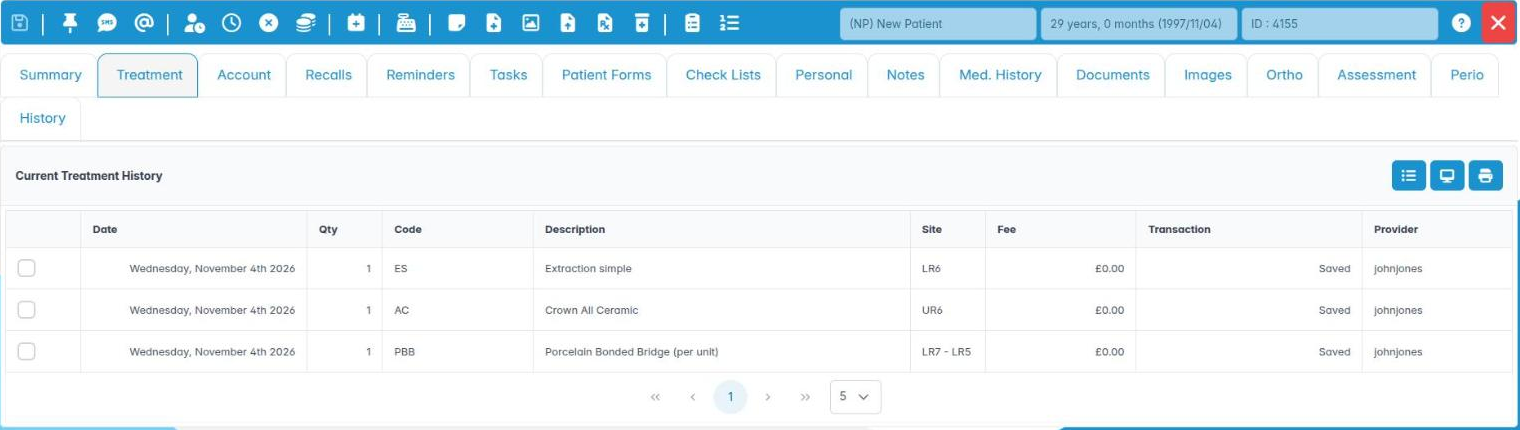
You can read completed and current treatment, switch to full history and print it.
Why this matters. Before an appointment the nurse and clinician need to see what was done last time. At the desk, the treatment list explains a bill (“what was the £85 for?”). For NHS patients it also shows which items belong to the current course of treatment.
Where to find it. Open a patient record and choose the Treatment tab.
How to
- Read the list: Date, Qty, Code, Description, Site (tooth or area), Fee, Transaction and Provider.
- By default you see the current treatment history. Click Show full treatment history to include everything; the same button then reads Show current treatment history.
- Click Show the patient treatment history to preview it as a report, or Print the patient treatment history to print or save it as a PDF.
Good to know
- This tab is for reading. Treatment is charted and completed in the appointment editor, not here.
- Fees on NHS items reflect the patient charge band, not a private fee.
- If you need to send treatment details to another practice or the patient (for example a subject access request), print the report and check it with your practice manager first.
More detail: Patient treatment history 2.
6. Keep a patient’s personal details up to date
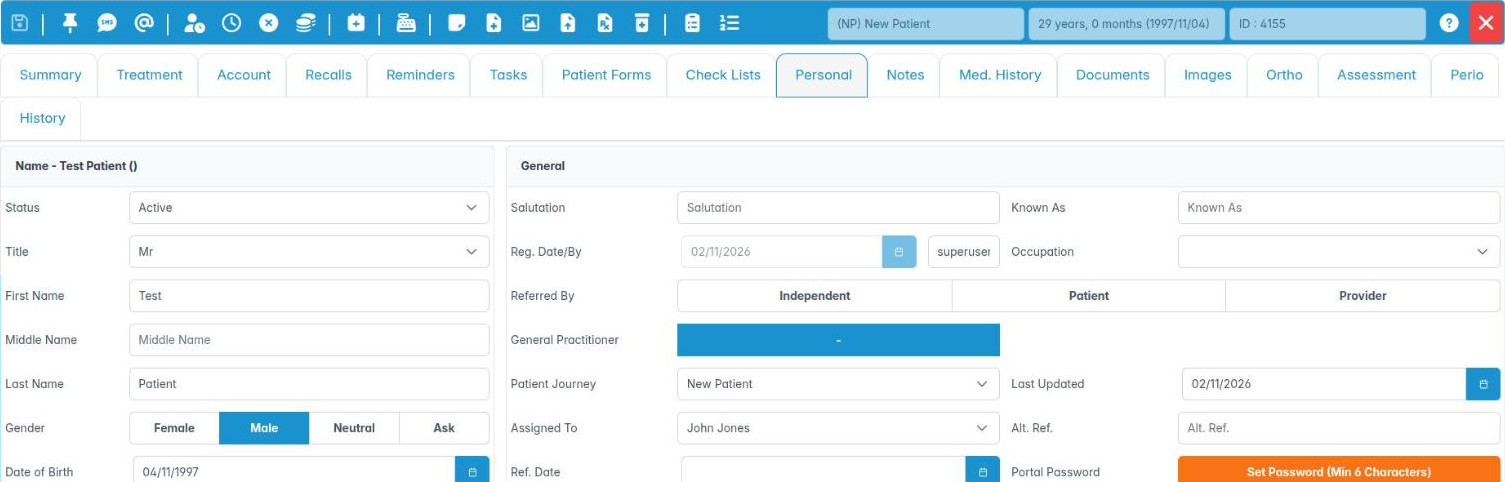
You can check and update the Personal tab, set a portal password and use the patient photo and QR code.
Why this matters. UK GDPR requires personal data to be accurate and kept up to date. Wrong mobile numbers mean missed reminders and recalls; a wrong address means a statement goes to the wrong house. Ask patients to confirm their details at every course of treatment, typically when they update their medical history.
Where to find it. Open a patient record and choose the Personal tab. This tab cannot be hidden.
How to
- Name: check Status, Title, names, Gender, Date of Birth and the NHS tick. The panel header shows Name – First Last (Known As).
- General: Salutation, Known As, Occupation, Alt. Ref. (a reference from your old system), Referred By, General Practitioner, Patient Journey and Assigned To. Reg. Date/By and Ref. Date show who registered the patient and when.
- Contact: home, work, other and Mobile numbers and Email. Tick Use Alternate Address if post should go to the alternate address.
- Main Address, Alternate Address and Next of Kin (with Relationship).
- Portal Password: enter a password and click Set Password (Min 6 Characters) to give the patient a portal login.
- The Patient Image Email QR Code panel and patient photograph help identify the patient.
- Save with the save button on the toolbar.
Good to know
- Changing Status to Deceased, Inactive or Non Communication stops recalls and communications. Use the right status, not a note.
- Never share a portal password by email. Ask the patient to choose one at the desk.
More detail: Patient personal details.
7. Use the Family Group, Tasks and Check Lists tabs
You can review a patient’s family group, add and complete tasks, and tick check list items such as GDPR consent.
Why this matters. These three tabs keep the admin around a patient tidy. Family Group shows who pays. Tasks keeps follow-ups (a call-back, a lab chase, an insurer form) attached to the patient so nothing is forgotten. Check Lists records that required steps have been done, including the built-in GDPR consent given item.
Where to find it. Open a patient record. Family Group only appears when the patient belongs to a family group.
How to
- Family Group shows the Family Principle (name, description, comments) and Family Members with journey code, date of birth and balance. Right-click a member for Remove Member or Show this members account.
- Tasks: click Add Task to open New Task. Enter a Title, choose a List, add Notes, a Due date (or All day), a Reminder, Priority and Assignee, then Save. Use Hide completed / Show completed to filter.
- Check Lists: the top table shows each list’s Status, Code, Description and Completed On. Select a list to see its items below, then tick an item to mark it done. The By column shows who ticked it, or Form / Upload when the system ticked it automatically.
Good to know
- Every patient has the built-in GDPR list. GDPR consent given starts ticked (“Ticked by default”). Unticking it records that the patient has not consented, and they are then left out of all mail shots.
- If the patient answers the GDPR form on the portal, the tick updates itself and shows “Patient portal”.
- Ticks belong to the patient, not the appointment: ticking from the appointment editor ticks it here too.
8. See a patient’s forms and arrange your tabs
You can check which forms a patient has been sent or returned, and hide or reorder patient record tabs for yourself.
Why this matters. Before an appointment you often need to know “did they fill in the form we sent?”. The Patient Forms tab answers that. And because different roles use different tabs (a receptionist rarely needs Perio), you can tidy the tab strip for yourself.
Where to find it. Patient Forms tab on any patient record. Tab layout: Utilities › Patient Tabs.
How to: Patient Forms tab
- Open the Patient Forms tab. The left table lists every Form Designer form sent to the patient, with a status (for example sent, opened or submitted).
- Select a form to see its answers on the right (Field, Type, Value), including signatures and any uploaded files, which you can download by clicking their names.
- Click View to see the response laid out, or Add to medical history for a medical history form (see the Medical history module).
How to: arrange your tabs
- Open Utilities › Patient Tabs.
- Hide the tabs you never use and drag the others into the order you prefer. Personal cannot be hidden.
- Click Save. Reset to default asks Show every Patient Details tab again, in its default order? and restores the standard layout. Exit closes the screen.
Good to know
- Your tab layout is personal to you on this practice. It doesn’t change what colleagues see.
- Hiding a tab doesn’t remove any information or permissions; you can show it again at any time.