
Message individual patients, run Email, SMS and Patient Forms mail shots within GDPR, work with form responses, and support patients on the tablet, kiosk and portal.
Who it is for: practice managers and administrators, receptionists.
In this guide:
- Send one patient an SMS or email
- Choose who receives a mail shot
- Write, test and send an Email or SMS mail shot
- Send a form to many patients and review the responses
- Send forms to the waiting-room tablet
- Help a patient use the tablet
- Explain kiosk self check-in to patients
- Explain the patient portal to a patient
1. Send one patient an SMS or email
You can send a single patient a text or email, use templates and merge fields, and check it was delivered.
Why this matters. Most patient contact is one-to-one: “your crown is back from the lab”, “please bring your exemption certificate”, a link to a form. Sending from ChiralCloud keeps a copy on the record, which is your evidence of what was said.
Where to find it. Patient toolbar Send this patient an SMS / Send this patient an Email, or right-click a patient in Find Patients (Send SMS / Send Email). The diary offers the same from an appointment.
How to: SMS
- Send SMS : (patient name) opens with the Mobile Number filled in.
- Type the Message, or use Insert template and edit it. Merge fields fill in the patient’s details.
- Click Send.
How to: email
- Send Email : (patient name) opens. Choose Email type: Text Email, or Patient Form Email to include a link to a published form.
- Check Email, Subject and Message. Paste from clipboard pastes copied text into the message.
- Click Send (Text Email) or Send (Patient Form Email).
Good to know
- If a merge field can’t be filled (for example no appointment booked), you’ll see Merge fields that cannot be filled in so you can fix the message before it goes.
- With no mobile or email on file you’ll see No Mobile Number or No Email Address.
- Every message is saved on the Documents tab under SMS & Emails, with its Delivery status. Online › Email Problems lists bounced and rejected emails.
- Never send clinical details by SMS. Keep texts short and non-sensitive.
More detail: Patient documents.
2. Choose who receives a mail shot
You can create a mail shot and build its patient selection with criteria or an uploaded list.
Why this matters. Mail shots let you contact many patients at once: a change of opening hours, a new hygienist, a flu-season reminder, or a form everyone must complete. Choosing the right audience avoids annoying patients and keeps you within GDPR.
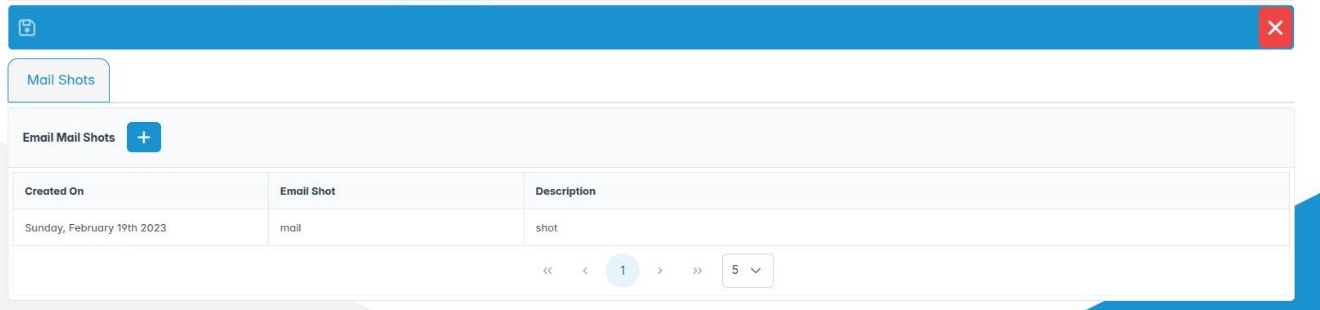
Where to find it. Patients › Mail Shots, then Email, SMS or Patient Forms. Each opens a list of past mail shots.
How to
- Click Add an Email Mail Shot (or Add an SMS Mail Shot / Add a Patient Form Mail Shot). Enter a Title, Description and Comments and click OK.
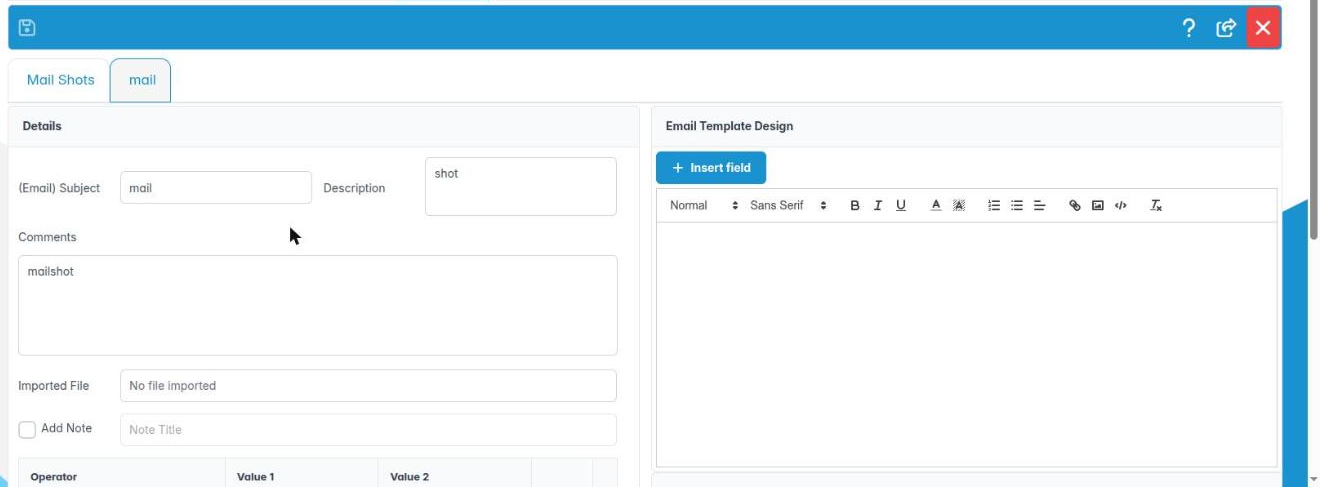
- Double-click the new mail shot to open it. Fill in Details: (Email) Subject, Description, Comments.
- Build the criteria table. Each row has an Operator and up to two values. Operators include DOB Before, DOB Between, DOB After, Next Appointment Before / Between / After, Registered Before / Between / After, Male, Female, Provider, Journey Code (JC), JC Changed Between and Patient Status. Use + and – to add or remove rows.
- Or choose Patient List (Upload) to upload a spreadsheet with a PatNo column. This can’t be combined with other criteria, and only the first 1,000 patients are used.
- Click Run Selection (the button beside Patient Selection). The table lists Name, Date Of Birth and Provider; untick anyone to leave out. The header shows, for example, “(9 of 12)”.
- Tick Add Note and give a Note Title if you want a note added to every recipient’s record.
Good to know
- Patients who haven’t given GDPR consent are left out of mail shots. They won’t receive it even if they match.
- Right-click a recipient for Patient Details or Remove Patient.
3. Write, test and send an Email or SMS mail shot
You can design the message, send yourself a test, then send the mail shot.
Why this matters. A mail shot goes to hundreds of people in one click and can’t be recalled. A test send to yourself catches typos, broken merge fields and formatting problems first.
Where to find it. Open a mail shot from Patients › Mail Shots › Email or SMS.
How to
- Write the content. For email, use the Email Template Design panel. For SMS, write the message text. Insert templates and merge fields where offered.
- If Add Note is ticked, write the Note Body that will be added to each patient’s record.
- Click Save on the toolbar.
- Click Send Test Email Mail Shot (or Send Test SMS Mail Shot). It goes to you, the logged-in user. Check it on your phone or inbox.
- When you’re happy, click Send Email Mail Shot (or Send SMS Mail Shot).
- Save & Exit closes the mail shot. If there are unsaved changes you’ll be asked to Save Resource.
Good to know
- Patients without GDPR consent, without an email address (for email) or without a mobile (for SMS) are skipped.
- SMS messages use your practice’s SMS credit. Check Reports › SMS Limits before a big send.
- Keep marketing honest and include how to opt out. Patients who ask to stop must have their GDPR consent unticked straight away.
- To reuse a mail shot, open it from the list, adjust and send again; to tidy up, right-click › Delete Mail Shot.
4. Send a form to many patients and review the responses
You can send a Patient Forms mail shot and use Form Responses to view, print, link and import responses.
Why this matters. Patient Forms mail shots send each patient a personal link to a Form Designer form: an updated medical history before the new year’s recall season, a GDPR consent form, a satisfaction survey. Answers come straight back into ChiralCloud.
Where to find it. Patients › Mail Shots › Patient Forms.
How to
- Create and open a mail shot, and select patients as for email.
- In the Patient Forms table (Name, Published, Submissions) click the form to send. Double-click a form to open its responses instead.
- Write the covering email in Email Template Design. Each patient’s personal form link is added automatically. If you pick a template over existing text you’re asked Replace the email with this template?
- Save, Send Test Patient Mail Shot, then Send Patient Mail Shot.
- Later, right-click the mail shot in the list and choose Mail Shot Results, or right-click a form and choose Show Patient Responses.
- In Form Responses, select a response to see its answers. Right-click for Patient Details, View Form, Print Form or Link to patient… (for a response that arrived without a patient; search by surname and click Link). Use Add to medical history for medical history forms.
Good to know
- Uploaded files in a response can be downloaded by clicking their names.
- Linking a response that contains a GDPR box updates that patient’s GDPR consent tick.
5. Send forms to the waiting-room tablet
You can queue patient details, medical history, questionnaires and consent forms for the tablet and manage the queue.
Why this matters. A tablet in reception lets patients update their own details, sign their medical history and consent forms while they wait, with no paper to scan. Self-entered, signed forms are better evidence and save the team time.
Where to find it. Queue items: Find Patients, right-click the patient, Compliance. Manage the queue: Patients › Tablet Registrations.
How to
- In Find Patients, right-click the patient and choose Compliance, then Questionnaire, Patient Details, Medical History or Consent Forms (pick the forms in the dialog). A message confirms the patient was added to the tablet.
- Hand the patient the tablet (see the next step).
- Open Patients › Tablet Registrations to see the queue. Tabs: Patient Details, Medical History, Consent Forms, Treatment Plans and Payment Plans. Each lists Name, Added On and Comments.
- Right-click a row for Patient Details (open the record) or Remove from tablet if it is no longer needed.
- Save & Exit closes the screen.
Good to know
- Treatment and payment plans reach the tablet from the treatment planning screens.
- Show Tablet Registrations, Print Tablet Registrations and Download Tablet Registrations are on the toolbar but don’t do anything yet.
- Clear old items from the queue each evening so the next day’s patients don’t see someone else’s name.
6. Help a patient use the tablet
You can talk a patient through the tablet screens and return the tablet safely to reception.
Why this matters. Patients of every age use the tablet, and some need help. Knowing what they see lets you guide them quickly and keeps their information private.
Where to find it. The tablet signed in with the practice’s tablet login.
What the patient sees
- A menu of large buttons: Patient Checkin, Patient Details, Medical History, Consent Forms, Questionnaire, Sign Treatment Plans, Sign Payment Plans.
- They tap the right button, pick their name from the list (Name, DOB) and tap Select (or Checkin).
- Medical History: they answer every question Yes or No, sign, then Save, or tap No Change if nothing has changed since last time. They must answer everything (Please answer all the questions either Yes / No).
- Patient Details: they check and Save their details.
- Consent Forms: they read each form, sign, tap Save This Signature and confirm. Clear wipes the signature to start again.
- When finished, the tablet asks for a staff code on a keypad before it returns to the menu, so a patient can’t browse other names.
Good to know
- Hand the tablet over already on the right screen when you can.
- If a patient taps the wrong name, take the tablet back and use the return arrow.
- Wipe the tablet between patients as part of your infection control routine.
7. Explain kiosk self check-in to patients
You know what patients see at the self check-in kiosk and how staff unlock it.
Why this matters. A check-in kiosk lets patients tell you they’ve arrived without queueing at the desk, and marks them arrived in the diary. It shows the minimum personal information, so others in the waiting room can’t learn anything about them.
Where to find it. The kiosk device in reception, showing the practice name and Patient self check-in.
What the patient does
- Step 1: Date of birth. They tap their date of birth as eight digits (day, month, year). Delete the last digit removes one digit, Clear removes all. Then Next.
- Step 2: Surname. They tap the first letter of their surname. Back returns to the date of birth.
- The kiosk shows We found your appointment with a short summary (for example “9:30am with Dr Patel”) and no full name or date of birth.
- They tap Yes, check me in, or No, that’s not me. Success shows You’re checked in. The screen clears itself after a short countdown, or they tap Check in someone else.
- If something is wrong they see Please speak to reception (for example We couldn’t check you in here). Change letter and Start again let them retry.
Staff only
- To close or sign in the kiosk, press and hold Staff only for about a second and a half, then enter the staff PIN (Enter / Clear). A quick tap does nothing.
Good to know
- Check the diary after kiosk check-ins: the patient appears as arrived, ready for the nurse to collect.
8. Explain the patient portal to a patient
You can describe what patients can do on the portal and help them get started.
Why this matters. The patient portal lets patients book, update their details, complete forms and sign documents from home. Every form filled in at home is one fewer clipboard in reception, and patients get access to their own information, which supports their GDPR right of access.
Where to find it. Patients log in with their portal reference and the password set on their Personal tab. Use Resend Portal Ref in Find Patients if they’ve lost the reference.
What the patient sees
- On first login they may be asked to Please Complete the GDPR consent form before continuing, and to complete any outstanding forms (Please Complete the requested forms before continuing).
- The dashboard offers Book An Appointment, Book A Video Call and Join Video Call (where your practice offers them), Add Medical History / Complete Medical History, Complete Questionnaire, Sign Consent Forms, Upload an Image(s) and Sign GDPR Consent Form.
- The menu has My Details (Personal Information, Upload XRay / Images), My Appointments › My History, My Documents, My Prescriptions › My History, My Treatment Plans › My History and My Payment Plans › My History.
- Booking: they pick a week (Back a week / Forward a week), choose a slot, add a booking note and confirm Are you sure you want to book this appointment.
Good to know
- Which menus appear depends on what your practice has enabled.
- My Consent under treatment and payment plans is shown but not yet working.
- Online bookings appear under Online › Online Bookings for the team to check.