Use patient journey stages, update the stage or assigned clinician for many patients at once, and transfer patients to another practice in your group.
Who it is for: practice managers and administrators, receptionists.
In this guide:
- Use patient journey stages to track where patients are
- Move many patients to a new journey stage
- Reassign many patients to a different clinician
- Transfer patients to another practice in your group
1. Use patient journey stages to track where patients are
You understand what journey stages are, where they are set and how they are used.
Why this matters. A journey stage is a short code that says where a patient is in your practice’s process: for example new enquiry, consultation booked, treatment plan issued, in treatment, retention, or lapsed. Practices that track stages can see at a glance how many consultations turned into treatment, and can target follow-ups. Orthodontic and implant practices, with long multi-stage treatments, rely on this heavily.
Where to find it
- Each patient’s stage: Personal tab, Patient Journey, and the right-hand end of the record toolbar.
- The list of stages: Housekeeping › Patient Journey Stages (administrators).
- Reporting: Reports › Patient Journey.
How to
- Agree a short, practice-wide list of stages and set them up in Housekeeping › Patient Journey Stages.
- Set the stage when you register a patient (Patient Journey on Add Patient) and change it on the Personal tab as the patient moves on.
- Use Reports › Patient Journey to count patients at each stage or changed in a date range.
- Use the stage in mail shots: the Journey Code (JC) and JC Changed Between criteria pick patients by stage.
- When many patients need moving at once (for example everyone who finished treatment last year), use Journey Stage Bulk Update (next step).
Good to know
- Each stage change is dated, which is what JC Changed Between and the journey report use.
- Keep stages about process, not clinical detail; they show up in lists and reports seen by the whole team.
2. Move many patients to a new journey stage
You can upload a patient list, check the matches and change their journey stage in one run, with a note.
Why this matters. Updating hundreds of records one by one is slow and error-prone. A bulk update, driven from a spreadsheet you have checked, does it in one go and leaves a note on every record so the change is traceable.
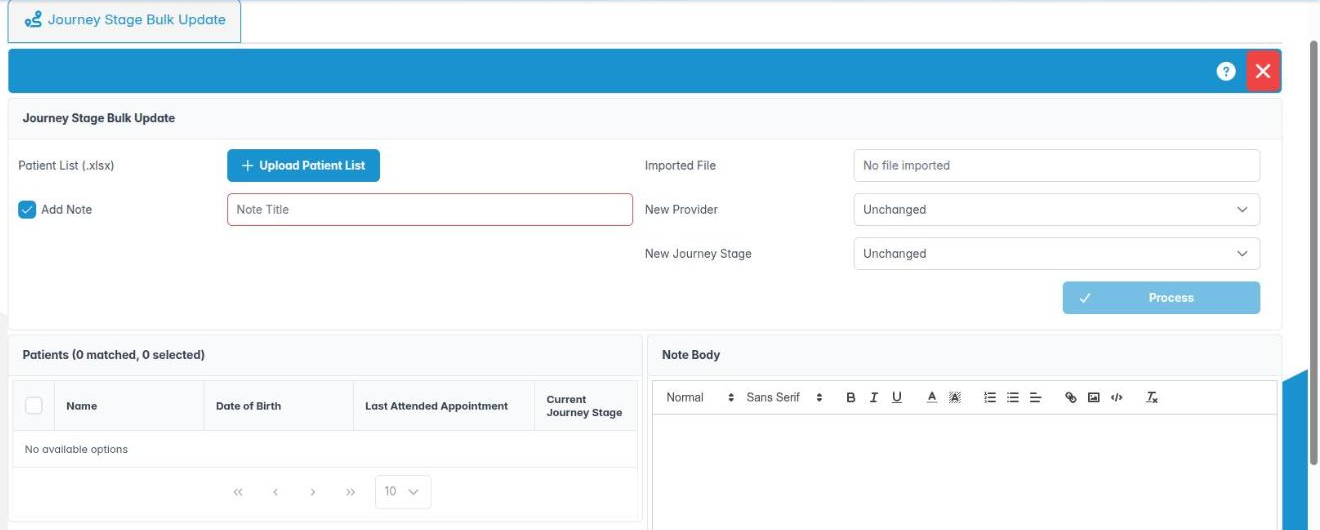
Where to find it. Patients › Journey Stage Bulk Update. You need the AID_JOURNEY_STAGE_BULK_UPDATE permission.
How to
- Prepare a spreadsheet (.xlsx) with a PatNo column of patient numbers, for example exported from a report.
- Under Patient List (.xlsx) choose the file. Imported File shows its name. If any numbers don’t match a patient you’ll see “n PatNo(s) not matched” listing the ones that will be skipped.
- Check the Patients (n matched, n selected) table: Name, Date of Birth, Last Attended Appointment and Current Journey Stage. All matches start ticked; untick anyone you want to leave alone. Right-click › Patient Details to check a record.
- Choose the New Journey Stage. Leave New Provider as Unchanged.
- Keep Add Note ticked, give a Note Title and write the Note Body explaining why.
- Click Process. The Confirm Bulk Update box says how many patients will be updated and the note title. Click Process to go ahead.
Good to know
- Process stays greyed out until exactly one of New Journey Stage or New Provider is set, at least one patient is ticked and, if Add Note is on, the note has a title and body.
- There is no undo. Check the list carefully before confirming.
3. Reassign many patients to a different clinician
You can use the same bulk page to move a list of patients to a new assigned clinician.
Why this matters. When a dentist leaves, reduces hours or a new associate joins, their patients need a new named clinician so they appear on the right recall lists and diaries. Doing it in bulk, with a note on each record, keeps continuity of care visible.
Where to find it. Patients › Journey Stage Bulk Update (permission AID_JOURNEY_STAGE_BULK_UPDATE).
How to
- Export the list of patients to move (for example Find Patients › Search by provider for the leaving clinician, or a report), and save it as an .xlsx with a PatNo column.
- Import it under Patient List (.xlsx) and check the matched patients. Untick any who should stay with another clinician (for example orthodontic patients mid-treatment).
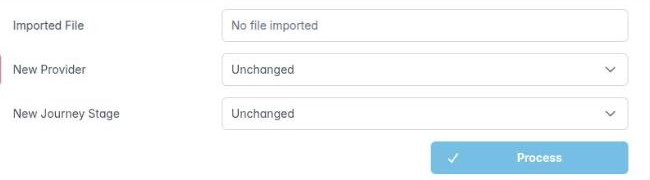
- Choose the New Provider. Leave New Journey Stage as Unchanged; you can only change one of the two in each run.
- Tick Add Note and write a clear note, for example “Transferred from Dr A to Dr B, Dr A left the practice”.
- Click Process and confirm.
Good to know
- To change both stage and provider, do two separate runs.
- Under GDC standards, patients should be told when their dentist changes. Follow the bulk update with a mail shot (choose the new Provider in the criteria) explaining who will look after them.
- Patients’ existing future appointments are not moved; rebook them in the diary as needed.
4. Transfer patients to another practice in your group
You can move a list of patients to another practice that shares your ChiralCloud group, safely.
Why this matters. Groups with several sites sometimes need to move patients between practices: a branch closes, a patient moves nearer another site, or a specialist service is centralised. A transfer moves the patients’ records to the other practice. It is a data controller decision, so agree it with the practice owner first and make sure patients have been told.
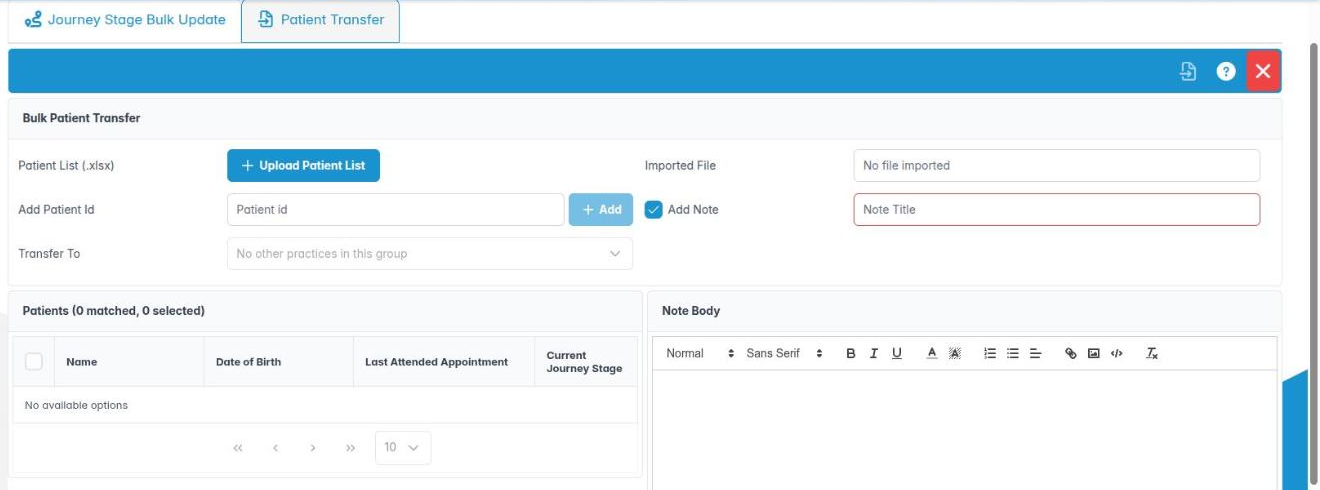
Where to find it. Patients › Patient Transfer. The panel is headed Bulk Patient Transfer.
How to
- Choose the destination in Transfer To. Only other practices shared with yours are listed. If there are none you’ll see No other practices in this group and the transfer can’t go ahead.
- Add patients: import an .xlsx with a PatNo column under Patient List (.xlsx), and/or type a number in Add Patient Id and click Add.
- Check the Patients (n matched, n selected) table (Name, Date of Birth, Last Attended Appointment, Current Journey Stage). Untick anyone who should not move. Right-click › Patient Details to check a record.
- Tick Add Note and fill in Note Title and Note Body.
- Click the Patient Transfer button on the toolbar. Confirm Bulk Update names the destination: “n patient(s) will be transferred to …”. Confirm.
- You’ll see Transfer Started, then Patient Transfer Complete.
Good to know
- The transfer can’t be undone from this page. Double-check the destination.
- Save & Exit closes the screen; Knowledge Base opens the help article.