
Manage laboratories, raise lab prescriptions from the appointment, track them through pickup and return, and approve work using the lab reports.
Who it is for: practice managers and administrators, clinicians, dental nurses, receptionists.
In this guide:
- Find and add a dental laboratory
- Update a laboratory and see its patients
- Raise a lab work request from the appointment
- Track a request in the patient’s Laboratory History
- Log lab work collected and returned
- Chase and approve lab work with the Lab Work Reports
1. Find and add a dental laboratory
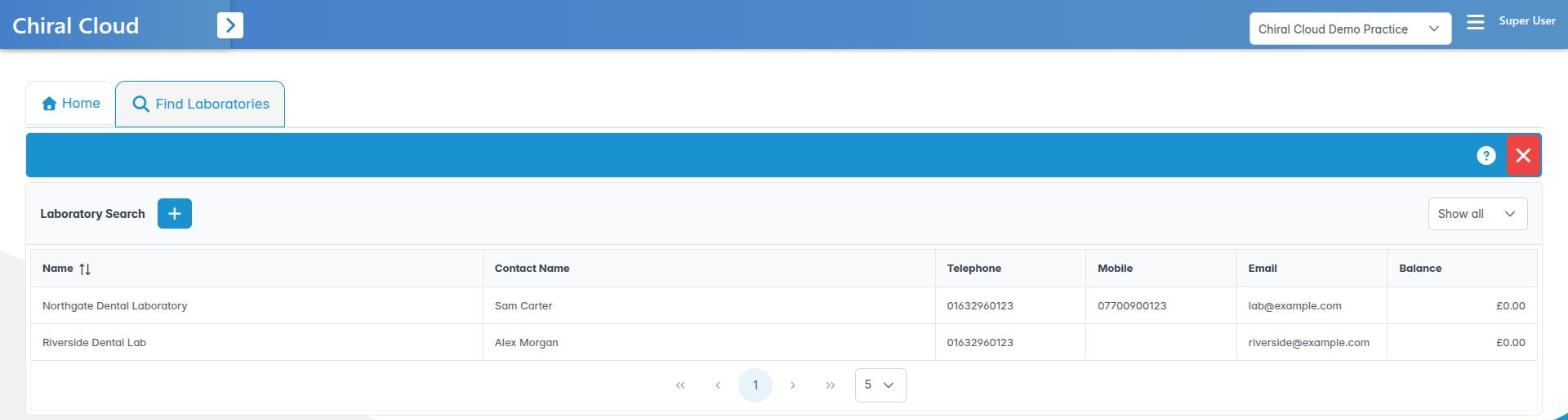
You can look up a laboratory and add a new one with its contact details.
Why this matters: every lab request needs to go to a laboratory on your list. Under the UK Medical Devices Regulations 2002 (as amended), dental appliances are custom-made devices: the laboratory must be registered with the MHRA, and it must supply a statement of conformity with each item. Keeping your labs’ details accurate means you can contact them quickly and check who made what.
Where to find it: Laboratories › Find Laboratories or Laboratories › Add Laboratory.
How to find a lab
- Open Find Laboratories. Search, then look at Name, Contact Name, Telephone, Mobile, Email and Balance.
- Double-click a lab, or right-click and choose Show Details, to open it.
- Click Add Laboratory to create a new one from here.
How to add a lab
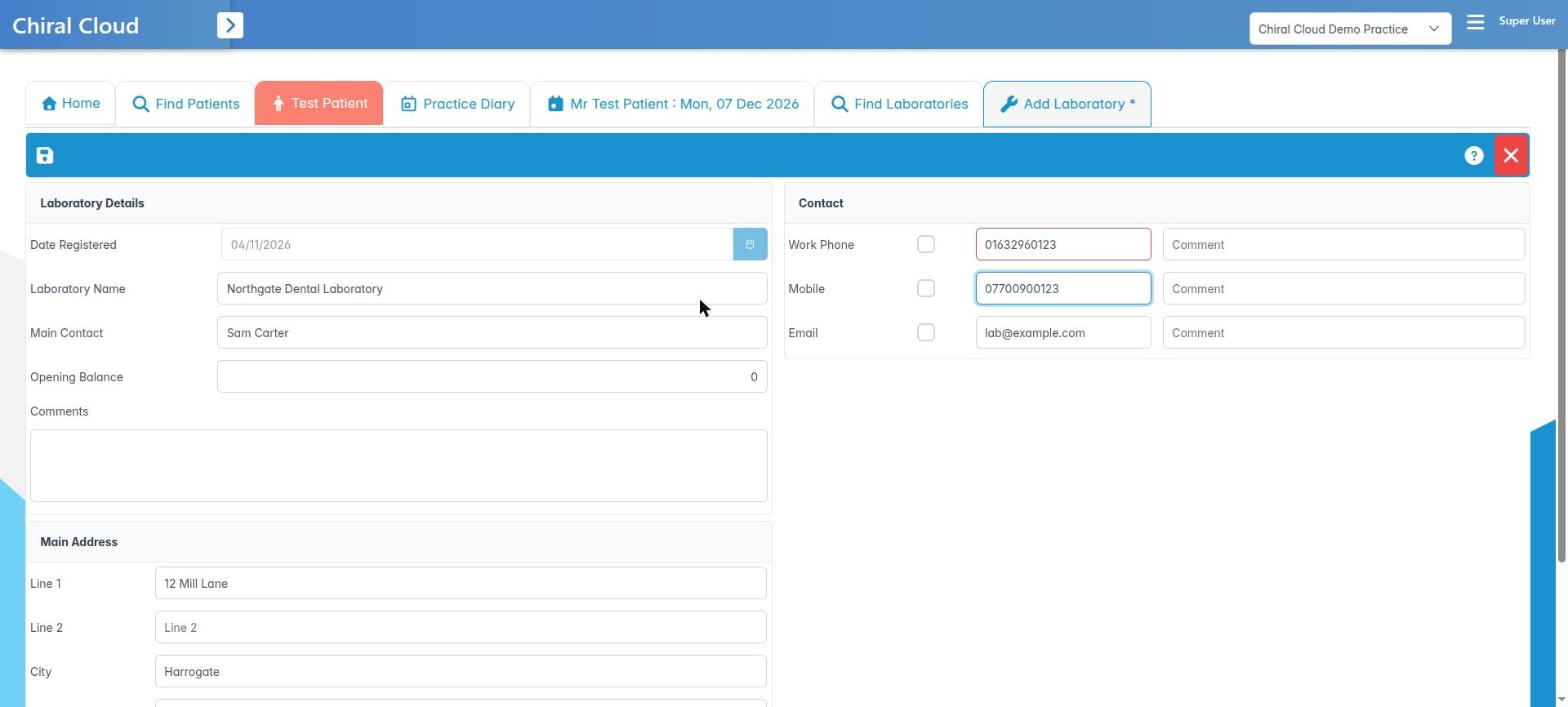
- Open Add Laboratory.
- Under Laboratory Details enter the Laboratory Name, Main Contact, Date Registered, Opening Balance and any Comments (for example MHRA registration number, usual turnaround).
- Complete the Main Address and contact numbers.
- Click Add new laboratory. You’ll see Laboratory Successfully Created (or Laboratory Creation Failed).
- Save & Exit. If you have unsaved changes you’ll be asked The form has been modified, save these changes?
Good to know
- The Knowledge Base button opens the help for this screen.
More detail: Find laboratory.
2. Update a laboratory and see its patients
You can edit a laboratory’s details and see which patients have had work from it.
Why this matters: if a lab changes address or contact, or if there’s a problem with a batch of work (for example a material recall), you need to know which patients had work from that lab. The laboratory record holds both.
Where to find it: open a lab from Find Laboratories. It has two tabs: Details and Patients.
How to
- On Details, update the Laboratory Details and Main Address as needed.
- Click Save on the toolbar. When you close with unsaved changes, Save Resource asks whether to save (Yes / No).
- Open the Patients tab. The list shows each Patient, the date the lab was Used On and the Note from the request.
- Double-click a patient, or right-click and choose Open Patient Summary, to open their record.
- Save & Exit to close.
Good to know
- Use the Patients list if you need to contact patients about a recall of a material or device from that laboratory.
- The Knowledge Base button opens help for the tab you are on.
3. Raise a lab work request from the appointment
You can create a lab request with a return date or target appointment, approval and notes.
Why this matters: a clear lab prescription is the clinician’s legal and clinical instruction to the technician. Under the Medical Devices Regulations, the prescribing dentist is responsible for the written prescription (the technician makes the device to it). It must identify the patient, describe the work and materials, shade and design, and the date it is needed. Linking it to the fit appointment stops patients turning up with no work back.
Where to find it: Create a new lab work request on the appointment editor toolbar. You can also right-click an appointment in the diary and choose Work Required.
How to
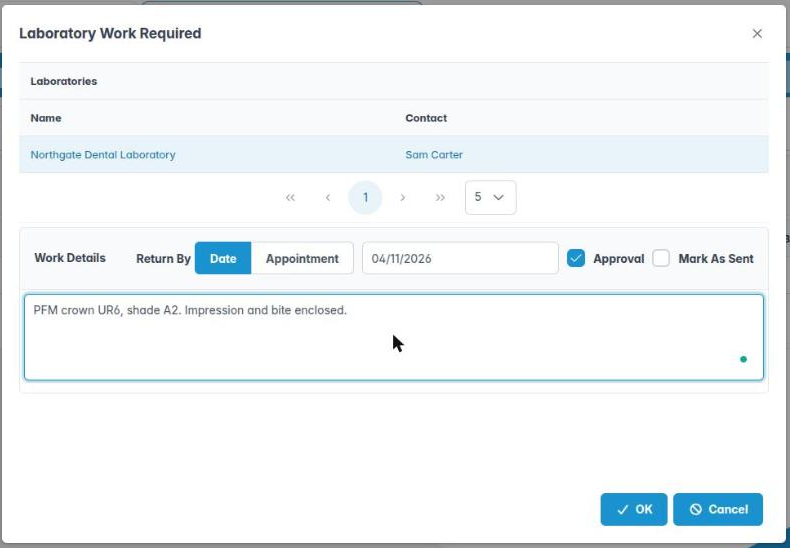
- Click Create a new lab work request. Laboratory Work Required opens.
- Select the lab in the Laboratories list (Name, Contact).
- In Work Details, set Return By: Date (pick the date) or Appointment (pick a future appointment; No future appointments means none are booked yet).
- Tick Approval if the clinician must check the work when it comes back before it can be fitted.
- Tick Mark As Sent if the work is going out now.
- Write the prescription in the note: tooth/teeth, type of work, material, shade, design, and any special instructions. Attach scans or photos via documents if needed.
- Click OK. It is greyed out until a lab and a return date or appointment are chosen.
Good to know
- Tick Work Required on the plan appointment so the fit visit is flagged in the diary.
- Keep the lab’s statement of conformity with the patient record when the work comes back.
4. Track a request in the patient’s Laboratory History
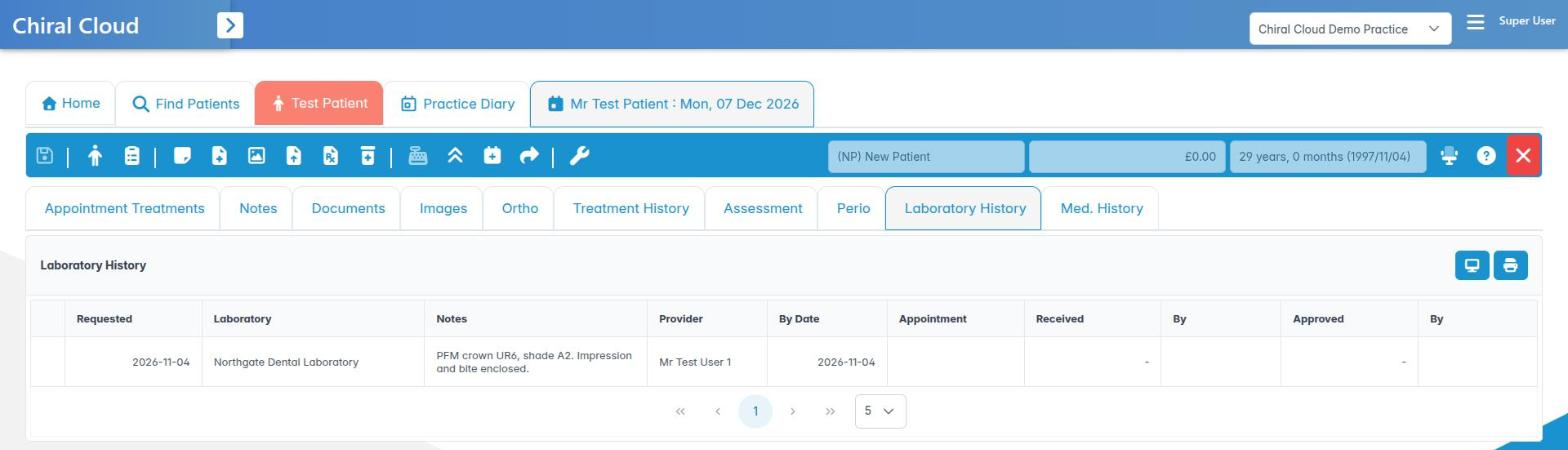
You can follow a lab request through its stages and act on it from the appointment.
Why this matters: chasing lab work is a daily job. Knowing at a glance whether the lab has been told, has collected the work, or has sent it back saves phone calls and stops patients being booked for fits that can’t happen.
Where to find it: the Laboratory History tab of the appointment editor.
How to
- The table shows a status icon, Requested, Laboratory, Notes, Provider, By Date, Appointment, Received and By, Approved and By.
- Right-click a request. What you see depends on its stage:
– Requested: Edit Work Request, Notify Lab, Lab Work Pickup, Cancel Lab Work.
– Lab Notified: Edit Work Request, Lab Work Pickup, Cancel Lab Work.
– Sent To Lab: View Work Request, Lab Work Returned, Cancel Lab Work.
– Received: View Work Request, and Lab Work Approval if approval was ticked.
– Approved: View Work Request. - Each action opens a short form with the date (for example Notified On / Notified By, Picked Up On, Return Date / Received By, Approval Date / Approved By, Cancellation Date / Cancelled By), a Barcode where relevant and a Note. Click OK.
- View Work Request also shows the history: Requested, Lab Informed, Picked Up, Returned, Approved.
Good to know
- Show the laboratory history and Print the laboratory history are not available yet.
5. Log lab work collected and returned
You can log work going out with the courier and coming back, by search or barcode.
Why this matters: when the courier calls, the nurse or receptionist needs to log quickly what is going and what has come back. Logging returns as soon as they arrive means the clinician knows the work is ready, and the diary can show it.
Where to find it: Laboratories › Lab Work Pickup and Laboratories › Lab Work Returned. Both can also be opened from the diary.
How to log a pickup
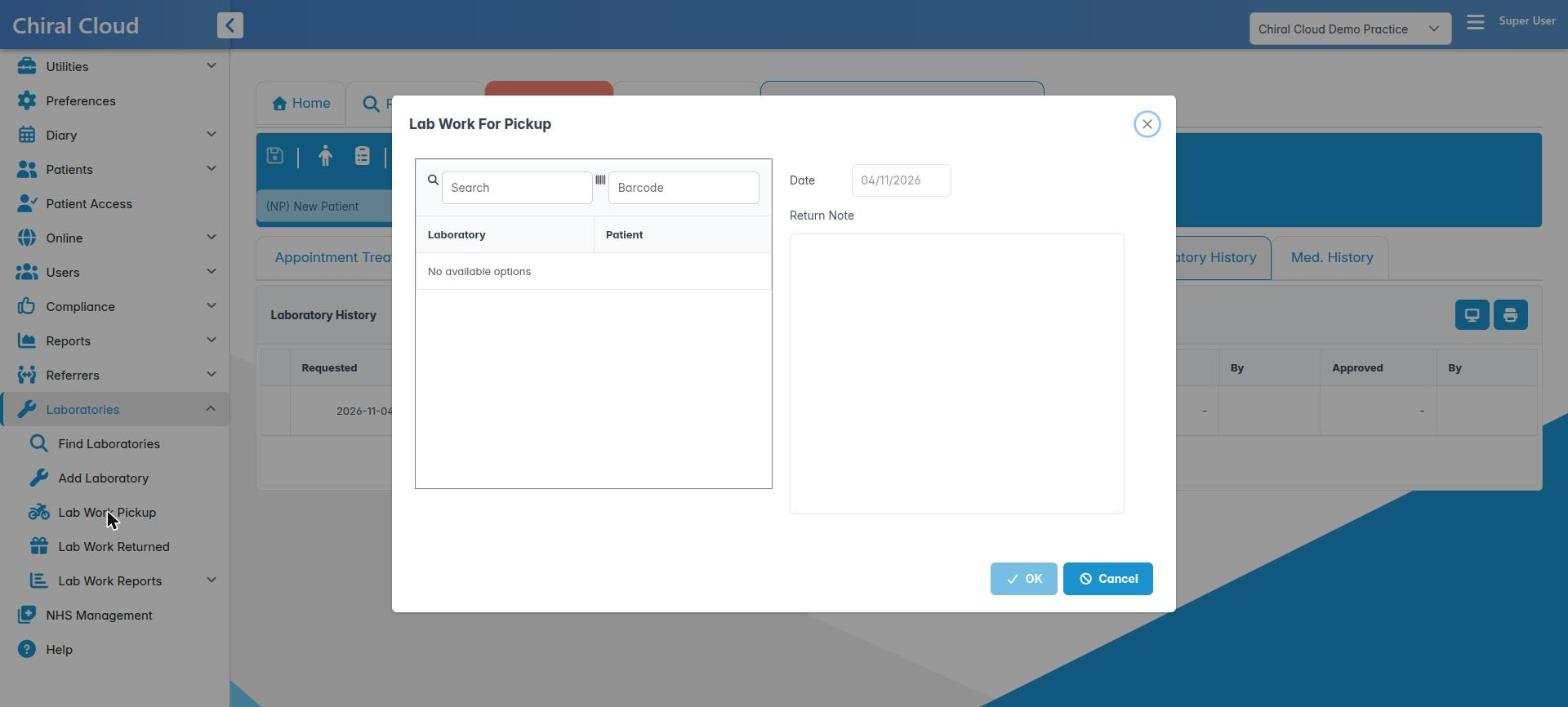
- Open Lab Work Pickup. The dialog is titled Lab Work For Pickup.
- Find the work by typing in Search (patient name) or scanning the Barcode on the lab bag.
- Select the row (Laboratory, Patient).
- Set the Date and add a Return Note if needed. Click OK.
How to log a return
- Open Lab Work Returned.
- Find it by Search or Barcode, select it, set the Date and By, add a Return Note and click OK.
- If the request needs approval, it now waits for the clinician (see the reports step).
Good to know
- Check the box contents against the prescription and that the lab’s statement of conformity (MDR custom-made device statement) is included before logging it as returned.
- Disinfect returned work before it goes to the surgery, following your cross-infection policy.
6. Chase and approve lab work with the Lab Work Reports
You can use the Raised, Due and Received reports to chase work and approve returns.
Why this matters: the lab reports are your safety net. They catch work that was never sent, work that is overdue for a fit, and work that has come back but not been checked by the clinician.
Where to find it: Laboratories › Lab Work Reports.
How to
- Lab Work Raised – everything requested. Columns include Requested, Laboratory, Patient, Provider, By Date, For Appointment, Notified and By. Right-click to Edit Work Request, Notify Lab, Lab Work Pickup or Cancel Lab Work, or Patient Details to open the patient.
- Lab Work Due – work expected back. Use Back a week / Forward a week. Right-click to View Work Request, mark Lab Work Returned or Cancel Lab Work.
- Lab Work Received – two tabs: Received and Approval Required. On Approval Required, the clinician checks the work, then right-clicks and chooses Lab Work Approval, sets the Approval Date and Approved By, and clicks OK.
- On every report: Show (on screen), Print and Download the report, Knowledge Base, and Save & Exit.
Good to know
- Run Lab Work Due each morning for the next few days’ fits.
- Only the clinician who prescribed the work, or another dentist, should approve it.