
Use the day-to-day activity reports to follow up cancellations and failed to attends, chase patients stuck in their journey, watch waiting times and keep SMS credit topped up.
Who it is for: practice managers and administrators, receptionists.
In this guide:
- Check the day’s cancellations and deletions
- Review a week of cancellations
- Follow up the week’s failed to attends
- Find patients at a stage of their journey
- See how many patients each clinician has at each stage
- Check arrival, in-chair and check-out times
- Check how many SMS credits are left
- Run the Bracelands practice reports
1. Check the day’s cancellations and deletions
You can see who cancelled, who was deleted from the diary, why, and who did it, for any single day.
Why this matters Every cancelled appointment is lost surgery time. Checking the day’s cancellations lets reception refill gaps from a cancellation list, spot patients who cancel repeatedly, and make sure your late-cancellation policy is applied fairly. It also shows deleted appointments, which should be rare – a deletion leaves no cancellation reason, so it is worth knowing who is doing it.
Where to find it Reports › Cancellations › Daily Cancellations
How to
- Open the report. It shows today.
- Use Back a day and Forward a day, or pick a date in the calendar, to move.
- The top panel, Daily Appointment Cancellations, lists each cancellation with Cancelled On, App. Date, Patient, Time, Duration, With, Summary, By (the member of staff) and Reason.
- The lower panel, Daily Appointment Deletions, lists appointments removed from the diary, with Deleted On and By.
- Double-click a row, or right-click and choose Show this patients summary, to open that patient’s record – for example to rebook them or add a note.
- Click Download daily appointment cancellations Report to save the list as a spreadsheet.
- Click Save & Exit when you are done.
Good to know
- The reasons come from Housekeeping › Cancellation Reasons. If staff keep choosing “Other”, ask your practice manager to add better reasons.
- App. Date is when the appointment was booked for; Cancelled On is when it was cancelled. A short gap between the two is a late cancellation.
- The Knowledge Base button opens the help article for this report.
2. Review a week of cancellations
You can review a whole week’s cancellations and deletions and download them for a practice meeting.
Why this matters One day’s cancellations tells you about today’s gaps. A week’s list tells you about patterns: a clinician whose patients cancel more than others, a day of the week that is always hit, or one patient cancelling three times. Many practices review this weekly with the practice manager, alongside the FTA list, to decide who gets a reminder call or a letter about the cancellation policy.
Where to find it Reports › Cancellations › Weeks Cancellations
How to
- Open the report. It shows the current week.
- Move with Back a week and Forward a week, or pick the week’s Monday in the calendar (only Mondays can be chosen).
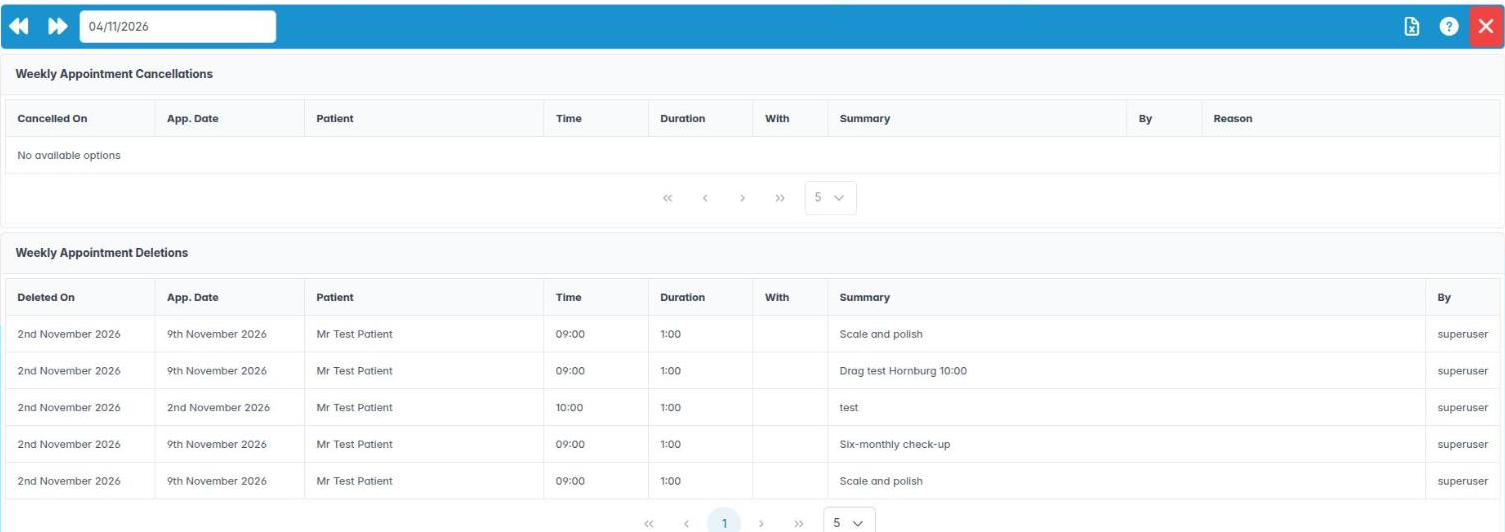
- The Weekly Appointment Cancellations panel lists every cancellation that week, with who cancelled it and the reason.
- The Weekly Appointment Deletions panel lists appointments deleted that week.
- Right-click a row and choose Show this patients summary to open the patient.
- Click Download the weeks cancellation list Report to get a spreadsheet you can sort and filter – handy for counting cancellations per clinician or per reason.
- Click Save & Exit to close.
Good to know
- Use the same columns as the daily report: Cancelled On, App. Date, Patient, Time, Duration, With, Summary, By, Reason.
- If you charge for late cancellations, check your written policy before acting on this list. Patients should have been told about the policy in advance.
3. Follow up the week’s failed to attends
You can list the week’s FTAs, see whether a reminder was sent, and print or download the list for follow-up.
Why this matters A failed to attend (FTA) is a patient who did not turn up and did not tell you. FTAs cost the practice money and, for NHS practices, can affect whether a course of treatment is completed. Most practices have a policy – for example a letter after the first FTA and a discussion about continuing care after repeated FTAs. This report is your weekly worklist, and it shows whether the patient was actually reminded, which matters if they say they were not.
Where to find it Reports › Non Attendance › Weekly FTAs
How to
- Open the report. The panel is headed Weekly Failed to Attends.
- Move between weeks with Back a week and Forward a week, or choose a Monday in the calendar.
- Read each row: App. Date, Patient, Time, Duration, With, Last Reminder (when the last reminder went), Sent Using (SMS, email and so on) and Status of that reminder.
- Right-click a row and choose Show this patients summary to open the patient, add a note or send a letter.
- Use Show the weeks failed to attend list to view a printable version, Print the weeks failed to attend list to print it, or Download the weeks failed to attend list Report to save it.
- Click Save & Exit when finished.
Good to know
- An appointment only appears here if it was marked as an FTA in the diary. If a patient arrived but nobody marked them as arrived, fix the diary first.
- A blank Last Reminder means no reminder was sent. Check the patient’s contact details and their reminder settings.
- Record any FTA conversation in the patient’s notes – it helps if a complaint follows.

4. Find patients at a stage of their journey
You can list every patient at a chosen patient journey stage, filtered by clinician, and act on them.
Why this matters Patient journey stages track where each patient is – for example “Consultation booked”, “Plan sent”, “Plan accepted”, “In treatment”, “Retainers”. They are especially useful for private, orthodontic and implant patients, where people can stall between a consultation and saying yes. A list of everyone sitting at “Plan sent” is a ready-made follow-up call list.
Where to find it Reports › Patient Journey, first tab Patient Journey.
How to
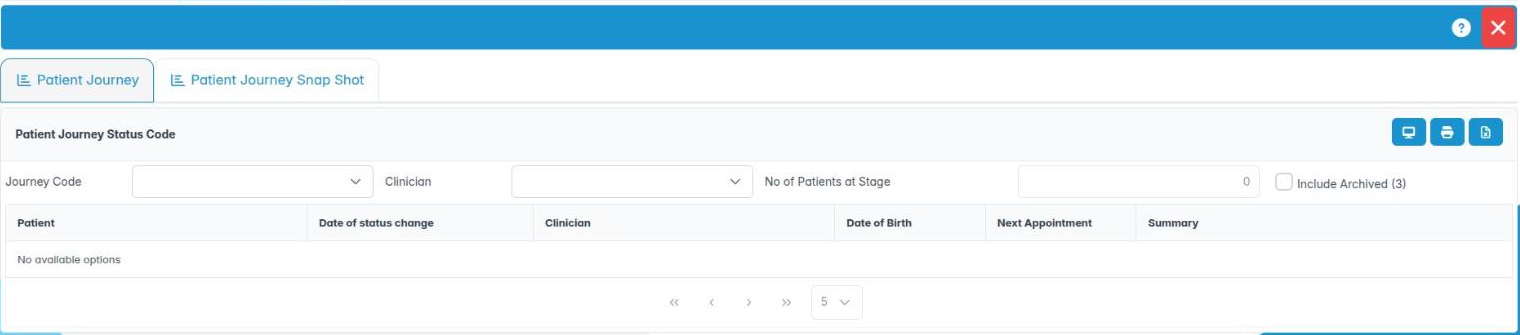
- Open the report. The panel is headed Patient Journey Status Code.
- Choose a stage in Journey Code.
- Optionally choose a Clinician to see only their patients, or leave it on All.
- No of Patients at Stage shows how many patients match.
- Read the list: Patient, Date of status change, Clinician, Date of Birth, Next Appointment and Summary. A long time since the status change with no next appointment usually means the patient needs a call.
- Double-click a patient, or right-click and choose Patient Details, to open their record.
- Use the panel buttons to show, print (Print the patient journey status Report) or download (Download the patient journey Excel file Report) the list.
Good to know
- Stages are set up in Housekeeping › Patient Journey Stages. Your practice decides the names and order.
- Stages change when staff update them on the patient record, or in bulk through Patients › Journey Stage Bulk Update.
- The Knowledge Base button opens the help for this report, and Save & Exit closes it.
5. See how many patients each clinician has at each stage
You can read the Patient Journey Snap Shot grid to see stage counts per clinician.
Why this matters The snap shot is the practice manager’s view of the pipeline. Instead of a list of names, it is a grid of numbers: one row per journey stage and one column per clinician. At a glance you can see, for example, that one dentist has twelve patients waiting at “Plan sent” while another has two, or that very few patients are moving from consultation to treatment. It is a good starting point for a weekly or monthly team meeting.
Where to find it Reports › Patient Journey, second tab Patient Journey Snap Shot.
How to
- Open Reports › Patient Journey and click the Patient Journey Snap Shot tab.
- Read the grid. The first column, Stage, shows each stage’s description and code. Each other column is a clinician, and the number is how many of their patients are at that stage today.
- Use Show the patient journey status snap shot Report to see a printable version.
- Use Print the patient journey status snap shot Report to print it, or Download the patient journey status snap shot Report to save a copy.
- To see the actual patients behind a number, switch back to the Patient Journey tab and choose that stage and clinician.
Good to know
- The snap shot is “as of now”. Download it on the same day each month if you want to compare months.
- Numbers are only as good as the stages staff record. If a stage shows zero when you know it should not, check that the team is updating stages on the patient record.
6. Check arrival, in-chair and check-out times
You can use the Daily and Monthly CheckIn reports to see how long patients waited and how long they were in the chair.
Why this matters Patients judge you on waiting time. These reports show, for each appointment, when the patient arrived, when they went into the surgery and when they left. You can spot clinicians who regularly run late, appointment types that are booked too short, and patients who were checked in but never seen. The record also helps if a patient complains about waiting, and it supports CQC evidence that you monitor patient experience.
Where to find it Compliance › CheckIn – CheckOut › Daily Report (tab title Daily CheckIn Report) or Monthly Report (tab title Monthly CheckIn Report).
How to
- Open the Daily Report. The panel is headed Daily Checkin – Checkouts.
- Move with Back a day and Forward a day, or pick a date.
- Read each row: the first column shows whether the patient attended, then Patient, Appointment Time, Duration, Checkin, In Chair, Checkout, Booked (date booked), By (who booked) and With.
- Right-click a row and choose Show this patients summary to open the patient.
- Click Download daily checkin – checkouts Report to save the day.
- For trends, open the Monthly Report instead. It works the same way with Back a month and Forward a month, and Download Monthly Checkin – Checkouts Report.
Good to know
- Checkin is filled when reception marks the patient as arrived (or the patient uses the check-in kiosk).
- In Chair and Checkout come from the clinical team, using Check patient out of chair in the appointment. If those columns are blank, the surgery team is not using it.
7. Check how many SMS credits are left
You can open the SMS Balance and know when to top up before reminders stop.
Why this matters Appointment reminders, recalls and many mail shots are sent by text message, and each one uses SMS credit from your practice’s SMS account. If the credit runs out, texts stop going – and you usually find out when the FTA list suddenly grows. Checking the balance every week or so, and before a big recall or mail shot, avoids that.
Where to find it Reports › SMS Limits
How to
- Click Reports › SMS Limits.
- A small window called SMS Balance opens, showing your remaining credit as a single number.
- Read the number, then click Close.
- If the balance is low, tell whoever looks after your SMS account (usually the practice manager) so they can top it up.
Good to know
- Long messages can use more than one credit each. A recall run to 500 patients may use more than 500 credits.
- The SMS provider account itself is set up in Preferences › Esendex by an administrator.
- If texts are not arriving but the balance is healthy, check the patient’s mobile number and their communication preferences before assuming a fault.
8. Run the Bracelands practice reports
You know what the Bracelands reports are and how to start them, if your practice has them.
Why this matters Some practices have reports written specially for them. The Bracelands group is one of these. It only appears when Chiral Systems has switched it on for your practice, so most practices will never see it. If you do, this step explains what each item does.
Where to find it Reports › Bracelands
How to
- To run Report 1 (10), Report 1 (15), Report 1 (20) or Report 1 (100), click the item. The numbers are the number of years the report looks back (100 means all history). A message such as “Bracelands 10 year report generation has started” appears. The report is built in the background – you do not wait on the screen.
- To see Report 9, click it. A tab opens headed Croydon Report 9 for a month. Move with Back a month and Forward a month. Columns are Patient, Date of charge, Clinician, Date of Birth, Quantity, Allocated To and Duration.
- In Report 9, use Show the COP9 report, Print the COP9 report or Download the COP9 Excel file. Right-click a row and choose Patient Details to open the patient.
- Monthly Transactions opens a month’s financial transactions; ask your practice manager how your practice uses it.
Good to know
- If you are unsure where the background reports are delivered, contact Chiral Systems support rather than running them repeatedly – each run is a heavy job.