
The BPE (Basic Periodontal Examination) is recorded on the patient assessment and on the orthodontic assessment. It is laid out as six sextants, checks the codes you can use for the patient’s age, and suggests next steps. The pictures use a made-up test patient in a demo practice.
1. Opening an assessment
Open the patient and click Assessment (or Ortho for the orthodontic assessment). Click + under Assessment History to add one for today; it opens ready to fill in.
To change an earlier assessment, right-click it in Assessment History and choose Edit Assessment. Until then it is only shown.

2. Recording the BPE
The BPE is in the Intra Oral section, labelled BPE/CPITN (on the Ortho tab it is next to CPITN). The six sextants are laid out upper right, upper anterior and upper left above lower right, lower anterior and lower left; each label shows the teeth it covers, in your practice’s tooth numbering.
Choose a code for each sextant. A sextant starts blank (–), which is different from 0.
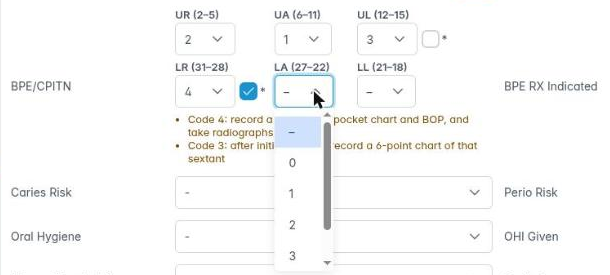

- For a code 3 or 4, a * box appears next to it; tick it to record furcation involvement (3* or 4*).
- Prompts under the grid suggest what to do next, for example Code 4: record a full 6-point pocket chart and BOP, and take radiographs, or Code 3: after initial therapy, record a 6-point chart of that sextant. If the patient has an implant, it reminds you that BPE is not used around implants.
- For patients aged 12 to 17 it becomes a Simplified BPE on the index teeth; from 7 to 11 only codes 0 to 2 can be used; and under 7 the BPE is not recorded.
For a full pocket chart, see Getting started with the perio chart.