
Follow up patients who register through the portal, allocate them to a clinician, resend portal links and fix emails that bounced.
Who it is for: practice managers and administrators, receptionists.
In this guide:
- Review the week’s online registrations
- Allocate new online patients to a clinician
- Resend a patient’s portal reference and link
- Fix emails that bounced or were not sent
1. Review the week’s online registrations
You can read the Weekly Online Registrations list and understand what each status and result means.
Why this matters When a patient registers through your practice’s online portal, ChiralCloud tries to match them to an existing record using their email and mobile, or creates a new patient. Someone at reception should check these every day or two. New patients need welcoming, booking and, for NHS practices, the right registration paperwork. Registrations that got stuck need a phone call.
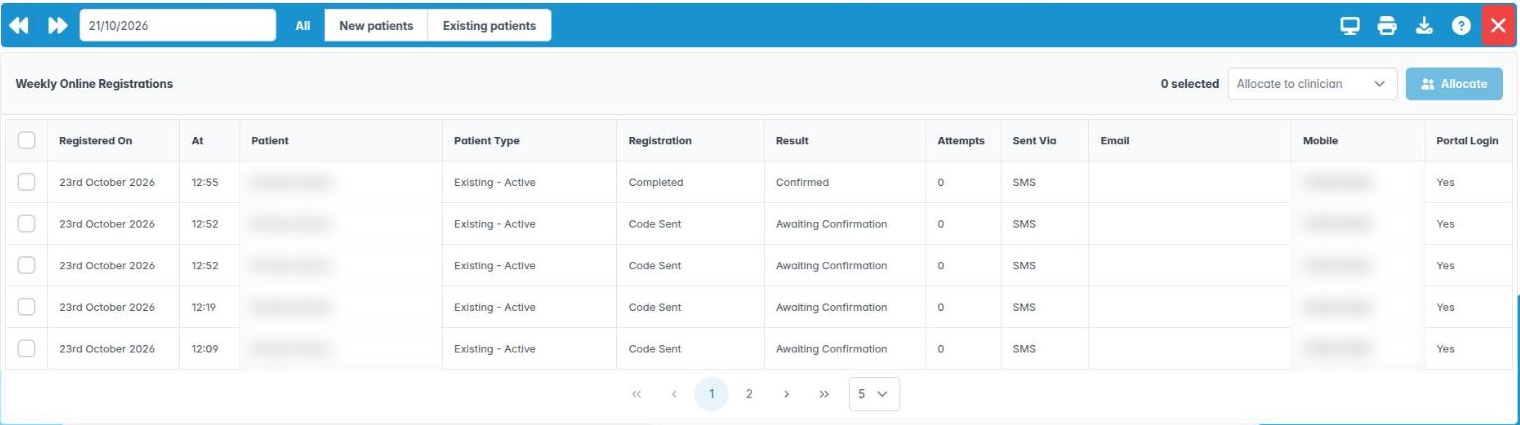
Where to find it Online › Online Registrations. The panel is headed Weekly Online Registrations.
How to
- Open the report. It shows the current week; move with Back a week and Forward a week, or pick a Monday.
- Use the filter on the toolbar: All, New patients or Existing patients.
- Read each row: Registered On, At, Patient, Patient Type, Registration, Result, Attempts, Sent Via, Email, Mobile and Portal Login.
- Patient Type says New (Pre-Acceptance) for a record the portal created, or Existing – and the patient’s status.
- Registration shows how far they got: Started, Code Sent, Code Confirmed, Completed, or Needs Attention.
- Result explains the match, for example Matched Email & Mobile, No Match, New Patient Created, Too Many Attempts or Registration Blocked.
- Portal Login says Yes once the patient has set a portal password.
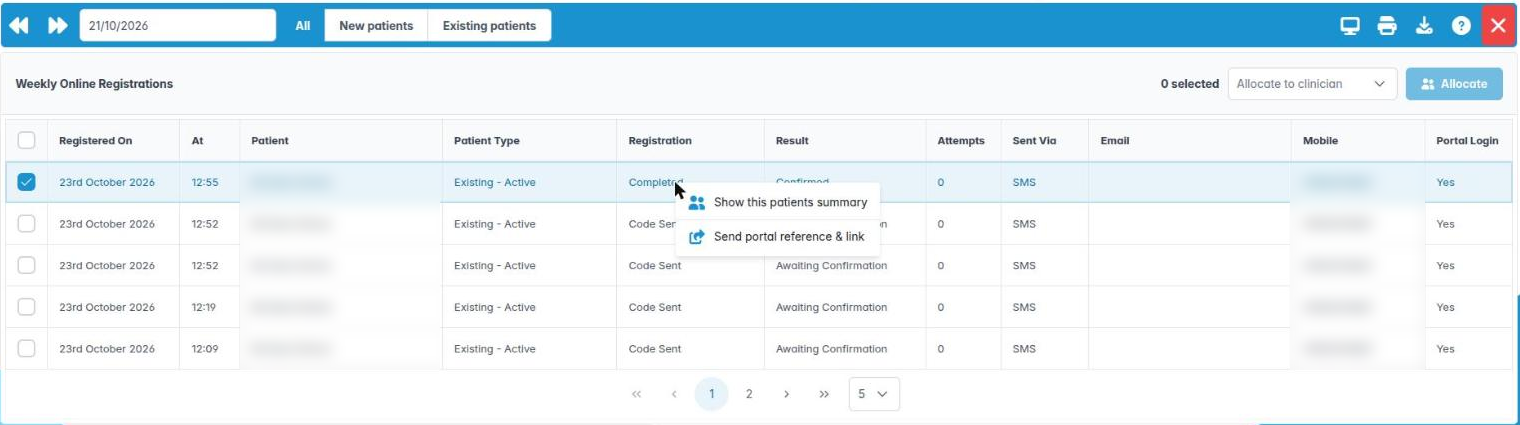
- Right-click and choose Show this patients summary to open the record.
Good to know
- Needs Attention, Too Many Attempts or New Patient Failed always need a person to follow up.
- Print, show or download the week’s list with Print weekly Online Registrations, Show weekly Online Registrations or Download the weeks registration list Report.
2. Allocate new online patients to a clinician
You can tick several registrations and allocate them to a clinician, which also accepts pre-acceptance patients.
Why this matters A patient who registers online arrives as Pre-Acceptance – they are not yet one of your patients. Before booking a new patient exam, most practices decide which dentist will look after them. Allocating does both jobs at once: it sets the patient’s clinician and accepts them.
Where to find it Online › Online Registrations, in the panel header on the right.
How to
- Open Online › Online Registrations and choose the week.
- Click New patients on the toolbar filter to show only new registrations.
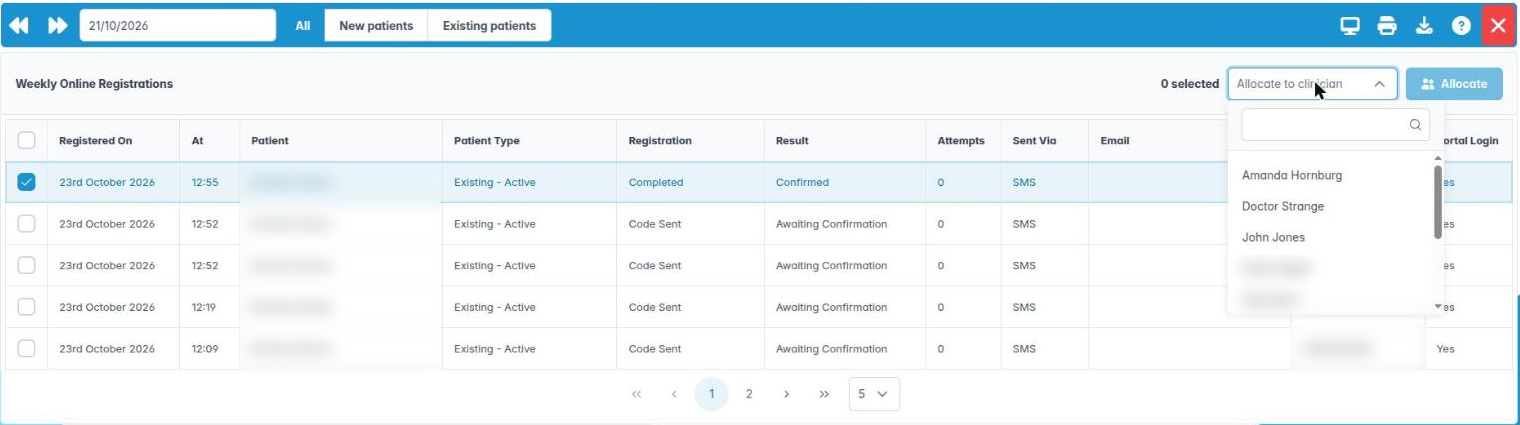
- Tick the box at the start of each patient you want to allocate. The header shows how many are selected, for example 3 selected.
- Choose a clinician in Allocate to clinician. You can type to search. Only active clinicians are listed.
- Click Allocate. The button stays greyed out until you have both chosen a clinician and ticked at least one row that has a patient record.
- In Allocate to Clinician, read the message “Allocate the selected patients to the chosen clinician? Pre-acceptance patients will be accepted.” and confirm.
- A message confirms the allocation. Then book their first appointment as normal.
Good to know
- Rows where the portal did not create a patient record are skipped. They have nothing to allocate.
- Right-clicking a row acts on that one row only, not on the ticked set. Ticking is only for Allocate.
- Check the patient’s details before you allocate. A registration with a mistyped email or a duplicate of an existing patient is easier to fix now than after booking.
3. Resend a patient’s portal reference and link
You can resend the portal reference to a patient who cannot get into the portal.
Why this matters Patients often lose the email or text with their portal details, or start registering and give up. Resending their portal reference and link is usually all it takes to get them back on track, so they can fill in their medical history and forms before they arrive rather than at the desk.
Where to find it Right-click a row in Online › Online Registrations. The same action is in the diary appointment menu as Resend Portal Ref.
How to
- Open Online › Online Registrations and find the patient. Rows with Portal Login showing No are the usual candidates.
- Check the Email and Mobile columns, and Sent Via to see how the code went last time. If the contact details are wrong, open the patient and correct them first.
- Right-click the row and choose Send portal reference & link.
- In Resend Portal Ref, confirm “Are you sure you want to resend this patients portal reference?”.
- A message Portal Reference Sent confirms it went.
Good to know
- If the row has no patient record, you will see a warning instead. Ask the patient to register again, or add them by hand.
- If the email keeps failing, look at Online › Email Problems – the address may be bouncing.
- Never read out or type a patient’s portal password for them. The link lets them set their own.
4. Fix emails that bounced or were not sent
You can use the Weekly Email Problems report to find failed emails and correct the patient’s details.
Why this matters If an email bounces, the patient never gets their reminder, invoice, form or portal link – and you will not know unless you look. Emails marked as spam can also harm the practice’s reputation with email providers. This report collects every email from the week that went wrong, so reception can phone the patient and fix the address.
Where to find it Online › Email Problems. The panel is headed Weekly Email Problems.
How to
- Open the report. It shows the current week; move with Back a week and Forward a week, or pick a Monday.
- Read each row: Date, Patient / Recipient, Address, Type (for example Appointment reminder, Recall, Invoice, receipt or statement, Form to fill in), Problem and Details.
- The Problem tag tells you what happened: Bounced (the address does not work), Rejected, Marked as spam, Not sent, or Not sent – address bouncing (skipped because the address had bounced before).
- Right-click a row and choose Show this patients summary to open the patient. Check the email address with them and correct it in their personal details.
- If the email was not to a patient (for example a referrer), you will see “This email was not sent to a patient” instead.
Good to know
- If there were no problems you will see “There were no email problems this week”.
- A patient who marked you as spam may simply not want emails. Ask, and update their communication preferences.
- A message that says No GDPR consent means the patient has not given consent to be contacted that way.
